Polishing rocks with sandpaper is an excellent way to reveal their natural beauty, and here at rockscapes.net, we’re thrilled to guide you through this rewarding process. This comprehensive guide provides the best way to enhance your rocks using simple tools and techniques. Unlock the hidden potential of your rock collection with our step-by-step guide, making them shine like never before, which helps transform your gems with ease, revealing stunning results.
Table of Contents
- Why Polish Rocks With Sandpaper?
- Understanding the Mohs Hardness Scale for Rock Polishing
- Essential Tools and Materials for Hand Polishing Rocks
- Step-by-Step Guide: How to Polish Rocks With Sandpaper
- Alternative Polishing Compounds: Beyond Toothpaste
- Enhancing the Process: Using a Dremel for Rock Polishing
- Rock Tumbling vs. Hand Polishing: Which Method Is Right for You?
- Tips for Achieving a Professional Finish
- Maintaining the Shine: Caring for Your Polished Rocks
- Unleashing Creativity: Rock Polishing Project Ideas
- Common Mistakes to Avoid When Polishing Rocks
- The Environmental Impact of Rock Polishing
- Advanced Techniques: Polishing Specific Types of Rocks
- Finding Inspiration: Rock Polishing Communities and Resources
- Frequently Asked Questions (FAQs)
1. Why Polish Rocks With Sandpaper?
Polishing rocks with sandpaper is a simple and satisfying way to transform dull stones into gleaming gems, and the rhythmic motion can be quite relaxing. According to research from Arizona State University’s School of Earth and Space Exploration, in July 2025, hand polishing provides a direct connection with nature, allowing for mindful interaction with each stone. For a hands-on method to bring out the natural beauty of your rock and mineral specimens, turning them into eye-catching decorative stones, consider this process.
- Accessibility: Hand polishing is an accessible method for both novice and experienced rock enthusiasts.
- Cost-Effective: The supplies needed are inexpensive.
- Versatility: It’s perfect for softer stones like turquoise and amber that may not withstand the tumbling process.
- Control: You have complete control over the shaping and polishing process, making it ideal for delicate or valuable specimens.
- Therapeutic: Many find the repetitive motion of hand polishing relaxing.
 Hand polishing softer stones
2. Understanding the Mohs Hardness Scale for Rock Polishing
The Mohs Hardness Scale is a crucial tool for anyone interested in rock polishing, including those who use rockscapes.net. Understanding the scale helps determine the appropriate polishing methods and materials for different types of rocks. It ranks minerals and rocks on a scale of 1 to 10, with 1 being the softest (talc) and 10 being the hardest (diamond).
Why is the Mohs Scale Important for Rock Polishing?
Knowing the hardness of a rock helps you choose the right sandpaper grit and polishing compounds. Softer stones are easier to polish by hand and require finer grits, while harder stones may need coarser grits and more aggressive techniques.
Mohs Hardness Scale Explained
Here’s a quick overview of the Mohs Hardness Scale and how it relates to rock polishing:
| Hardness | Mineral | Polishability | Sandpaper Grit Recommendation | Examples of Rocks and Minerals |
|---|---|---|---|---|
| 1-3 | Talc, Gypsum | Very Easy | 400-grit and higher | Talc, Gypsum, Amber |
| 4-6 | Fluorite, Apatite | Easy to Moderate | 220-grit to 600-grit | Fluorite, Apatite, Turquoise |
| 7-8 | Quartz, Topaz | Moderate to Hard | 120-grit to 1200-grit, followed by polishing compounds | Quartz, Topaz, Agate, Jasper |
| 9-10 | Corundum, Diamond | Very Hard | Diamond paste and specialized equipment | Corundum (Sapphire, Ruby), Diamond (requires specialized tools and expertise) |
Practical Applications
- Softer Stones (1-3): These are ideal for beginners. They polish quickly and easily with fine-grit sandpaper.
- Medium Stones (4-6): These require a bit more effort but still polish well by hand. Start with medium-grit sandpaper to remove imperfections, then move to finer grits for polishing.
- Harder Stones (7-8): These demand more time and effort. Coarser grits are necessary to shape and smooth the surface, followed by finer grits to achieve a shine.
- Very Hard Stones (9-10): These are best left to professionals with specialized equipment. Polishing them by hand is extremely difficult and time-consuming.
Understanding the Mohs Hardness Scale is essential for effective rock polishing. By matching the right techniques and materials to the hardness of your rocks, you can achieve stunning results and showcase their natural beauty.
3. Essential Tools and Materials for Hand Polishing Rocks
To begin polishing rocks with sandpaper, gathering the right tools and materials is essential. These items will help ensure a smooth and efficient polishing process, enhancing the natural beauty of your rocks. Here’s a comprehensive list to get you started, designed to bring out the best in your rocks with simple techniques:
Must-Have Tools
- Assorted Sandpaper:
- Grit Range: Start with a coarser grit (e.g., 220-grit) for initial shaping and smoothing, then progress to finer grits (e.g., 500-grit, 1200-grit, 2000-grit, 3000-grit) for polishing.
- Types: Wet/dry sandpaper is ideal as it can be used with water, reducing dust and improving the polishing action.
- Water Source:
- Bucket or Bowl: To keep the sandpaper and rocks wet during the polishing process.
- Spray Bottle: For easy application of water as needed.
- Flat Work Surface:
- Cutting Board or Tile: Provides a stable and flat surface for sanding.
- Soft Cloths:
- Microfiber or Denim: For applying polishing compounds and buffing the rocks.
- Toothbrush:
- Old Toothbrush: For cleaning rocks and removing debris from crevices.
- Safety Gear:
- Safety Glasses: To protect your eyes from flying particles.
- Gloves: To protect your hands from abrasion and chemicals.
- Mask: To avoid inhaling fine particles.
- Optional Tools:
- Dremel or Rotary Tool: With polishing attachments for faster and more precise polishing of harder stones.
- Polishing Compounds: Such as cerium oxide, tin oxide, or aluminum oxide, for achieving a high-gloss finish.
- Mineral Oil: For enhancing the shine and protecting the polished surface.
Material Considerations
- Quality of Sandpaper: Invest in high-quality sandpaper that doesn’t tear easily and maintains its grit.
- Water Quality: Use clean water to avoid introducing contaminants that could scratch the rocks.
- Cloth Selection: Opt for soft, lint-free cloths to prevent leaving residue on the polished surface.
Where to Source Your Tools
- Local Hardware Stores: For sandpaper, buckets, gloves, and safety glasses.
- Hobby and Craft Stores: For polishing compounds, Dremel tools, and specialty cloths.
- Online Retailers: Such as Amazon or specialized rock and mineral supply stores, for a wide selection of tools and materials.
Having these essential tools and materials on hand will ensure a successful and enjoyable rock polishing experience. Each item plays a crucial role in transforming rough stones into beautifully polished gems.
4. Step-by-Step Guide: How to Polish Rocks With Sandpaper
This detailed guide provides a step-by-step method for polishing rocks with sandpaper, designed to achieve professional-looking results at home. Here’s how to transform your rocks into stunning pieces using simple, effective techniques:
Step 1: Cleaning the Rocks
- Prepare a Cleaning Solution: Fill a bucket with warm, soapy water.
- Scrub the Rocks: Use an old toothbrush to scrub each rock thoroughly, removing dirt, debris, and any stubborn residue.
- Rinse: Rinse the rocks with clean water to remove all traces of soap.
- Inspect: Ensure the rocks are completely clean before proceeding to the next step.
 Cleaning the Rocks
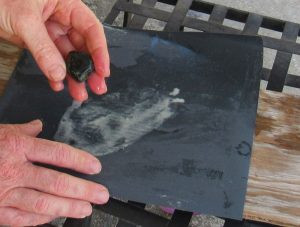
Step 2: Initial Shaping with Coarse Sandpaper (220-Grit)
- Prepare the Sandpaper: Moisten a sheet of 220-grit sandpaper and place it grit-side up on a flat work surface like a cutting board.
- Wet the Rock: Wet the rock with clean water.
- Sand the Edges: Hold the rock firmly in your dominant hand and rub it along the sandpaper, focusing on rounding sharp edges and removing any rough spots.
- Maintain Moisture: Continuously wet the rock and sandpaper to remove particles and facilitate the sanding process.
- Check Progress: Regularly check the rock’s shape, continuing until you achieve the desired smoothness.
Step 3: Refining the Shape with Medium Sandpaper (500-Grit)
- Switch Sandpaper: Replace the 220-grit sandpaper with 500-grit sandpaper.
- Repeat the Process: Moisten the sandpaper and rock, and continue sanding to remove scratches left by the coarser grit.
- Focus on Scratches: Pay attention to any deep scratches, working them out with consistent pressure and motion.
- Rinse Frequently: Rinse the rock often to check your progress and ensure no debris interferes with the sanding.
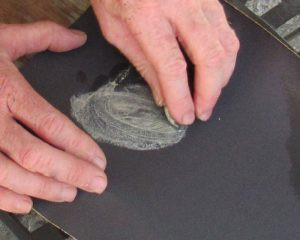
Step 4: Polishing with Fine Sandpaper (1200-Grit and Higher)
- Switch to Fine Grit: Replace the 500-grit sandpaper with 1200-grit sandpaper.
- Continue Sanding: Moisten the sandpaper and rock, and sand the surface to remove any remaining fine scratches.
- Observe the Shine: You should start to see a shine developing on the rock’s surface.
- Optional: Higher Grits: For an even higher shine, repeat the process with 2000-grit and 3000-grit sandpaper.
Step 5: Final Polishing with Cloth and Polishing Compound
- Prepare the Cloth: Dampen a square of thick cloth (denim or microfiber works well).
- Apply Polishing Compound: Add a small dab of toothpaste or a commercial polishing compound (such as cerium oxide or tin oxide) to the cloth.
- Buff the Rock: Work the rock through the polishing compound on the fabric, applying consistent pressure.
- Check and Repeat: Depending on the stone, add more polishing compound as needed and continue buffing until the desired shine is achieved.
 Polishing a Piece of Amber
Step 6: Final Rinse and Coating
- Rinse Thoroughly: Rinse the rock under clean water to remove any residual polishing compound.
- Dry the Rock: Dry the rock with a clean, soft cloth.
- Apply Mineral Oil (Optional): Coat the newly polished rock with a thin layer of mineral oil or commercial rock polish to enhance the luster and protect the surface.
- Display: Once the rock is dry, it’s ready to be displayed and admired.
Additional Tips for Best Results
- Patience: Take your time and don’t rush the process. Rushing can lead to uneven polishing and scratches.
- Consistent Pressure: Apply consistent pressure while sanding to ensure a uniform finish.
- Cleanliness: Keep your work area and materials clean to avoid introducing contaminants that can scratch the rocks.
By following these steps, you can effectively polish rocks with sandpaper, transforming them into beautiful, polished gems.
5. Alternative Polishing Compounds: Beyond Toothpaste
While toothpaste is a readily available and effective polishing compound, several alternatives can enhance the shine and finish of your rocks. These compounds are designed to work with different types of stones and can provide professional-level results.
Common Polishing Compounds
- Cerium Oxide:
- Ideal For: Quartz, agate, and other hard stones.
- Benefits: Provides a high-gloss finish and effectively removes fine scratches.
- Usage: Mix with water to form a slurry and apply with a soft cloth or polishing wheel.
- Aluminum Oxide:
- Ideal For: A wide range of stones, including softer varieties.
- Benefits: Versatile compound that delivers a good shine and is relatively inexpensive.
- Usage: Can be used as a pre-polish to remove scratches before using a finer compound like cerium oxide.
- Tin Oxide:
- Ideal For: Opals and other delicate stones.
- Benefits: Produces a brilliant shine without being too abrasive.
- Usage: Mix with water to create a paste and apply with a soft cloth or polishing pad.
- Diamond Paste:
- Ideal For: Very hard stones like sapphires and rubies.
- Benefits: Extremely effective at removing material and creating a flawless finish.
- Usage: Apply sparingly to a polishing lap or cloth and use with a rotary tool.
How to Use Polishing Compounds
- Prepare the Compound: Mix the polishing compound with water according to the manufacturer’s instructions to form a slurry or paste.
- Apply to Cloth or Pad: Apply a small amount of the compound to a soft cloth, polishing pad, or buffing wheel.
- Polish the Stone: Rub the stone against the treated cloth or pad, using consistent pressure and motion.
- Rinse and Inspect: Rinse the stone with clean water to remove any residue and inspect the finish. Repeat the polishing process as needed until the desired shine is achieved.
Tips for Using Polishing Compounds
- Start with a Small Amount: It’s better to start with a small amount of compound and add more as needed to avoid over-polishing or scratching the stone.
- Use Clean Materials: Ensure your cloths and pads are clean to prevent introducing contaminants that can scratch the stone.
- Follow Instructions: Always follow the manufacturer’s instructions for mixing and using the polishing compound.
Safety Precautions
- Wear Safety Glasses: Protect your eyes from flying particles.
- Use a Mask: Avoid inhaling fine particles by wearing a dust mask.
- Ventilation: Work in a well-ventilated area to prevent inhaling fumes.
Experimenting with different polishing compounds can significantly enhance the final look of your polished rocks, providing a deeper shine and smoother finish.
6. Enhancing the Process: Using a Dremel for Rock Polishing
A Dremel or rotary tool can significantly enhance the rock polishing process, especially for shaping and polishing intricate or hard-to-reach areas. Here’s how to effectively use a Dremel to achieve professional-quality results, and how it can benefit your projects from rockscapes.net.
Benefits of Using a Dremel
- Speed: Dremels can speed up the polishing process, especially for harder stones.
- Precision: They allow for precise shaping and polishing of small or detailed areas.
- Versatility: Dremels can be used with a variety of attachments for different stages of polishing.
- Efficiency: They can handle harder stones that are difficult to polish by hand.
Essential Dremel Attachments for Rock Polishing
- Grinding Stones: For shaping and removing rough edges.
- Sanding Drums: With varying grits for smoothing the surface.
- Felt Polishing Wheels: For applying polishing compounds and achieving a high shine.
- Diamond-Coated Bits: For grinding and polishing very hard stones.
- Rubber Polishing Points: For detailed polishing work.
Step-by-Step Guide to Polishing Rocks with a Dremel
- Prepare the Rock: Clean the rock thoroughly and remove any loose debris.
- Shape the Rock (if needed): Use a grinding stone or coarse sanding drum to shape the rock and remove any sharp edges or imperfections.
- Smooth the Surface: Switch to finer sanding drums to smooth the surface and remove scratches left by the coarser grits.
- Apply Polishing Compound: Attach a felt polishing wheel to the Dremel and apply a small amount of polishing compound (such as cerium oxide or tin oxide).
- Polish the Rock: Polish the rock with the polishing wheel, using light pressure and consistent motion.
- Rinse and Inspect: Rinse the rock with clean water to remove any residue and inspect the finish. Repeat the polishing process as needed until the desired shine is achieved.
- Final Coating (Optional): Apply a thin layer of mineral oil or commercial rock polish to enhance the luster.
Safety Precautions When Using a Dremel
- Wear Safety Glasses: Protect your eyes from flying particles.
- Use a Mask: Avoid inhaling fine particles by wearing a dust mask.
- Wear Gloves: Protect your hands from abrasion and the heat generated by the Dremel.
- Work in a Well-Ventilated Area: Ensure good ventilation to prevent inhaling fumes.
- Secure the Rock: Hold the rock firmly or use a vise to prevent it from slipping.
Tips for Best Results
- Start Slow: Begin with a low speed and gradually increase it as needed to avoid overheating the rock or damaging the polishing attachment.
- Use Light Pressure: Applying too much pressure can cause the Dremel to stall or create uneven polishing.
- Keep the Rock Cool: Dip the rock in water periodically to keep it cool and prevent overheating.
- Clean Attachments Regularly: Clean the polishing attachments regularly to remove debris and ensure optimal performance.
Using a Dremel can significantly improve the efficiency and quality of your rock polishing projects, allowing you to achieve professional-level results with greater ease.
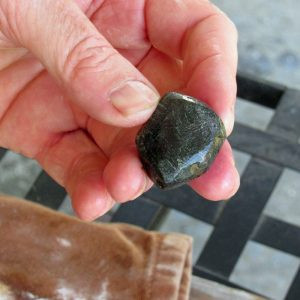 After Four Rounds of Shaping and Polishing
7. Rock Tumbling vs. Hand Polishing: Which Method Is Right for You?
When it comes to polishing rocks, two popular methods are rock tumbling and hand polishing. Each has its own advantages and disadvantages, making them suitable for different types of stones and preferences.
Rock Tumbling
What is Rock Tumbling?
Rock tumbling is a process that uses a rotating barrel to grind, smooth, and polish rocks over several weeks. The rocks are placed in the tumbler with various grits of abrasive material, which gradually smooths the surfaces.
Advantages of Rock Tumbling:
- Hands-Off Process: Once the rocks are loaded into the tumbler, the machine does most of the work.
- Large Batches: Tumblers can polish multiple rocks simultaneously.
- Consistent Results: Provides a uniform finish across all rocks in the batch.
Disadvantages of Rock Tumbling:
- Time-Consuming: The process can take several weeks to complete.
- Not Suitable for Soft Stones: Soft stones may break or disintegrate in the tumbler.
- Less Control: Difficult to control the final shape and finish of each rock.
- Noisy: Tumblers can be quite noisy, which may be a problem for some users.
Hand Polishing
What is Hand Polishing?
Hand polishing involves using sandpaper, polishing compounds, and manual effort to smooth and polish rocks.
Advantages of Hand Polishing:
- Control: Greater control over the shaping and polishing process, allowing for detailed work.
- Suitable for Delicate Stones: Ideal for softer stones that may not withstand tumbling.
- Quick Turnaround: Can produce results in a matter of hours, compared to weeks for tumbling.
- Quiet: Hand polishing is a quiet process, suitable for those who prefer a more peaceful environment.
Disadvantages of Hand Polishing:
- Labor-Intensive: Requires significant manual effort and time.
- Smaller Scale: Best suited for polishing individual rocks or small batches.
- Requires Skill: Achieving a consistent finish requires skill and practice.
Which Method Should You Choose?
Consider these factors when deciding between rock tumbling and hand polishing:
| Factor | Rock Tumbling | Hand Polishing |
|---|---|---|
| Type of Stones | Hard stones like agate, jasper, and quartz | Soft stones like turquoise, amber, and opal |
| Batch Size | Large batches | Individual rocks or small batches |
| Time | Several weeks | Hours |
| Effort | Hands-off, machine-driven | Labor-intensive, manual effort |
| Control | Less control over final shape and finish | Greater control over final shape and finish |
| Noise | Noisy | Quiet |
| Cost | Initial investment in a tumbler and supplies | Lower initial cost, primarily sandpaper and compounds |
Ultimately, the best method depends on your specific needs and preferences. Rock tumbling is great for polishing large quantities of hard stones with minimal effort, while hand polishing offers greater control and is better suited for delicate or valuable specimens.
8. Tips for Achieving a Professional Finish
Achieving a professional finish when polishing rocks requires attention to detail and a few key techniques.
Selecting the Right Sandpaper
- Start with the Right Grit: Begin with a grit appropriate for the rock’s condition. Coarse grits (e.g., 220-grit) are for shaping and removing imperfections, while finer grits (e.g., 1200-grit and higher) are for polishing.
- Use Wet/Dry Sandpaper: Wet/dry sandpaper can be used with water, which helps reduce dust and improves the polishing action.
- Replace Worn Sandpaper: Replace sandpaper as it wears down to maintain consistent polishing.
Polishing Techniques
- Consistent Pressure: Apply consistent pressure while sanding to ensure a uniform finish.
- Move in a Circular Motion: Use a circular motion when sanding to avoid creating straight lines or grooves.
- Keep the Surface Wet: Keep the rock and sandpaper wet to help remove particles and prevent overheating.
- Rinse Frequently: Rinse the rock frequently to check your progress and remove any debris.
Using Polishing Compounds Effectively
- Choose the Right Compound: Select a polishing compound appropriate for the type of stone you are polishing.
- Apply Sparingly: Use a small amount of polishing compound and add more as needed.
- Use a Soft Cloth: Use a soft, lint-free cloth or polishing pad to apply the compound.
- Buff Thoroughly: Buff the rock thoroughly with the polishing compound until the desired shine is achieved.
Additional Tips
- Cleanliness: Keep your work area and materials clean to avoid introducing contaminants that can scratch the rocks.
- Patience: Take your time and don’t rush the process. Rushing can lead to uneven polishing and scratches.
- Inspect Carefully: Regularly inspect the rock for any imperfections and address them before moving on to the next step.
- Final Polish: After polishing, consider applying a thin layer of mineral oil or commercial rock polish to enhance the luster and protect the surface.
By following these tips, you can achieve a professional finish when polishing rocks, showcasing their natural beauty and creating stunning pieces for display or collection.
9. Maintaining the Shine: Caring for Your Polished Rocks
Once you’ve put in the effort to polish your rocks, proper care and maintenance are essential to keep them looking their best.
Cleaning Polished Rocks
- Gentle Cleaning: Use a soft cloth and mild soap to gently clean your polished rocks.
- Avoid Harsh Chemicals: Avoid using harsh chemicals or abrasive cleaners, as they can damage the polished surface.
- Rinse Thoroughly: Rinse the rocks thoroughly with clean water to remove any soap residue.
- Dry with a Soft Cloth: Dry the rocks with a soft, lint-free cloth.
Protecting the Surface
- Avoid Scratches: Store polished rocks in a way that prevents them from scratching each other.
- Display Carefully: Display polished rocks in a safe location where they won’t be knocked over or damaged.
- Avoid Direct Sunlight: Prolonged exposure to direct sunlight can cause some stones to fade or discolor.
Re-Polishing
- Reapply Mineral Oil: Periodically reapply a thin layer of mineral oil or commercial rock polish to enhance the luster and protect the surface.
- Touch-Up Polishing: If the shine starts to fade, you can touch up the polishing with a soft cloth and a small amount of polishing compound.
- Professional Polishing: For more significant damage or loss of shine, consider having the rocks professionally polished.
Storage Tips
- Individual Bags: Store each polished rock in an individual cloth bag to prevent scratches.
- Display Cases: Use display cases or cabinets with soft lining to showcase your polished rocks while protecting them.
- Avoid Dampness: Store rocks in a dry environment to prevent moisture damage.
By following these care and maintenance tips, you can ensure that your polished rocks retain their shine and beauty for years to come.
10. Unleashing Creativity: Rock Polishing Project Ideas
Polishing rocks opens up a world of creative possibilities, from decorative items to personalized gifts. Here are some project ideas to inspire you:
Decorative Items
- Rock Gardens: Use polished rocks to create beautiful and unique rock gardens, either indoors or outdoors.
- Table Centerpieces: Arrange polished rocks in a bowl or tray to create a stunning table centerpiece.
- Paperweights: Polished rocks make excellent and unique paperweights.
- Bookends: Use larger polished rocks as bookends to add a natural touch to your bookshelf.
Jewelry
- Pendants: Drill a small hole in a polished rock and attach it to a necklace chain to create a unique pendant.
- Earrings: Use smaller polished rocks to create eye-catching earrings.
- Bracelets: String polished rocks together to create a beautiful bracelet.
Home Décor
- Mosaic Art: Use polished rocks to create intricate mosaic patterns on tables, walls, or garden stones.
- Picture Frames: Glue polished rocks to a plain picture frame to add a natural and elegant touch.
- Candle Holders: Create unique candle holders by placing polished rocks around the base of a candle.
Gifts
- Personalized Rocks: Engrave polished rocks with names, dates, or special messages to create personalized gifts.
- Gift Sets: Create gift sets that include polished rocks along with other items like jewelry-making supplies or decorative containers.
Educational Projects
- Rock Collections: Polished rocks can be used to create educational rock collections for children or students.
- Science Projects: Use polished rocks in science projects to teach about geology, minerals, and the Earth’s natural resources.
Tips for Creative Projects
- Choose the Right Rocks: Select rocks that are appropriate for the project in terms of size, shape, and color.
- Plan Your Design: Sketch out your design before starting to ensure a cohesive and visually appealing result.
- Use Appropriate Adhesives: Use strong and durable adhesives to attach polished rocks to other materials.
- Add Finishing Touches: Consider adding finishing touches like paint, varnish, or sealant to enhance the look and protect the finished product.
By exploring these project ideas, you can unleash your creativity and transform polished rocks into beautiful and meaningful creations.
11. Common Mistakes to Avoid When Polishing Rocks
Polishing rocks can be a rewarding hobby, but it’s easy to make mistakes that can affect the final result. Here are some common mistakes to avoid to ensure your rocks look their best:
Using the Wrong Grit Sandpaper
- Mistake: Starting with too fine a grit or skipping grits altogether.
- Solution: Always start with a coarse grit to remove imperfections and gradually move to finer grits for polishing.
Not Cleaning Rocks Properly
- Mistake: Polishing rocks without thoroughly cleaning them first.
- Solution: Always clean rocks thoroughly with soap and water before polishing to remove dirt and debris.
Applying Too Much Pressure
- Mistake: Applying too much pressure while sanding or polishing.
- Solution: Use consistent, light pressure to avoid creating uneven surfaces or scratches.
Not Keeping the Surface Wet
- Mistake: Sanding or polishing rocks without keeping the surface wet.
- Solution: Keep the rock and sandpaper wet to help remove particles and prevent overheating.
Using Contaminated Materials
- Mistake: Using dirty cloths, polishing pads, or water.
- Solution: Use clean materials to avoid introducing contaminants that can scratch the rocks.
Rushing the Process
- Mistake: Rushing through the polishing steps.
- Solution: Take your time and don’t skip steps. Rushing can lead to uneven polishing and a poor finish.
Not Wearing Safety Gear
- Mistake: Neglecting to wear safety glasses, gloves, or a mask.
- Solution: Always wear safety gear to protect yourself from flying particles, abrasion, and dust.
Over-Polishing
- Mistake: Polishing the rocks for too long, which can wear away the edges and create a rounded, unnatural look.
- Solution: Monitor the rocks closely and stop polishing when the desired shine is achieved.
Using the Wrong Polishing Compound
- Mistake: Using a polishing compound that is not appropriate for the type of stone.
- Solution: Choose a polishing compound that is specifically designed for the type of stone you are polishing.
Not Maintaining Tools
- Mistake: Using worn-out sandpaper or dirty polishing attachments.
- Solution: Replace sandpaper as it wears down and clean polishing attachments regularly to maintain optimal performance.
By avoiding these common mistakes, you can improve the quality of your rock polishing projects and achieve stunning results.
12. The Environmental Impact of Rock Polishing
Rock polishing, while a fulfilling hobby, has environmental implications that are important to consider. By understanding these impacts, you can take steps to minimize your footprint and practice more sustainable polishing methods.
Water Usage
- Impact: Rock polishing, especially when done by hand, requires water to keep the surfaces wet and remove particles. This can contribute to water scarcity in some regions.
- Mitigation: Use water sparingly and collect wastewater for reuse in non-potable applications, such as watering plants.
Waste Generation
- Impact: The process generates waste in the form of used sandpaper, polishing compounds, and rock sludge.
- Mitigation: Dispose of waste properly, following local regulations. Consider using biodegradable or recycled materials whenever possible.
Energy Consumption
- Impact: Using power tools like Dremels or rock tumblers consumes electricity.
- Mitigation: Use energy-efficient tools and minimize usage. Consider hand polishing for smaller projects to reduce energy consumption.
Dust and Air Quality
- Impact: Polishing rocks can create fine dust particles that can be harmful if inhaled.
- Mitigation: Wear a dust mask to protect your lungs. Work in a well-ventilated area or use a dust collection system.
Sourcing of Materials
- Impact: The mining and transportation of rocks and polishing compounds can have environmental consequences.
- Mitigation: Source rocks and materials from local suppliers to reduce transportation emissions. Consider using recycled or repurposed materials whenever possible.
Chemicals and Polishing Compounds
- Impact: Some polishing compounds contain chemicals that can be harmful to the environment if not disposed of properly.
- Mitigation: Use environmentally friendly polishing compounds whenever possible. Dispose of chemicals properly, following local regulations.
Tips for Sustainable Rock Polishing
- Conserve Water: Use water sparingly and reuse it when possible.
- Reduce Waste: Use durable materials and dispose of waste properly.
- Conserve Energy: Use energy-efficient tools and minimize usage.
- Protect Air Quality: Wear a dust mask and work in a well-ventilated area.
- Source Responsibly: Source rocks and materials from local and sustainable suppliers.
- Use Eco-Friendly Products: Choose environmentally friendly polishing compounds and cleaning products.
By being mindful of these environmental impacts and taking steps to mitigate them, you can enjoy rock polishing while minimizing your footprint on the planet.
13. Advanced Techniques: Polishing Specific Types of Rocks
Different types of rocks require different polishing techniques to achieve the best results. Here’s a guide to polishing some popular types of rocks:
Agate
- Characteristics: Agate is a hard, durable stone with intricate banding patterns.
- Polishing Technique: Start with a coarse grit (220-grit) to shape the agate, then move to finer grits (500-grit, 1200-grit, and higher) to achieve a high shine. Use cerium oxide or diamond paste for the final polish.
- Tips: Agate can be polished using both hand polishing and rock tumbling methods. Be patient, as achieving a high shine may take time.
Jasper
- Characteristics: Jasper is a dense, opaque stone that comes in a variety of colors and patterns.
- Polishing Technique: Similar to agate, start with a coarse grit to shape the jasper, then move to finer grits for polishing. Aluminum oxide and cerium oxide work well for the final polish.
- Tips: Jasper can be prone to scratching, so use clean materials and avoid rushing the polishing process.
Quartz
- Characteristics: Quartz is a hard, transparent or translucent stone that is relatively easy to polish.
- Polishing Technique: Start