Rock climb belaying is a crucial skill for anyone venturing into the world of climbing, ensuring safety and control. At rockscapes.net, we’re dedicated to providing you with the knowledge and guidance to master this essential technique. Whether you’re just starting out or looking to refine your skills, this guide will walk you through the steps, equipment, and best practices for safe and effective belaying, as well as helping you understand climbing commands.
1. Understanding the Fundamentals of Belaying
Belaying involves using a rope and belay device to protect a climber from falling. It’s a partnership built on trust and clear communication. Here, we’ll discuss the types of belay devices, belay techniques, and belay safety checks.
1.1 What is Belaying and Why is It Important?
Belaying is the process of controlling the rope to protect a climber from a fall. The belayer manages the rope, taking in slack as the climber ascends and providing a controlled descent if needed. According to research from Arizona State University’s School of Earth and Space Exploration, the success of belaying relies heavily on the skill and attention of the belayer. It’s critical because it directly impacts the climber’s safety and confidence, and is the bedrock of a successful climb.
1.2 Types of Belay Devices
Belay devices come in several forms, each offering unique advantages and disadvantages:
-
ATC (Air Traffic Controller): A tubular device that provides friction to help control the rope.
-
Grigri: An assisted-braking device that automatically locks under sudden tension, adding an extra layer of security.
-
Figure Eight: A device known for its simplicity and effectiveness in creating friction.
-
Reverso: A versatile device that can be used for belaying one or two climbers and for rappelling.
The ATC is the most common and versatile device and is preferred by professionals.
1.3 Essential Belay Techniques
Mastering belay techniques is crucial for climber safety. According to Climbing.com, two popular methods include:
-
PBUS (Pull, Brake, Under, Slide): A systematic method involving pulling slack, braking, positioning the hand underneath, and sliding the braking hand up.
-
Slip-Slap-Slide: A technique that focuses on quickly adjusting the rope to maintain tension.
PBUS is a more modern technique that allows belayers to respond to changes in the climber’s position faster.
1.4 Belay Safety Checks
Before any climb, conduct thorough safety checks to ensure everyone is secure:
- Partner Check: Verify that the harness is correctly fitted and double-backed.
- Knot Check: Ensure the figure-eight knot is properly tied and backed up.
- Device Check: Confirm the belay device is correctly threaded and locked with a carabiner.
Always perform a partner check before climbing to ensure maximum safety.
2. Essential Gear for Rock Climbing Belay
To begin rock climbing, it’s critical to have the right gear. Below, we’ll discuss the components of climbing gear such as climbing ropes, climbing harnesses, belay devices, carabiners, and climbing helmets.
2.1 Climbing Ropes: Choosing the Right One
 Climbing rope with a figure 8 knot
Climbing ropes are your lifeline, and selecting the right one is essential. Factors to consider include:
- Type: Single ropes are the most common for top-roping and sport climbing.
- Length: A 60-70 meter rope is standard for most gym and outdoor climbs.
- Diameter: Ropes range from 9mm to 11mm, with thinner ropes being lighter but less durable.
Always choose a rope approved by the UIAA (International Climbing and Mountaineering Federation) for safety.
2.2 Climbing Harnesses: Comfort and Safety
A climbing harness should fit snugly around your waist and legs, providing support and comfort. Key features include:
- Adjustable Leg Loops: Allow for a customized fit.
- Gear Loops: Provide easy access to essential equipment.
- Belay Loop: A reinforced loop for attaching the belay device.
Ensure the harness is certified and in good condition before each climb.
2.3 Belay Devices: ATC vs. Grigri
As discussed earlier, belay devices come in different types. The choice between an ATC and a Grigri depends on personal preference and experience level:
| Feature | ATC (Air Traffic Controller) | Grigri (Assisted Braking) |
|---|---|---|
| Braking | Manual | Assisted Braking |
| Usage | Versatile, suitable for various scenarios | Best for single-pitch sport climbing |
| Experience Level | Requires more experience | Easier for beginners |
Always familiarize yourself with the specific device you’re using.
2.4 Carabiners: Locking vs. Non-Locking
Carabiners are metal loops used to connect different parts of the climbing system. There are two main types:
- Locking Carabiners: Provide extra security and are used for critical connections, such as attaching the belay device to the harness.
- Non-Locking Carabiners: Used for less critical connections, such as clipping ropes to quickdraws.
Always use locking carabiners for belaying to prevent accidental opening.
2.5 Climbing Helmets: Head Protection
A climbing helmet is crucial for protecting your head from falling rocks or impacts. Look for a helmet that:
- Fits Well: Should be snug but not too tight.
- Is Certified: Meets safety standards.
- Provides Ventilation: Keeps your head cool during strenuous climbs.
Wearing a helmet is a simple way to significantly reduce the risk of head injuries.
3. Step-by-Step Guide to Belaying Safely
Belaying safely requires precision and attention to detail. Now, we’ll give a step-by-step guide for belaying with an ATC, communicating with your climber, and using a Grigri.
3.1 Belaying with an ATC: The PBUS Method
The PBUS method is a systematic approach to belaying with an ATC. Here’s how it works:
- Pull: Pull the slack in the rope as the climber ascends.
- Brake: Lock the rope by pulling down with your brake hand.
- Under: Place your non-brake hand under your brake hand.
- Slide: Slide your brake hand up the rope to prepare for the next pull.
Practicing these steps ensures smooth and controlled belaying.
3.2 Communicating with Your Climber: Climbing Commands
Clear communication is essential for a safe climb. Standard climbing commands include:
- Climber: “On belay?”
- Belayer: “Belay on.”
- Climber: “Climbing.”
- Belayer: “Climb on.”
- Climber: “Take!” (indicating they need tension on the rope)
- Belayer: “Got you!”
- Climber: “Lowering!”
- Belayer: “Lowering!”
Using these commands helps ensure both partners are on the same page.
3.3 Using a Grigri: Assisted Braking Technique
The Grigri is an assisted-braking device that offers an extra layer of security. To use it effectively:
- Thread the Rope: Follow the device’s instructions to properly thread the rope.
- Lock the Carabiner: Attach the Grigri to your belay loop with a locking carabiner.
- Belay as Usual: Use the PBUS method, but the Grigri will automatically lock under sudden tension.
- Lowering: To lower the climber, gently depress the lever while maintaining control of the brake strand.
Always practice with a Grigri under the supervision of an experienced climber before using it on a real climb.
4. Mastering Essential Climbing Knots for Belaying
The skill of knot tying is an important component of the climbing skillset. In this section, we’ll describe the rewoven figure eight knot, the water knot, and the munter hitch.
4.1 The Rewoven Figure Eight Knot: Tying into the Harness
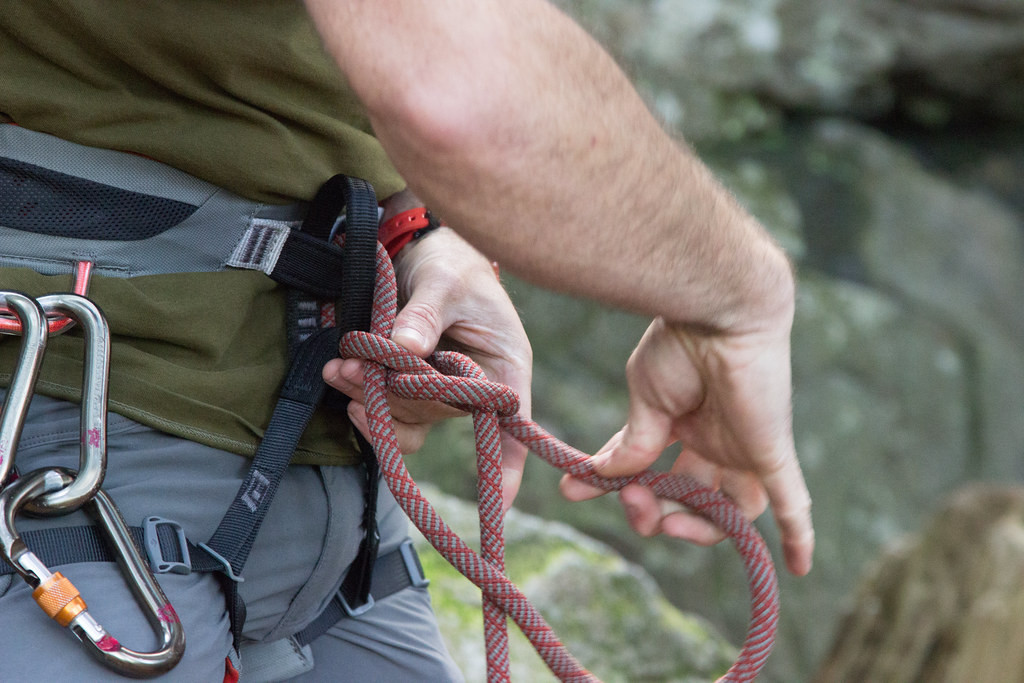 Close-up of a rewoven figure 8 knot on climbing rope
The rewoven figure eight knot is used to securely attach the rope to the climber’s harness. Here’s how to tie it:
- Create a Figure Eight: Form a figure eight knot in the rope.
- Thread Through Loops: Pass the end of the rope through both tie-in loops on the harness.
- Reweave: Follow the original figure eight knot with the rope’s end, mirroring the shape.
- Tighten and Check: Ensure the knot is snug and properly formed.
Always double-check the knot before starting to climb.
4.2 The Water Knot: Joining Webbing
The water knot is used to join two ends of webbing, often for creating slings or extending anchor points:
- Overlap Webbing: Overlap the ends of the two pieces of webbing.
- Thread Through: Thread one end through the loops of the other, following the natural path.
- Tighten: Pull the knot tight, leaving a tail of at least 3 inches.
This knot is reliable for creating secure connections in non-critical applications.
4.3 The Munter Hitch: A Versatile Belay Knot
The Munter hitch is a versatile knot that can be used for belaying in emergency situations when a belay device is not available:
- Form a Loop: Create a loop in the rope and pass it through the belay loop on your harness.
- Twist and Clip: Twist the loop and clip it into the carabiner.
- Brake: Pull down on the brake strand to create friction and control the descent.
The Munter hitch requires practice and should only be used in emergencies.
5. Safety First: Avoiding Common Belaying Mistakes
Belaying mistakes can lead to serious accidents, so it’s important to avoid them at all costs. Here, we’ll look at common errors, how to prevent them, and the importance of continuous learning and training.
5.1 Common Belaying Errors and How to Prevent Them
Several common belaying errors can compromise safety:
- Dropping the Brake Hand: Always keep a firm grip on the brake strand.
- Failing to Pay Attention: Stay focused on the climber and the rope.
- Short-Roping: Not taking in slack quickly enough, which can cause the climber to hit the wall if they fall.
- Incorrectly Threading the Belay Device: Double-check that the rope is correctly threaded through the device.
Regular practice and vigilance can help prevent these errors.
5.2 The Importance of Continuous Learning and Training
Climbing techniques and equipment are constantly evolving, so continuous learning is essential. According to the American Mountain Guides Association (AMGA), ongoing training helps climbers and belayers stay up-to-date on best practices and new technologies.
- Take Courses: Enroll in advanced climbing courses.
- Practice Regularly: Consistent practice builds muscle memory and reinforces good habits.
- Stay Informed: Read climbing publications and attend workshops.
Continuous learning enhances your skills and ensures safer climbing experiences.
6. Advanced Belaying Techniques for Experienced Climbers
For experienced climbers, mastering advanced belaying techniques can enhance safety and efficiency. Here, we’ll discuss belaying lead climbers, dynamic belaying, and multi-pitch belaying.
6.1 Belaying a Lead Climber: Paying Out Rope Smoothly
Belaying a lead climber requires paying out rope smoothly to allow the climber to clip into protection points. Key techniques include:
- Anticipating Needs: Watch the climber and anticipate when they need more rope.
- Smooth Payouts: Avoid jerky movements that can disrupt the climber’s progress.
- Communication: Maintain clear communication to coordinate rope management.
Smooth rope management is critical for lead climbing safety.
6.2 Dynamic Belaying: Softening the Impact of a Fall
Dynamic belaying involves using a slight upward movement to soften the impact of a fall. This technique reduces the force on the climber and the anchor system:
- Anticipate the Fall: Recognize when the climber is about to fall.
- Jump Slightly: Jump upward slightly to create slack in the rope.
- Brake Firmly: Maintain a firm grip on the brake strand to control the descent.
Dynamic belaying requires practice and coordination between the climber and belayer.
6.3 Multi-Pitch Belaying: Managing Complex Systems
Multi-pitch climbing involves climbing routes with multiple sections, each requiring a belay station. Key considerations include:
- Anchor Management: Build secure and redundant anchor systems.
- Communication: Use clear and concise commands to coordinate transitions.
- Rope Management: Keep the ropes organized and prevent tangling.
Multi-pitch belaying demands advanced skills and meticulous attention to detail.
7. Indoor vs. Outdoor Belaying: Adjusting Your Technique
The belaying techniques required for an indoor gym and outdoor rock climbing differ due to the varying environments and challenges. We’ll discuss adapting techniques for indoor climbing and outdoor climbing as well as environmental considerations.
7.1 Adapting Belay Techniques for Indoor Climbing
Indoor climbing gyms offer a controlled environment, but belaying still requires focus and precision. Key adaptations include:
- Awareness: Be aware of other climbers and gym traffic.
- Rope Management: Keep the rope tidy and out of the way.
- Communication: Adjust your communication to the gym’s noise level.
Indoor belaying focuses on efficiency and safety in a confined space.
7.2 Adapting Belay Techniques for Outdoor Climbing
Outdoor climbing presents unique challenges, such as uneven terrain and unpredictable weather. Adaptations include:
- Anchor Placement: Ensure anchors are secure and well-placed.
- Environmental Awareness: Be mindful of loose rocks, wildlife, and weather conditions.
- Adjusting for Terrain: Position yourself to minimize rope drag and maintain a clear view of the climber.
Outdoor belaying requires adaptability and a deep understanding of the environment.
7.3 Environmental Considerations for Outdoor Belaying
Outdoor belaying should always consider the environment. You should always follow Leave No Trace principles to minimize your impact:
- Minimize Impact: Stay on established trails and avoid disturbing vegetation.
- Pack Out Trash: Carry out all trash and waste.
- Respect Wildlife: Avoid approaching or feeding animals.
Responsible belaying protects the environment for future generations.
8. Choosing the Right Climbing Gym for Belay Practice
When starting out, selecting the right climbing gym is essential for belay practice. Here, we’ll give you an overview of facilities and services, safety standards, and community and learning opportunities.
8.1 Overview of Facilities and Services Offered
When choosing a climbing gym for belay practice, consider the following facilities and services:
- Rope Climbing Walls: Ensure the gym has a variety of roped climbs with varying difficulty levels.
- Belay Training Programs: Look for gyms that offer comprehensive belay training courses.
- Equipment Rental: Check if the gym rents out necessary equipment, such as harnesses and belay devices.
The services and facilities offered play a crucial role in the overall learning experience.
8.2 Safety Standards and Certifications to Look For
Safety should be a top priority when selecting a climbing gym. Key safety standards and certifications to look for include:
- Certified Instructors: Ensure the gym’s instructors are certified by reputable organizations.
- Regular Equipment Inspections: Check if the gym conducts regular inspections of its equipment.
- Emergency Protocols: Inquire about the gym’s emergency protocols and procedures.
Adhering to safety standards ensures a secure and supportive learning environment.
8.3 Community and Learning Opportunities Available
A strong climbing community can enhance your learning experience. Look for gyms that offer:
- Group Climbing Sessions: Participate in group sessions to meet other climbers and learn from their experiences.
- Workshops and Clinics: Attend workshops and clinics to improve your skills and knowledge.
- Social Events: Engage in social events to connect with the climbing community.
A supportive community fosters a positive and motivating atmosphere.
9. The Mental Aspects of Belaying: Focus and Trust
Belaying is not just a physical skill; it also involves mental discipline and trust. We’ll address building trust between climber and belayer, the importance of focus and mindfulness, and managing fear and anxiety.
9.1 Building Trust Between Climber and Belayer
Trust is the foundation of a successful climbing partnership. Building trust involves:
- Open Communication: Discuss concerns, expectations, and safety protocols.
- Reliability: Consistently demonstrate competence and attentiveness.
- Mutual Respect: Treat each other with respect and understanding.
Trust enhances the climbing experience and ensures safer outcomes.
9.2 The Importance of Focus and Mindfulness
Belaying requires unwavering focus and mindfulness. Staying present and attentive helps you anticipate the climber’s needs and respond quickly to any situation:
- Minimize Distractions: Avoid distractions, such as phones or conversations.
- Stay Alert: Monitor the climber and the rope at all times.
- Visualize Scenarios: Mentally prepare for potential scenarios and how to respond.
Focus and mindfulness improve your belaying skills and ensure the climber’s safety.
9.3 Managing Fear and Anxiety While Belaying
Belaying can be intimidating, especially when belaying a more experienced climber. Managing fear and anxiety involves:
- Acknowledging Feelings: Recognize and acknowledge your fears.
- Practicing Relaxation Techniques: Use relaxation techniques, such as deep breathing, to calm your nerves.
- Seeking Support: Talk to experienced climbers or instructors for guidance and support.
Overcoming fear and anxiety builds confidence and enhances your performance.
10. Staying Updated: Resources for Continuous Belaying Education
To stay current with belaying techniques and safety practices, we’ll discuss online resources and communities, local climbing organizations and clubs, and advanced climbing courses and certifications.
10.1 Online Resources and Communities for Belaying
Numerous online resources and communities offer valuable information and support for belayers:
- Climbing Websites: Websites like Climbing.com and Rock & Ice Magazine provide articles, videos, and tutorials.
- Online Forums: Participate in online forums to ask questions, share experiences, and learn from others.
- Social Media Groups: Join social media groups to connect with climbers and belayers worldwide.
Online resources offer a wealth of information and support for continuous learning.
10.2 Local Climbing Organizations and Clubs
Local climbing organizations and clubs provide opportunities for:
- Group Climbs: Participate in group climbs to practice your skills and meet other climbers.
- Workshops and Clinics: Attend workshops and clinics to learn from experienced instructors.
- Networking: Network with other climbers and build lasting relationships.
Local organizations enhance your skills and connect you with the climbing community.
10.3 Advanced Climbing Courses and Certifications
For those seeking advanced training, consider enrolling in advanced climbing courses and pursuing certifications:
- AMGA Courses: The American Mountain Guides Association (AMGA) offers courses and certifications for climbing instructors and guides.
- Wilderness First Aid: Obtain wilderness first aid certification to handle medical emergencies in outdoor settings.
- Rescue Training: Participate in rescue training to learn how to assist injured climbers.
Advanced training enhances your skills and prepares you for challenging climbing scenarios.
FAQ About Belaying
1. What is the most important aspect of belaying?
The most important aspect of belaying is maintaining constant focus and attention on the climber and the rope system.
2. How often should I practice belaying?
You should practice belaying regularly, ideally at least once a week, to maintain and improve your skills.
3. What should I do if I feel uncomfortable belaying a climber?
If you feel uncomfortable belaying a climber, communicate your concerns and consider asking an experienced belayer to take over.
4. Can I belay with a non-locking carabiner?
No, you should never belay with a non-locking carabiner. Always use a locking carabiner for belaying to prevent accidental opening.
5. Is it safe to belay with gloves?
Belaying with gloves can provide extra grip and protection, but make sure the gloves do not hinder your ability to feel and control the rope.
6. What is the proper way to lower a climber using an ATC?
To properly lower a climber using an ATC, slowly release the rope while maintaining a firm grip on the brake strand, ensuring a smooth and controlled descent.
7. What should I do if the climber falls while I’m belaying?
If the climber falls, immediately engage the brake by pulling down firmly on the brake strand to arrest the fall.
8. How do I inspect my belay device for wear and tear?
Inspect your belay device regularly for any signs of wear, such as cracks, sharp edges, or deformation, and replace it if necessary.
9. What are the key differences between belaying with an ATC and a Grigri?
The key difference is that the ATC is a manual device requiring constant braking, while the Grigri is an assisted-braking device that locks under sudden tension, providing an extra layer of security.
10. How can I improve my reaction time while belaying?
Improve your reaction time by practicing frequently, staying focused, and visualizing potential scenarios to mentally prepare for quick responses.
Rock climbing and belaying require both skill and knowledge. By understanding the fundamentals of belaying, you can help make the climbing experience safe and fun for everyone.
Ready to take your rock climbing and belaying skills to the next level? Visit rockscapes.net for more inspiration, detailed information on different types of rocks, and expert advice to help you start planning your next climbing adventure today. Contact us at Address: 1151 S Forest Ave, Tempe, AZ 85281, United States. Phone: +1 (480) 965-9011. Website: rockscapes.net.