Rock tumbling is an engaging activity that transforms rough rocks into beautifully polished gems. At rockscapes.net, we’re passionate about helping you master this craft, revealing the stunning potential hidden within ordinary stones and enhancing your landscaping projects. Rock tumbling not only polishes rocks but also brings out their natural beauty. Are you eager to learn how to transform rough rocks into stunning, polished stones? Let’s dive in and discover how you can achieve amazing results!
1. Understanding Rock Tumbling
What is rock tumbling and why is it so popular?
Rock tumbling is the process of smoothing and polishing rough rocks using a machine called a rock tumbler. This process enhances their natural beauty, making them perfect for landscaping, jewelry, and crafts. According to a study from Arizona State University’s School of Earth and Space Exploration, the popularity of rock tumbling stems from its ability to reveal the hidden colors and patterns within ordinary stones.
1.1. What Is Rock Tumbling?
Rock tumbling is the art of transforming rough, unpolished rocks into smooth, lustrous gems. This process involves using a rock tumbler, a machine that gently grinds and polishes rocks over several stages using different grades of abrasive grit. The result is a collection of beautifully polished stones that showcase their natural colors and patterns.
1.2. Why Is Rock Tumbling Popular?
Rock tumbling is popular for several reasons:
- Accessibility: It’s a relatively inexpensive hobby to start, with tumblers and supplies readily available.
- Creativity: It allows you to create unique, personalized items for jewelry, crafts, or decoration.
- Educational: It’s a great way to learn about different types of rocks and minerals.
- Therapeutic: The repetitive nature of the process can be relaxing and meditative.
- Landscaping: Polished rocks and stones can elevate the look of any outdoor space.
1.3. What Are The Benefits Of Rock Tumbling?
The benefits of rock tumbling extend beyond just creating pretty stones. It offers a range of advantages, including:
- Cost-Effective: Polished rocks can be expensive to buy, but tumbling your own is much more affordable.
- Customization: You can choose the exact types of rocks and the level of polish you desire.
- Sustainability: It’s a great way to repurpose and appreciate natural materials.
- Family Fun: It’s an engaging activity that can be enjoyed by people of all ages.
2. Essential Equipment And Supplies
What tools and materials do you need to start rock tumbling?
To start rock tumbling, you need a rock tumbler, various grades of abrasive grit (coarse, medium, fine, and polish), ceramic media, water, and, of course, rough rocks. High-quality equipment and supplies ensure optimal results.
2.1. Rock Tumbler Types: Rotary vs. Vibratory
There are two main types of rock tumblers: rotary and vibratory. Rotary tumblers are more common and use a rotating barrel to grind the rocks against abrasive grit. Vibratory tumblers, on the other hand, use vibrations to achieve the same effect in a shorter amount of time.
Rotary Tumblers
- Pros:
- More affordable
- Better for shaping rocks
- Quieter operation
- Cons:
- Longer tumbling time (weeks)
- Can be less effective for very hard rocks
Vibratory Tumblers
- Pros:
- Faster tumbling time (days)
- Better for polishing delicate stones
- Cons:
- More expensive
- Noisier operation
- Less effective for shaping rocks
2.2. Abrasive Grit: Coarse, Medium, Fine, And Polish
Abrasive grit is the key to transforming rough rocks into polished gems. Each grade of grit plays a specific role in the tumbling process:
Grit Grades
| Grit Grade | Grit Size | Purpose |
|---|---|---|
| Coarse | 60/90 | Shapes the rocks and removes rough edges. |
| Medium | 120/220 | Smoothes the rocks and prepares them for finer grits. |
| Fine | 500/600 | Further smooths the rocks and removes any remaining imperfections. |
| Polish | TXP Aluminum Oxide | Creates the final, high-gloss shine on the rocks. |
2.3. Ceramic Media: Why And How To Use It
Ceramic media are small, non-abrasive shapes that are added to the tumbler barrel along with the rocks. They serve several important functions:
- Cushioning: They prevent the rocks from bumping into each other and causing damage.
- Distribution: They help distribute the abrasive grit evenly throughout the barrel.
- Filling: They fill empty space in the barrel, ensuring proper tumbling action.
2.4. Other Essential Supplies
In addition to the rock tumbler, abrasive grit, and ceramic media, you’ll also need a few other essential supplies:
- Water: Clean water is used in each stage of the tumbling process.
- Bucket: A bucket is used for washing the rocks and separating the grit.
- Sieve or Colander: A sieve or colander is used for rinsing the rocks and grit.
- Safety Glasses: Safety glasses protect your eyes from splashes and debris.
- Gloves: Gloves protect your hands from the abrasive grit and chemicals.
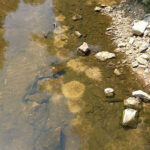
3. Selecting The Right Rocks
What types of rocks are best for rock tumbling and where can you find them?
The best rocks for tumbling have a Mohs hardness between 6 and 7 and are free of fractures and porous areas. Agate, jasper, and quartz are excellent choices, and they can be found in streams, beaches, and rock shops.
3.1. Ideal Rock Properties For Tumbling
The ideal rocks for tumbling have several key properties:
- Hardness: A Mohs hardness between 6 and 7 ensures that the rocks are durable enough to withstand the tumbling process.
- Density: Rocks with a uniform density will tumble more evenly.
- Texture: Fine-grained rocks with a smooth texture will polish more easily.
- Absence of Fractures: Rocks with fractures or cracks are likely to break during tumbling.
- Non-Porous: Porous rocks can trap grit and contaminate later stages of the process.
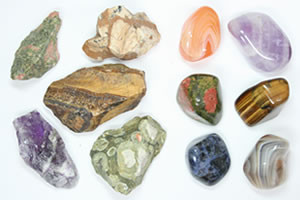
3.2. Popular Rock Types For Rock Tumbling
Some of the most popular rock types for rock tumbling include:
- Agate: A variety of chalcedony known for its vibrant colors and patterns.
- Jasper: An opaque variety of chalcedony that comes in a wide range of colors and patterns.
- Quartz: A hard, durable mineral that polishes to a high shine.
- Petrified Wood: Fossilized wood that has been replaced by minerals, often with stunning colors and patterns.
- Obsidian: A volcanic glass that polishes to a smooth, reflective surface.
3.3. Where To Find Rocks For Tumbling
You can find rocks for tumbling in a variety of locations:
- Streams and Rivers: Many streams and rivers contain a variety of rocks that are suitable for tumbling.
- Beaches: Beaches are a great place to find smooth, rounded rocks that are perfect for tumbling.
- Rock Shops: Rock shops sell a wide variety of rough rocks that are specifically chosen for tumbling.
- Online Vendors: Online vendors offer a convenient way to purchase rough rocks from the comfort of your own home.
- Your Own Backyard: You may be surprised at the variety of rocks you can find in your own backyard.
4. The Four-Step Rock Tumbling Process
What are the steps involved in rock tumbling and how long does each step take?
The rock tumbling process consists of four main steps: coarse grind (7 days), medium grind (7 days), fine grind (7 days), and polish (7 days). Each step uses a different grade of abrasive grit to gradually smooth and polish the rocks.
4.1. Step 1: Coarse Grind
The coarse grind is the first and most aggressive step in the rock tumbling process. Its purpose is to shape the rocks, remove rough edges, and eliminate any major imperfections.
- Duration: 7 days
- Grit: 60/90 silicon carbide
- Procedure: Place the rocks in the tumbler barrel, add coarse grit and water until the water line is just below the top of the rocks. Seal the barrel and run for seven days.
- Important Notes: Inspect the rocks after the first week. If they still have rough edges, repeat the coarse grind for another week.
 coarse grind
4.2. Step 2: Medium Grind
The medium grind is the second step in the rock tumbling process. Its purpose is to smooth the rocks and prepare them for finer grits.
- Duration: 7 days
- Grit: 120/220 silicon carbide
- Procedure: Clean the rocks and tumbler barrel thoroughly. Place the rocks back in the barrel, add medium grit and water until the water line is just below the top of the rocks. Seal the barrel and run for seven days.
- Important Notes: Be sure to remove all traces of coarse grit before starting the medium grind.
4.3. Step 3: Fine Grind / Pre-Polish
The fine grind, also known as pre-polish, is the third step in the rock tumbling process. Its purpose is to further smooth the rocks and remove any remaining imperfections.
- Duration: 7 days
- Grit: 500/600 silicon carbide
- Procedure: Clean the rocks and tumbler barrel thoroughly. Place the rocks back in the barrel, add fine grit and water until the water line is just below the top of the rocks. Seal the barrel and run for seven days.
- Important Notes: At this stage, the rocks should be extremely smooth and may have a slight luster.
4.4. Step 4: Polish
The polish is the final step in the rock tumbling process. Its purpose is to create a high-gloss shine on the rocks.
- Duration: 7 days
- Polish: TXP aluminum oxide
- Procedure: Clean the rocks and tumbler barrel thoroughly. Place the rocks back in the barrel, add polish and water until the water line is just below the top of the rocks. Seal the barrel and run for seven days.
- Important Notes: For best results, use a separate tumbler barrel dedicated solely to the polishing step.
5. Detailed Step-By-Step Instructions
How do you properly load the tumbler barrel and what is the correct water-to-rock ratio?
To properly load the tumbler barrel, fill it about 1/2 to 2/3 full with rocks, add the appropriate amount of grit for each step, and then add water until the water line is just below the top of the rocks.
5.1. Preparing The Rocks For Tumbling
Before you start tumbling, it’s important to prepare the rocks properly. This involves:
- Sorting: Sort the rocks by hardness and size.
- Cleaning: Wash the rocks thoroughly to remove any dirt or debris.
- Trimming: Trim off any sharp edges or protrusions.
5.2. Loading The Tumbler Barrel
To load the tumbler barrel:
- Fill the barrel about 1/2 to 2/3 full with rocks.
- Add the appropriate amount of grit for the current step.
- Add water until the water line is just below the top of the rocks.
5.3. Grit-To-Rock Ratio
The correct grit-to-rock ratio is essential for achieving optimal results. A general guideline is to use two tablespoons of grit per pound of rock.
5.4. Water-To-Rock Ratio
The correct water-to-rock ratio is also important. Add enough water to just below the top of the rocks.
5.5. Running The Tumbler
Once the barrel is loaded, seal it tightly and place it on the tumbler. Turn on the tumbler and let it run for the duration specified for each step.
6. Cleaning And Inspecting Rocks Between Steps
Why is it important to clean the rocks and tumbler barrel between each step?
Cleaning the rocks and tumbler barrel between each step is crucial to prevent contamination from coarser grits, which can scratch the rocks in later stages. Thorough cleaning ensures the best possible polish.
6.1. The Importance Of Preventing Contamination
Contamination is the biggest enemy of rock tumbling. Even a few grains of coarse grit can ruin the final polish.
6.2. How To Properly Clean Rocks And Barrel
To properly clean the rocks and tumbler barrel:
- Remove the rocks from the barrel.
- Rinse the rocks thoroughly with clean water.
- Wash the tumbler barrel with soap and water.
- Rinse the barrel thoroughly with clean water.
6.3. Inspecting The Rocks For Progress
Between each step, inspect the rocks for progress. Look for:
- Smoothness: The rocks should be getting smoother with each step.
- Shape: The rocks should be developing a rounded, pleasing shape.
- Imperfections: Any remaining imperfections should be getting smaller.
6.4. What To Do If Rocks Aren’t Progressing
If the rocks aren’t progressing as expected, consider:
- Repeating the previous step: Sometimes, another week in the previous grit is all that’s needed.
- Adding more grit: If the grit has been used up, add more.
- Checking the tumbler: Make sure the tumbler is running properly and the barrel is sealed tightly.
7. Troubleshooting Common Problems
What are some common problems in rock tumbling and how can you fix them?
Common problems include rocks not polishing, fracturing, or becoming pitted. These issues can often be resolved by ensuring proper cleaning, using the correct grit sequence, and selecting suitable rock types.
7.1. Rocks Not Polishing
If your rocks aren’t polishing, the problem may be:
- Contamination: Make sure the rocks and barrel are thoroughly cleaned between steps.
- Insufficient polish: Use a high-quality polish and make sure you’re using enough of it.
- Hard water: Use distilled water instead of tap water.
- Insufficient tumbling time: Give the rocks more time in the polishing stage.
7.2. Rocks Fracturing
If your rocks are fracturing, the problem may be:
- Fragile rocks: Choose rocks that are less prone to fracturing.
- Overloading the barrel: Don’t overload the tumbler barrel.
- Tumbling too fast: Reduce the speed of the tumbler.
- Insufficient cushioning: Add more ceramic media to the barrel.
7.3. Rocks Becoming Pitted
If your rocks are becoming pitted, the problem may be:
- Porous rocks: Avoid tumbling porous rocks.
- Contamination: Make sure the rocks and barrel are thoroughly cleaned between steps.
- Using too much grit: Use the correct grit-to-rock ratio.
7.4. Uneven Polishing
If your rocks are polishing unevenly, the problem may be:
- Uneven hardness: Make sure the rocks in the barrel are of similar hardness.
- Uneven size: Make sure the rocks in the barrel are of similar size.
- Insufficient tumbling action: Add more ceramic media to the barrel.
8. Advanced Tumbling Techniques
Can you combine different types of rocks in one batch and are there ways to speed up the tumbling process?
It’s generally best to tumble rocks of similar hardness together. While there are ways to potentially speed up the process using vibratory tumblers, patience is key to achieving the best results.
8.1. Tumbling Different Types Of Rocks Together
It’s generally not recommended to tumble different types of rocks together, as they may have different hardness levels and require different tumbling times. However, if you do choose to tumble different types of rocks together, make sure they have similar hardness levels and tumbling requirements.
8.2. Speeding Up The Tumbling Process
While patience is key to achieving the best results, there are a few things you can do to potentially speed up the tumbling process:
- Use a vibratory tumbler: Vibratory tumblers tumble rocks much faster than rotary tumblers.
- Use smaller rocks: Smaller rocks tumble faster than larger rocks.
- Use more grit: Using more grit can speed up the grinding process.
- Use warm water: Warm water can help dissolve the grit and polish more quickly.
8.3. Achieving A High-Gloss Polish
To achieve a high-gloss polish:
- Use a high-quality polish: TXP aluminum oxide is a popular choice.
- Use a separate polishing barrel: This prevents contamination from coarser grits.
- Burnish the rocks: Burnishing is a process of tumbling the rocks in soapy water after the polishing step to remove any remaining polish residue and enhance the shine.
8.4. Adding Color Enhancers
Some people add color enhancers to the tumbler during the polishing stage to enhance the natural colors of the rocks. However, this is a matter of personal preference and is not necessary to achieve a beautiful polish.
9. Safety Precautions And Best Practices
What safety measures should you take when rock tumbling?
Always wear safety glasses and gloves when handling rocks and chemicals. Avoid pouring used grit down the drain, as it can clog plumbing. Work in a well-ventilated area and follow all manufacturer’s instructions for your equipment.
9.1. Handling Chemicals Safely
When handling abrasive grit and polish, it’s important to take certain safety precautions:
- Wear safety glasses: Protect your eyes from splashes and debris.
- Wear gloves: Protect your hands from the abrasive grit and chemicals.
- Work in a well-ventilated area: Avoid breathing in dust or fumes.
9.2. Disposing Of Used Grit Properly
Used grit should never be poured down the drain, as it can clog plumbing. Instead, allow the grit to settle to the bottom of the water, then pour off the clear water and dispose of the grit in a sealed container.
9.3. Maintaining Your Rock Tumbler
To keep your rock tumbler in good working condition:
- Clean it regularly: Remove any grit or debris after each use.
- Lubricate moving parts: Follow the manufacturer’s instructions for lubricating moving parts.
- Replace worn parts: Replace any worn parts, such as belts or barrels, as needed.
9.4. General Safety Tips
- Read and follow all manufacturer’s instructions for your equipment.
- Keep children and pets away from the rock tumbler.
- Store abrasive grit and polish in a safe place, out of reach of children and pets.
10. Creative Uses For Tumbled Stones
How can you use your tumbled stones for landscaping and other creative projects?
Tumbled stones can be used in a variety of creative ways, including landscaping, jewelry making, crafts, and home decor. Their smooth, polished surfaces and vibrant colors add a touch of natural beauty to any project.
10.1. Landscaping Ideas
Tumbled stones are a versatile landscaping material that can be used in a variety of ways:
- Pathways: Create a beautiful and functional pathway through your garden.
- Ground Cover: Use tumbled stones as a low-maintenance ground cover.
- Rock Gardens: Create a stunning rock garden with a variety of tumbled stones.
- Water Features: Add tumbled stones to your water features for a natural look.
- Edging: Use tumbled stones to create an attractive border around your flower beds or garden.
10.2. Jewelry Making
Tumbled stones can be used to create unique and beautiful jewelry:
- Pendants: Drill a hole in a tumbled stone and hang it from a necklace.
- Earrings: Attach tumbled stones to earring hooks or posts.
- Bracelets: String tumbled stones together to create a bracelet.
- Rings: Set tumbled stones in ring settings.
10.3. Crafts And Home Decor
Tumbled stones can be used in a variety of crafts and home decor projects:
- Mosaics: Create a mosaic using tumbled stones.
- Picture Frames: Glue tumbled stones to picture frames.
- Candle Holders: Fill glass candle holders with tumbled stones.
- Vases: Fill glass vases with tumbled stones.
- Paperweights: Use tumbled stones as paperweights.
10.4. Gifting
Tumbled stones make a thoughtful and unique gift for friends and family. You can give them as is, or incorporate them into a piece of jewelry or a craft project.
11. Rock Tumbling For Landscaping Projects
How can tumbled stones enhance your outdoor spaces?
Tumbled stones can add color, texture, and visual interest to gardens, pathways, and water features. Their smooth surfaces make them safe and comfortable to walk on, while their natural beauty complements any landscape design.
11.1. Enhancing Garden Aesthetics
Tumbled stones can enhance garden aesthetics by adding:
- Color: Choose tumbled stones in a variety of colors to add visual interest to your garden.
- Texture: The smooth, rounded surfaces of tumbled stones provide a pleasing contrast to the rough textures of plants and soil.
- Focal Points: Use tumbled stones to create focal points in your garden, such as a rock garden or a water feature.
11.2. Creating Pathways And Walkways
Tumbled stones can be used to create beautiful and functional pathways and walkways:
- Easy to Install: Tumbled stone pathways are easy to install and require minimal maintenance.
- Durable: Tumbled stones are durable and can withstand heavy foot traffic.
- Safe: The smooth surfaces of tumbled stones make them safe and comfortable to walk on.
11.3. Accenting Water Features
Tumbled stones can be used to accent water features, such as ponds, fountains, and waterfalls:
- Natural Look: Tumbled stones add a natural look to water features.
- Erosion Control: Tumbled stones can help control erosion around water features.
- Filtration: Tumbled stones can help filter water in water features.
11.4. Rock Gardens And Zen Gardens
Tumbled stones are a key element in rock gardens and zen gardens:
- Rock Gardens: Rock gardens are a type of garden that features rocks and plants that thrive in rocky environments.
- Zen Gardens: Zen gardens are a type of garden that is designed to promote meditation and contemplation.
12. Finding Inspiration And Resources
Where can you find inspiration for rock tumbling projects and learn more about rocks and minerals?
Rockscapes.net is an excellent resource for design ideas, information about different types of rocks, and expert tips on landscaping with stone. Additionally, books, magazines, and online communities offer a wealth of inspiration and knowledge.
12.1. Online Resources
There are many online resources for rock tumbling enthusiasts:
- Rockscapes.net: Rockscapes.net offers a wealth of information about rocks, minerals, and landscaping with stone.
- Rock Tumbling Forums: Online forums are a great place to connect with other rock tumbling enthusiasts, ask questions, and share tips and ideas.
- Rock Tumbling Blogs: Many rock tumbling blogs offer tutorials, project ideas, and product reviews.
12.2. Books And Magazines
There are many books and magazines about rocks, minerals, and rock tumbling:
- “Gemstones of North America” by Walter Schumann: A comprehensive guide to gemstones found in North America.
- “Rocks & Minerals” Magazine: A magazine that features articles about rocks, minerals, and geology.
- “Lapidary Journal Jewelry Arts” Magazine: A magazine that features articles about lapidary arts, jewelry making, and rock tumbling.
12.3. Local Rock And Gem Clubs
Local rock and gem clubs are a great place to connect with other rockhounds, learn about rocks and minerals, and participate in field trips and workshops.
12.4. Museums And Educational Institutions
Museums and educational institutions often have exhibits about rocks, minerals, and geology. These exhibits can be a great source of inspiration and knowledge.
13. Case Studies: Successful Landscaping With Tumbled Stones
Can you provide examples of stunning landscapes that use tumbled stones effectively?
Several successful landscaping projects demonstrate the effective use of tumbled stones in creating visually appealing and functional outdoor spaces. These examples showcase the versatility and beauty of tumbled stones in various design contexts.
13.1. Residential Garden In Arizona
In a residential garden in Arizona, tumbled stones were used to create a drought-tolerant landscape that is both beautiful and sustainable:
- Ground Cover: Tumbled stones were used as a ground cover to reduce water evaporation and suppress weeds.
- Pathways: Tumbled stone pathways were used to create a winding route through the garden.
- Rock Garden: A rock garden was created using a variety of tumbled stones and desert plants.
13.2. Public Park In California
In a public park in California, tumbled stones were used to create a visually appealing and accessible space for visitors:
- Water Feature: A water feature was created using tumbled stones and native plants.
- Seating Area: A seating area was created using tumbled stones and wooden benches.
- Play Area: A play area was created using tumbled stones and playground equipment.
13.3. Commercial Building In Texas
In a commercial building in Texas, tumbled stones were used to create a sustainable and low-maintenance landscape:
- Green Roof: A green roof was created using tumbled stones and drought-tolerant plants.
- Rain Garden: A rain garden was created using tumbled stones and native grasses.
- Xeriscaping: Xeriscaping techniques were used to reduce water consumption and create a sustainable landscape.
13.4. Community Garden In Florida
In a community garden in Florida, tumbled stones were used to create a welcoming and functional space for gardeners:
- Pathways: Tumbled stone pathways were used to create a network of accessible routes through the garden.
- Raised Beds: Raised beds were created using tumbled stones and recycled materials.
- Composting Area: A composting area was created using tumbled stones and wooden pallets.
14. Rock Tumbling As A Business
Is it possible to turn a rock tumbling hobby into a profitable business?
Yes, it’s possible to turn a rock tumbling hobby into a profitable business by selling polished stones, creating custom jewelry, or offering rock tumbling workshops and classes.
14.1. Selling Polished Stones
One way to turn a rock tumbling hobby into a business is to sell polished stones:
- Online Marketplaces: Sell polished stones on online marketplaces such as Etsy and eBay.
- Craft Fairs: Sell polished stones at craft fairs and local markets.
- Rock Shops: Sell polished stones to local rock shops and gem stores.
14.2. Creating Custom Jewelry
Another way to turn a rock tumbling hobby into a business is to create custom jewelry:
- Online Store: Create an online store to sell custom jewelry.
- Local Boutiques: Sell custom jewelry to local boutiques and gift shops.
- Custom Orders: Take custom orders for jewelry pieces.
14.3. Offering Rock Tumbling Workshops And Classes
A third way to turn a rock tumbling hobby into a business is to offer rock tumbling workshops and classes:
- Community Centers: Offer workshops and classes at community centers and recreation facilities.
- Schools: Offer workshops and classes at schools and after-school programs.
- Private Lessons: Offer private lessons to individuals or small groups.
14.4. Partnering With Landscaping Companies
You can also partner with landscaping companies to supply tumbled stones for landscaping projects:
- Wholesale Pricing: Offer wholesale pricing to landscaping companies.
- Custom Orders: Take custom orders for specific types and sizes of tumbled stones.
- Marketing Materials: Provide landscaping companies with marketing materials to promote the use of tumbled stones in their projects.
15. Eco-Friendly Rock Tumbling Practices
How can you minimize the environmental impact of rock tumbling?
You can minimize the environmental impact of rock tumbling by using water sparingly, disposing of used grit properly, and sourcing rocks and supplies from sustainable sources.
15.1. Using Water Sparingly
To use water sparingly:
- Collect Rainwater: Collect rainwater to use in the tumbling process.
- Reuse Water: Reuse water from one step to the next, filtering out any grit or debris.
- Minimize Rinsing: Minimize the amount of rinsing you do between steps.
15.2. Disposing Of Used Grit Responsibly
As mentioned earlier, used grit should never be poured down the drain. Instead, allow the grit to settle to the bottom of the water, then pour off the clear water and dispose of the grit in a sealed container.
15.3. Sourcing Rocks Sustainably
To source rocks sustainably:
- Collect Rocks Responsibly: Collect rocks only from areas where it is permitted and avoid disturbing the natural environment.
- Buy From Sustainable Sources: Buy rocks from vendors who source them sustainably.
- Use Recycled Materials: Use recycled materials, such as broken glass or ceramics, in the tumbling process.
15.4. Using Energy-Efficient Equipment
To use energy-efficient equipment:
- Choose An Energy-Efficient Tumbler: Choose a rock tumbler that is energy-efficient.
- Use A Timer: Use a timer to turn off the tumbler when it is not in use.
- Run The Tumbler During Off-Peak Hours: Run the tumbler during off-peak hours to reduce energy consumption.
16. Frequently Asked Questions (FAQ)
16.1. What Is The Best Type Of Rock Tumbler For Beginners?
A rotary tumbler with a three-pound capacity is generally recommended for beginners due to its simplicity and affordability.
16.2. How Long Does It Take To Tumble Rocks?
The entire rock tumbling process takes approximately 28 days, with each of the four steps lasting about seven days.
16.3. Can I Tumble Rocks From The Beach?
Yes, you can tumble rocks from the beach, but make sure they meet the ideal rock properties for tumbling, such as hardness and density.
16.4. What Is The Best Grit To Use For Polishing?
TXP aluminum oxide is widely considered the best grit for polishing due to its ability to create a high-gloss shine.
16.5. How Do I Prevent My Rocks From Cracking?
To prevent rocks from cracking, choose rocks that are less prone to fracturing, avoid overloading the barrel, and add ceramic media for cushioning.
16.6. Can I Reuse Tumbling Grit?
No, tumbling grit cannot be reused as it loses its abrasive properties after one use.
16.7. What Do I Do If My Rocks Are Not Shiny After Polishing?
If your rocks are not shiny after polishing, make sure they are thoroughly cleaned, use a high-quality polish, and consider burnishing them in soapy water.
16.8. How Often Should I Change The Water In My Tumbler?
You should change the water in your tumbler with each grit change to prevent contamination.
16.9. Can I Add Soap To The Tumbler To Help With Polishing?
No, adding soap to the tumbler during the polishing stage is not recommended as it can interfere with the polishing process. Soap is only used during the burnishing stage.
16.10. What Is The Best Way To Store My Polished Stones?
The best way to store your polished stones is in a dry, cool place away from direct sunlight. You can store them in a display case, a jewelry box, or any other container that will protect them from dust and scratches.
17. Call To Action
Ready to transform your own rough rocks into stunning landscape features? Visit rockscapes.net today for inspiration, expert advice, and a wide selection of rocks and supplies to get you started. Explore our design ideas, learn about different types of stones, and get the guidance you need to create breathtaking outdoor spaces. Let rockscapes.net be your partner in bringing the beauty of natural stone to your landscaping projects!
Address: 1151 S Forest Ave, Tempe, AZ 85281, United States
Phone: +1 (480) 965-9011
Website: rockscapes.net