Are you looking to revitalize your favorite rocking chair? Learning How To Sew A Rocking Chair Cushion can transform it into a cozy and stylish piece of furniture. At rockscapes.net, we provide all the necessary information on how to choose the best materials, customize your design, and create a cushion that perfectly complements your rocking chair and home décor. Let’s create a beautiful and comfortable addition to your space.
Table of Contents
- Why Sew Your Own Rocking Chair Cushion?
- Understanding the Anatomy of a Rocking Chair Cushion
- Essential Tools and Materials for Sewing a Rocking Chair Cushion
- Step-by-Step Guide: How to Sew a Rocking Chair Cushion
- Choosing the Right Fabric: A Detailed Guide
- Measuring Your Rocking Chair for the Perfect Cushion Fit
- Creating a Custom Cushion Template: A Detailed Approach
- Cutting and Preparing the Fabric
- Sewing the Cushion Cover: Techniques and Tips
- Adding Ties or Straps to Secure Your Cushion
- Stuffing the Cushion: Achieving the Right Comfort Level
- Finishing Touches: Adding Zippers, Buttons, or Piping
- Maintenance and Care Tips for Your Rocking Chair Cushion
- Advanced Techniques: Creating Tufted or Piped Cushions
- Troubleshooting Common Sewing Problems
- Rocking Chair Cushion Ideas: Inspiration and Design Tips
- Where to Find High-Quality Fabrics and Materials
- The Environmental Benefits of DIY Cushions
- Frequently Asked Questions (FAQs) About Sewing Rocking Chair Cushions
- Conclusion: Enjoy Your Handmade Rocking Chair Cushion
1. Why Sew Your Own Rocking Chair Cushion?
Sewing your own rocking chair cushion offers numerous advantages, making it a worthwhile project for DIY enthusiasts and homeowners alike. What are the benefits of making your own cushions? By creating your own cushions, you gain complete control over the design, materials, and fit, ensuring a perfect match for your rocking chair and personal style.
- Customization: Tailor the cushion to your exact preferences in terms of size, shape, color, and fabric.
- Cost-Effectiveness: Save money compared to purchasing custom-made or high-end cushions.
- Personal Satisfaction: Experience the joy of creating something unique and functional with your own hands.
- Perfect Fit: Ensure the cushion fits your rocking chair perfectly, enhancing comfort and aesthetics.
- Material Choice: Select durable, high-quality materials that meet your specific needs and preferences.
- Unique Style: Create a cushion that reflects your personal style and complements your home décor.
- Repair and Upcycle: Easily repair or update your cushions as needed, extending their lifespan and reducing waste.
Making your own rocking chair cushion is a rewarding endeavor, providing comfort, style, and a sense of accomplishment. Whether you’re an experienced sewer or a beginner, the process allows you to create a personalized item that enhances your living space.
2. Understanding the Anatomy of a Rocking Chair Cushion
Before diving into the sewing process, it’s crucial to understand the different components of a rocking chair cushion. What are the main parts of a cushion and how do they contribute to its overall comfort and functionality? A typical rocking chair cushion consists of several key elements:
- Cushion Cover: The outer fabric layer that provides the aesthetic appeal and protects the inner filling.
- Cushion Filling: The material inside the cushion that provides comfort and support, such as foam, batting, or fiberfill.
- Ties or Straps: Fabric strips used to secure the cushion to the rocking chair, preventing it from slipping.
- Zipper or Closure: An optional feature that allows for easy removal of the cushion cover for cleaning or replacement.
- Piping or Trim: Decorative elements that add visual interest and can enhance the cushion’s durability.
- Batting Layer: A layer of padding between the fabric cover and filling, providing extra cushioning and a smooth surface.
- Cushion Base: The underlying structure or support that maintains the cushion’s shape and prevents sagging.
Understanding these components is essential for designing and constructing a rocking chair cushion that meets your specific needs and preferences. By considering each element carefully, you can create a cushion that is both comfortable and visually appealing.
3. Essential Tools and Materials for Sewing a Rocking Chair Cushion
To successfully sew a rocking chair cushion, you’ll need a range of tools and materials. What are the must-have items for this project? Here’s a comprehensive list to get you started:
| Tool/Material | Description | Usage |
|---|---|---|
| Fabric | Durable upholstery fabric in your desired color and pattern. | Outer layer of the cushion cover. |
| Cushion Filling | High-density foam, batting, or fiberfill. | Provides comfort and support. |
| Sewing Machine | Essential for stitching fabric together efficiently. | Sewing the cushion cover and attaching ties. |
| Scissors or Rotary Cutter | Sharp scissors or a rotary cutter with a cutting mat. | Cutting fabric accurately. |
| Measuring Tape | Flexible tape measure for accurate measurements. | Measuring the rocking chair and fabric. |
| Pins | Straight pins for holding fabric pieces together. | Securing fabric before sewing. |
| Thread | Strong thread that matches your fabric. | Sewing seams and attaching embellishments. |
| Zipper (Optional) | Zipper for easy removal of the cushion cover. | Adding a closure for cleaning or replacement. |
| Fabric Marker or Chalk | For marking fabric for cutting and sewing. | Tracing patterns and marking seam lines. |
| Iron and Ironing Board | For pressing fabric and seams. | Ensuring a professional finish. |
| Ruler or Yardstick | Straight edge for measuring and marking straight lines. | Creating accurate templates. |
| Ties or Straps | Fabric strips or ribbon for securing the cushion to the rocking chair. | Attaching the cushion to the chair. |
| Upholstery Needle | Strong, curved needle for hand-sewing thick fabrics. | Hand-sewing finishing details. |
Having these tools and materials on hand will streamline the sewing process and ensure a professional-looking finished product. Take the time to gather everything before you begin to avoid interruptions and ensure a smooth crafting experience. Rockscapes.net offers guidance on sourcing the best materials for your project.
4. Step-by-Step Guide: How to Sew a Rocking Chair Cushion
Sewing a rocking chair cushion can be a straightforward project with the right guidance. What are the key steps to follow? Here’s a detailed, step-by-step guide to help you create a comfortable and stylish cushion:
- Measure Your Rocking Chair: Accurately measure the seat and back of your rocking chair to determine the dimensions of the cushion.
- Create a Template: Use paper or fabric to create a template based on your measurements. Add extra seam allowance.
- Choose Your Fabric: Select a durable, upholstery-weight fabric that complements your décor.
- Cut the Fabric: Lay the template on the fabric and cut out the pieces, adding seam allowance.
- Sew the Cushion Cover: Stitch the fabric pieces together, leaving an opening for the filling or inserting a zipper.
- Prepare the Filling: Cut the foam or batting to fit the cushion cover.
- Stuff the Cushion: Insert the filling into the cushion cover, ensuring an even distribution.
- Close the Opening: Hand-sew or machine-sew the opening closed, or insert the cushion through the zipper.
- Add Ties or Straps: Sew fabric ties or straps to the cushion to secure it to the rocking chair.
- Finishing Touches: Add piping, buttons, or other decorative elements as desired.
By following these steps carefully, you can create a custom rocking chair cushion that enhances the comfort and style of your favorite seat. Each step is crucial to ensuring a well-fitted and durable cushion.
5. Choosing the Right Fabric: A Detailed Guide
Selecting the right fabric is essential for creating a durable and visually appealing rocking chair cushion. What factors should you consider when choosing fabric? Here’s a detailed guide:
| Fabric Type | Description | Pros | Cons | Best For |
|---|---|---|---|---|
| Cotton | Natural fiber, soft and breathable. | Comfortable, versatile, easy to work with. | Can fade, stain easily, not as durable as other options. | Casual and decorative cushions. |
| Linen | Natural fiber, known for its strength and texture. | Durable, breathable, gets softer with each wash. | Wrinkles easily, can be more expensive. | Elegant and rustic-style cushions. |
| Polyester | Synthetic fiber, highly durable and resistant to stains. | Affordable, stain-resistant, durable, easy to clean. | Not as breathable as natural fibers, can feel less luxurious. | High-traffic areas, outdoor cushions. |
| Olefin | Synthetic fiber, excellent resistance to sunlight, mildew, and wear. | Highly durable, stain-resistant, water-resistant, ideal for outdoor use. | Can feel less soft than other fabrics. | Outdoor rocking chairs, cushions exposed to the elements. |
| Acrylic | Synthetic fiber, good resistance to fading, stains, and mildew. | Durable, easy to clean, good for outdoor use. | Can pill or stretch over time. | Outdoor cushions, cushions in sunny areas. |
| Upholstery Blends | Combination of natural and synthetic fibers. | Offers the benefits of both types, such as durability and comfort. | Performance varies depending on the blend. | Versatile use, combining the best qualities of different fibers. |
| Faux Leather/Vinyl | Synthetic material that mimics the look and feel of leather. | Durable, easy to clean, water-resistant, stylish. | Can feel less breathable, may crack over time. | Modern and contemporary designs, easy-to-clean cushions. |
| Velvet | Soft, luxurious fabric with a distinctive pile. | Adds a touch of elegance, comfortable, visually appealing. | Can be difficult to clean, shows wear easily, may not be suitable for high-traffic areas. | Decorative cushions, low-traffic areas. |
When choosing your fabric, consider the following factors:
- Durability: Select a fabric that can withstand regular use and wear.
- Comfort: Opt for a fabric that feels soft and comfortable against the skin.
- Maintenance: Choose a fabric that is easy to clean and maintain.
- Aesthetics: Select a fabric that complements your home décor and personal style.
- Sunlight Exposure: If the cushion will be exposed to sunlight, choose a fade-resistant fabric.
- Moisture Resistance: For outdoor cushions, select a water-resistant or waterproof fabric.
By carefully considering these factors, you can choose the perfect fabric for your rocking chair cushion, ensuring both longevity and visual appeal. Rockscapes.net provides resources for selecting the best materials for your DIY projects.
6. Measuring Your Rocking Chair for the Perfect Cushion Fit
Accurate measurements are essential for creating a rocking chair cushion that fits perfectly. How do you measure your rocking chair to ensure a snug and comfortable fit? Follow these steps:
- Measure the Seat Width: Measure the widest part of the seat from side to side.
- Measure the Seat Depth: Measure from the front edge of the seat to the back.
- Measure the Back Height: Measure from the top of the seat to the top of the backrest.
- Measure the Back Width: Measure the widest part of the backrest from side to side.
- Consider Contours: Note any curves or angles in the seat or backrest that may affect the cushion shape.
- Add Seam Allowance: Add 1/2 to 1 inch to each measurement for seam allowance.
- Account for Thickness: Determine the desired thickness of the cushion and add this to your measurements.
- Measure for Ties: Decide where you want to place the ties or straps and measure the distance between them.
- Create a Sketch: Draw a sketch of the rocking chair with all the measurements labeled.
By taking accurate measurements and considering all the relevant factors, you can create a cushion that fits your rocking chair perfectly, providing optimal comfort and support. Accurate measurements are crucial for a successful project.
7. Creating a Custom Cushion Template: A Detailed Approach
Creating a custom template is crucial for achieving a well-fitted rocking chair cushion. What are the best practices for making a template? Here’s a detailed approach:
- Gather Materials: Collect large paper (such as butcher paper or kraft paper), a measuring tape, a ruler, and a pencil or marker.
- Measure the Rocking Chair: Accurately measure the seat and backrest dimensions, including width, depth, and height, as outlined in the previous section.
- Sketch the Outline: On the paper, sketch the outline of the seat and backrest, using the measurements you’ve taken.
- Account for Curves: If your rocking chair has curves or angles, trace these carefully onto the template. You can use flexible measuring tools to capture the contours accurately.
- Add Seam Allowance: Add a seam allowance of 1/2 to 1 inch around the entire template. This extra fabric will be needed for sewing the cushion cover together.
- Mark Tie Placement: Decide where you want to position the ties or straps and mark these locations on the template. Measure and mark the placement accurately to ensure the cushion stays in place.
- Label the Template: Label each template piece (e.g., “Seat,” “Backrest”) and indicate the fabric grain direction with an arrow.
- Cut Out the Template: Carefully cut out the template pieces along the marked lines.
- Test the Fit: Place the paper template on the rocking chair to check the fit. Make any necessary adjustments before cutting the fabric.
- Transfer to Fabric: Lay the template pieces on your chosen fabric and trace around them, adding the seam allowance.
By following these steps, you can create a custom cushion template that ensures a precise fit for your rocking chair, resulting in a comfortable and stylish cushion. A well-made template is the foundation of a successful sewing project.
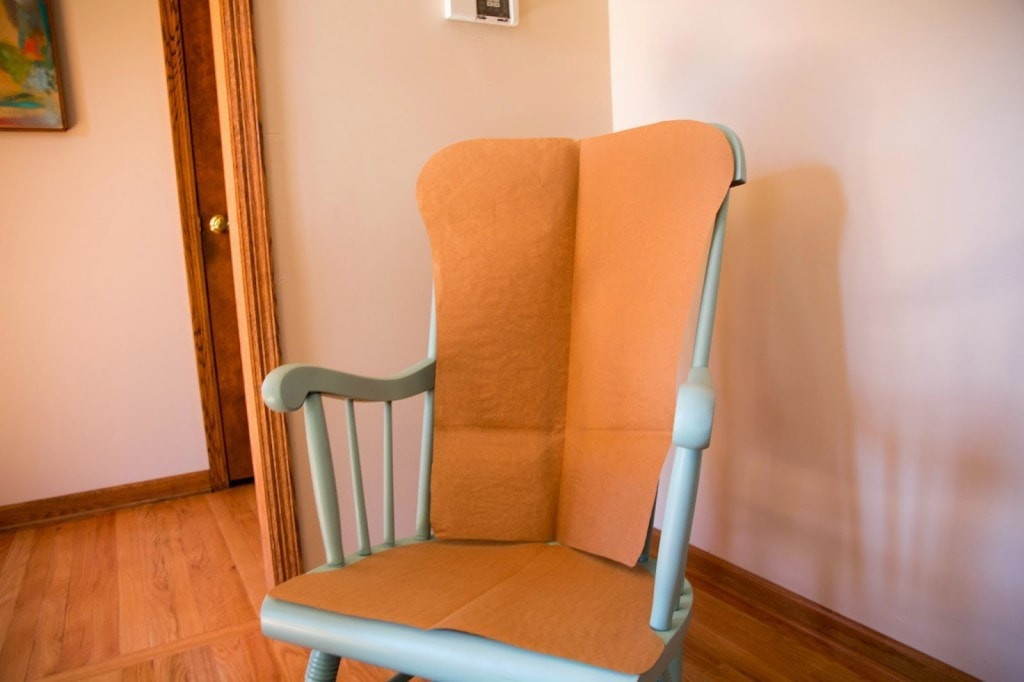 template for DIY Upholstered Rocking Chair by home decor blogger DIY Decor Mom
8. Cutting and Preparing the Fabric
Once you have your template, the next step is to cut and prepare the fabric. How do you ensure accurate and efficient fabric cutting? Follow these guidelines:
- Prepare the Fabric: Wash, dry, and iron the fabric to prevent shrinkage and ensure a smooth surface.
- Lay Out the Fabric: Place the fabric on a flat, stable surface, such as a cutting table or the floor.
- Position the Template: Lay the template pieces on the fabric, ensuring they are aligned with the fabric grain.
- Secure the Template: Use pins or pattern weights to hold the template in place.
- Trace the Template: Trace around the template pieces with a fabric marker or chalk, adding seam allowance.
- Cut the Fabric: Use sharp scissors or a rotary cutter to cut along the marked lines, ensuring clean and accurate cuts.
- Mark Notches: Cut small notches along curved edges to help with alignment during sewing.
- Transfer Markings: Transfer any markings from the template to the fabric, such as tie placement or zipper location.
- Organize Pieces: Keep the cut fabric pieces organized and labeled to avoid confusion during the sewing process.
By following these steps carefully, you can cut and prepare the fabric accurately, ensuring a professional-looking finished product. Proper fabric preparation is essential for a smooth and successful sewing project.
9. Sewing the Cushion Cover: Techniques and Tips
Sewing the cushion cover is a crucial step in creating your rocking chair cushion. What are the best techniques and tips for achieving a professional finish? Consider these points:
- Seam Selection: Choose a suitable seam for your fabric type and cushion design. A straight stitch is generally used for most seams.
- Seam Allowance: Maintain a consistent seam allowance throughout the sewing process, typically 1/2 to 1 inch.
- Pinning: Pin the fabric pieces together securely, aligning edges and corners carefully.
- Stitching: Sew along the marked seam lines, using a consistent stitch length and backstitching at the beginning and end of each seam to secure the stitches.
- Curved Seams: For curved seams, clip the seam allowance to reduce bulk and allow the fabric to lay flat.
- Corners: Trim the corners of the seam allowance to reduce bulk and create sharp, defined corners.
- Pressing: Press each seam open with an iron to create a smooth, professional finish.
- Zipper Insertion: If adding a zipper, follow the zipper manufacturer’s instructions carefully. Use a zipper foot for accurate placement.
- Lining: Consider adding a lining to the cushion cover for added durability and a smoother finish.
- Test Fit: Before completing the cushion cover, test fit it over the cushion filling to ensure a proper fit.
By following these techniques and tips, you can sew a cushion cover that is both durable and visually appealing. Attention to detail is key to achieving a professional-quality finished product.
10. Adding Ties or Straps to Secure Your Cushion
Adding ties or straps is essential for keeping your rocking chair cushion securely in place. What are the best methods for attaching these? Here’s a detailed guide:
- Choose Your Material: Select a durable fabric or ribbon that matches your cushion cover. Grosgrain ribbon or twill tape are excellent choices.
- Determine Length: Measure the length needed for the ties or straps, allowing enough to tie securely around the rocking chair frame.
- Cut the Ties: Cut the fabric or ribbon into the desired lengths.
- Finish the Edges: Fold the raw edges of the ties or straps under and sew them to prevent fraying.
- Position the Ties: Pin the ties or straps to the cushion cover at the desired locations, typically at the corners or sides.
- Sew the Ties: Sew the ties or straps securely to the cushion cover, using a strong stitch and reinforcing the attachment point.
- Placement: Ensure the ties are placed symmetrically and at points that will effectively secure the cushion to the chair.
- Test the Attachment: Test the ties or straps by tying them around the rocking chair frame and ensuring they hold the cushion in place.
By following these steps, you can add ties or straps that keep your rocking chair cushion securely in place, enhancing comfort and preventing slippage. Secure attachment is crucial for functionality and safety.
11. Stuffing the Cushion: Achieving the Right Comfort Level
The type and amount of filling you use will significantly impact the comfort of your rocking chair cushion. How do you achieve the right level of comfort? Consider these guidelines:
- Choose Your Filling: Select a filling material that suits your preferences. Options include foam, batting, fiberfill, or a combination of these.
- Foam: High-density foam provides firm support and maintains its shape well.
- Batting: Batting is a soft, fluffy material that adds cushioning and conforms to the body.
- Fiberfill: Fiberfill is a lightweight, inexpensive option that provides good loft and softness.
- Cut the Filling: Cut the filling material to the size and shape of the cushion cover, using the template as a guide.
- Layering: If using multiple filling materials, layer them to achieve the desired comfort level. For example, a layer of foam topped with batting provides both support and softness.
- Insert the Filling: Carefully insert the filling into the cushion cover, ensuring an even distribution.
- Adjust as Needed: Adjust the amount of filling to achieve the desired firmness and thickness. Add or remove filling as needed.
- Smooth the Surface: Smooth the surface of the cushion to eliminate any lumps or bumps.
- Test the Comfort: Sit on the cushion to test the comfort level and make any necessary adjustments.
By carefully selecting and adjusting the filling material, you can create a rocking chair cushion that provides optimal comfort and support for hours of relaxation. The right filling can make all the difference in comfort.
12. Finishing Touches: Adding Zippers, Buttons, or Piping
Adding finishing touches such as zippers, buttons, or piping can enhance the look and functionality of your rocking chair cushion. What are the benefits of these additions? Here’s a guide:
- Zippers:
- Benefits: Allow for easy removal of the cushion cover for cleaning or replacement.
- Installation: Install the zipper along one edge of the cushion cover, following the manufacturer’s instructions. Use a zipper foot for accurate placement.
- Buttons:
- Benefits: Add a decorative touch and can be used to create a tufted effect.
- Attachment: Sew buttons securely to the cushion cover, using a strong thread and reinforcing the attachment point.
- Piping:
- Benefits: Adds a decorative edge and enhances the cushion’s durability.
- Preparation: Create piping by wrapping fabric around a cord and sewing it close to the cord.
- Attachment: Sew the piping to the edges of the cushion cover before sewing the cover together, encasing the piping in the seam.
- Other Embellishments:
- Consider adding other decorative elements such as trim, tassels, or embroidery to personalize your cushion.
By adding these finishing touches, you can create a rocking chair cushion that is both functional and visually appealing. These details can elevate the overall look and feel of your cushion.
13. Maintenance and Care Tips for Your Rocking Chair Cushion
Proper maintenance and care will prolong the life of your rocking chair cushion and keep it looking its best. What are the key tips for maintaining your cushion? Here’s a guide:
- Regular Cleaning:
- Vacuum the cushion regularly to remove dust and debris.
- Spot clean stains with a mild detergent and water.
- Removable Covers:
- If your cushion has a removable cover, wash it according to the fabric manufacturer’s instructions.
- Close the zipper or buttons before washing to prevent damage.
- Sunlight Protection:
- Avoid prolonged exposure to direct sunlight to prevent fading.
- Use curtains or blinds to filter sunlight when necessary.
- Moisture Control:
- Keep the cushion dry to prevent mildew and mold growth.
- Use a water-resistant spray for outdoor cushions.
- Rotation:
- Rotate the cushion regularly to distribute wear evenly.
- Storage:
- Store the cushion in a clean, dry place when not in use.
- Use a storage bag to protect it from dust and pests.
- Professional Cleaning:
- Consider professional cleaning for deep stains or delicate fabrics.
By following these maintenance and care tips, you can keep your rocking chair cushion looking beautiful and comfortable for years to come. Regular care ensures longevity and appearance.
14. Advanced Techniques: Creating Tufted or Piped Cushions
For those looking to elevate their sewing skills, creating tufted or piped cushions can add a touch of elegance and sophistication. What are the techniques involved? Here’s an overview:
- Tufted Cushions:
- Marking: Mark the locations for the tufts on the cushion cover.
- Sewing: Use a long needle to sew through the cushion at each marked location, creating a tufted effect.
- Buttons: Attach buttons at each tuft to secure the stitching and add a decorative touch.
- Piped Cushions:
- Preparation: Create piping by wrapping fabric around a cord and sewing it close to the cord.
- Attachment: Sew the piping to the edges of the cushion cover before sewing the cover together, encasing the piping in the seam.
- Corners: Carefully miter the corners of the piping for a clean, professional finish.
- Additional Tips:
- Use a walking foot on your sewing machine to help feed multiple layers of fabric evenly.
- Practice these techniques on scrap fabric before working on your final project.
- Watch online tutorials for visual guidance.
By mastering these advanced techniques, you can create rocking chair cushions that are both beautiful and unique. Advanced techniques add sophistication and style.
15. Troubleshooting Common Sewing Problems
Even experienced sewers can encounter problems. What are some common issues and how can you fix them? Here are some troubleshooting tips:
| Problem | Possible Cause(s) | Solution(s) |
|---|---|---|
| Stitches Skipping | Incorrect needle, incorrect thread, machine not threaded properly. | Change the needle, use the correct thread, re-thread the machine. |
| Fabric Puckering | Tension too tight, incorrect stitch length, fabric stretching. | Adjust the tension, increase the stitch length, avoid stretching the fabric. |
| Needle Breaking | Incorrect needle, sewing over pins, thick fabric. | Use the correct needle for the fabric, remove pins before sewing, use a stronger needle. |
| Uneven Seams | Inconsistent seam allowance, fabric slipping. | Use a seam guide, pin the fabric securely, use a walking foot. |
| Zipper Not Working | Incorrect installation, fabric caught in the zipper. | Reinstall the zipper correctly, remove any fabric caught in the zipper. |
| Ties or Straps Coming Loose | Weak stitching, insufficient reinforcement. | Use a stronger stitch, reinforce the attachment point with extra stitching. |
| Cushion Filling Lumpy | Uneven distribution of filling, poor-quality filling. | Redistribute the filling evenly, use high-quality filling material. |
| Fabric Fraying | Raw edges not finished properly, fabric prone to fraying. | Finish the raw edges with a serger, zigzag stitch, or bias tape. |
| Tension Issues | Top and bottom tension is not balanced. | Adjust the tension dials, clean and oil the sewing machine. |
By identifying and addressing these common sewing problems, you can ensure a smooth and successful cushion-making process. Troubleshooting skills are essential for any sewing project.
16. Rocking Chair Cushion Ideas: Inspiration and Design Tips
Need some inspiration? What are some creative ideas for designing your rocking chair cushion? Here are some design tips to spark your imagination:
- Color and Pattern:
- Choose colors and patterns that complement your home décor.
- Consider using bold patterns or vibrant colors for a statement piece.
- Fabric Combinations:
- Mix and match different fabrics to create a unique and textured look.
- Use contrasting fabrics for the seat and backrest.
- Embellishments:
- Add decorative elements such as buttons, trim, or tassels to personalize your cushion.
- Consider adding embroidery or appliques for a custom touch.
- Shape and Size:
- Experiment with different shapes and sizes to create a cushion that fits your rocking chair perfectly.
- Consider adding extra padding for enhanced comfort.
- Seasonal Themes:
- Create cushions with seasonal themes to update your décor throughout the year.
- Use fabrics and colors that reflect the current season.
- Reversible Designs:
- Create reversible cushions with different designs on each side for added versatility.
- Personalized Touches:
- Add personalized touches such as monograms or family initials to create a unique and sentimental cushion.
By exploring these design ideas, you can create a rocking chair cushion that is both stylish and comfortable. Let your creativity shine and design a cushion that reflects your personal taste.
17. Where to Find High-Quality Fabrics and Materials
Sourcing high-quality fabrics and materials is essential for creating a durable and beautiful rocking chair cushion. Where can you find the best supplies? Here are some recommended resources:
- Online Fabric Stores:
- Fabric.com: Offers a wide selection of upholstery fabrics and supplies.
- Etsy: Features unique and handmade fabrics from independent sellers.
- Spoonflower: Allows you to design and print your own custom fabrics.
- Local Fabric Stores:
- Support local businesses and browse a curated selection of fabrics.
- Get personalized advice and assistance from knowledgeable staff.
- Craft Stores:
- Joann Fabric and Crafts: Offers a variety of fabrics, fillings, and sewing supplies.
- Hobby Lobby: Provides a wide range of craft and fabric options.
- Upholstery Suppliers:
- Specialized suppliers offer high-quality upholstery fabrics and materials.
- May offer trade discounts for professionals.
- Thrift Stores and Estate Sales:
- Find unique and vintage fabrics at affordable prices.
- Upcycle old fabrics for a sustainable and creative project.
- rockscapes.net:
- Provides curated recommendations for high-quality fabrics and materials.
- Offers links to trusted suppliers and retailers.
By utilizing these resources, you can source high-quality fabrics and materials for your rocking chair cushion, ensuring a beautiful and long-lasting finished product. Quality materials are essential for a durable and stylish cushion.
18. The Environmental Benefits of DIY Cushions
Creating your own rocking chair cushion can be an environmentally friendly choice. What are the ecological advantages of DIY projects? Consider these points:
- Reduced Waste:
- Upcycle old fabrics and materials to reduce waste and landfill contributions.
- Avoid purchasing mass-produced items that often have a high environmental impact.
- Sustainable Materials:
- Choose organic, natural, or recycled fabrics to minimize your environmental footprint.
- Select eco-friendly fillings such as bamboo or recycled fiberfill.
- Local Sourcing:
- Purchase fabrics and materials from local suppliers to reduce transportation emissions.
- Support local businesses and communities.
- Customization:
- Create a cushion that perfectly fits your needs, reducing the likelihood of future replacements.
- Repair and update your cushion as needed, extending its lifespan and minimizing waste.
- Reduced Carbon Footprint:
- DIY projects often require less energy and resources compared to mass production.
- Reduce your carbon footprint by making your own cushion.
By choosing to sew your own rocking chair cushion, you can make a positive impact on the environment. Sustainable practices contribute to a healthier planet.
19. Frequently Asked Questions (FAQs) About Sewing Rocking Chair Cushions
Do you have questions about sewing rocking chair cushions? Here are some frequently asked questions and their answers:
Q1: What is the best fabric for a rocking chair cushion?
A1: The best fabrics are durable upholstery-weight materials such as cotton, linen, polyester, or acrylic blends.
Q2: How do I measure my rocking chair for a cushion?
A2: Measure the seat width, seat depth, back height, and back width. Add seam allowance to each measurement.
Q3: How much fabric do I need to make a cushion?
A3: The amount of fabric depends on the size of your rocking chair and the complexity of your design. Generally, 2-3 yards of fabric are sufficient.
Q4: What type of filling should I use for my cushion?
A4: Options include foam, batting, or fiberfill. Choose a filling that provides the desired comfort and support.
Q5: How do I clean my rocking chair cushion?
A5: Vacuum the cushion regularly and spot clean stains with a mild detergent and water. If the cover is removable, wash it according to the fabric manufacturer’s instructions.
Q6: How do I add ties or straps to my cushion?
A6: Cut fabric or ribbon into the desired lengths, finish the edges, and sew them securely to the cushion cover at the corners or sides.
Q7: How do I prevent my cushion from slipping?
A7: Add ties