Want to know how to make your rock collection gleam? Polishing rocks is an amazing craft and hobby to get into. This guide from rockscapes.net will help you discover the secrets to making your stones shine. Learn How To Shine Rocks by hand, achieving a beautiful luster with simple tools and techniques. Whether you’re a beginner or an experienced rockhound, this comprehensive guide covers everything from selecting the right stones to mastering the final polish. Learn more about rock shining, stone polishing and lapidary techniques to transform your dull stones into dazzling gems.
1. Why Choose Hand Polishing for Your Rocks?
Hand polishing rocks is a fantastic way for rock enthusiasts of all ages and skill levels to bring out the natural beauty of their stones. This method is accessible, budget-friendly, and yields stunning results with a personal touch. Hand polishing is particularly well-suited for softer stones such as turquoise and amber, which may not withstand the tumbling process effectively. For instance, research from Arizona State University’s School of Earth and Space Exploration highlights the unique properties of various minerals, making hand polishing a preferred method for delicate specimens.
- Accessibility: Even a novice can quickly learn how to polish rocks by hand.
- Cost-Effectiveness: Requires minimal materials, making it a low-cost hobby.
- Relaxation: Many find the repetitive motions of hand polishing calming and meditative.
- Suitable for Delicate Stones: Ideal for softer materials that may be damaged in a rock tumbler.
- Personal Touch: Offers a greater degree of control over the final result, ensuring each stone retains its unique character.
2. What Essential Materials Are Needed to Polish Rocks by Hand?
Gathering the right materials is essential for effective hand polishing. Here’s a detailed list to get you started:
- Rocks: Choose softer stones like turquoise, amber, or obsidian for easier polishing.
- Bucket: A small bucket for holding water to clean and rinse the rocks.
- Soap: Mild soap for cleaning the rocks.
- Old Toothbrush: Useful for scrubbing away stubborn dirt and debris.
- Sandpaper:
- 220-grit: For initial shaping and smoothing of rough edges.
- 500-grit: To remove heavy scratches and further refine the shape.
- 1200-grit: For removing lighter scratches and beginning the polishing process.
- Cutting Board: A hard, flat surface for sanding.
- Thick Cloth: Denim or similar material for final polishing.
- Toothpaste: Abrasive toothpaste works well as a polishing compound.
- Mineral Oil or Rock Polish: To enhance the luster and bring out the stone’s natural colors.
- Dremel (Optional): A motorized rotary tool for faster shaping and polishing of harder stones.
- Safety Gear (If Using a Dremel): Protective eyewear, gloves, and a mask to protect against dust and debris.
3. How Do You Prepare Your Rocks for Polishing?
Proper preparation is critical to achieving a flawless finish. Follow these steps to clean and shape your rocks effectively.
Step 1: Cleaning the Rocks
- Fill a bucket with hot, soapy water.
- Thoroughly scrub the rocks with an old toothbrush to remove any dirt, grime, or residue.
- Rinse the rocks with clean water to remove all traces of soap.
- Refill the bucket with clean water for use throughout the polishing process.
Step 2: Initial Shaping with 220-Grit Sandpaper
- Moisten the 220-grit sandpaper and place it grit-side up on a cutting board or another hard, flat surface.
- Wet the rock and hold it firmly in your dominant hand.
- Rub the rock along the sandpaper to smooth the edges and achieve the desired shape.
- Continuously wet the rock to remove fine particles and facilitate the sanding process.
Step 4. What Sandpaper Grades Should You Use for Polishing Rocks?
Selecting the right sandpaper grades is crucial for achieving a smooth, polished surface on your rocks. Here’s a breakdown of the recommended grits and their specific purposes:
- 220-Grit Sandpaper: Use this coarse sandpaper for the initial shaping of the rock. It effectively smooths rough edges and removes any large imperfections.
- 500-Grit Sandpaper: This medium-grit sandpaper is ideal for refining the shape and removing heavy scratches left by the 220-grit sandpaper. It prepares the surface for finer polishing.
- 1200-Grit Sandpaper: This extra-fine sandpaper is used to remove light scratches and begin the polishing process. It buffs the surface to create a preliminary shine.
5. What Is The Process Of Refining The Shape And Removing Scratches?
To refine the shape and remove heavy scratches, follow these steps using 500-grit sandpaper:
- Wet Sandpaper: Moisten the 500-grit sandpaper and place it grit-side up on a hard, flat surface.
- Wet Rock: Keep the rock wet throughout the sanding process to achieve better results and remove particles.
- Rub and Smooth: Rub the rock along the sandpaper, focusing on areas with significant scratches or imperfections.
- Rinse Frequently: Rinse the rock frequently to check your progress and ensure that no spots are missed.
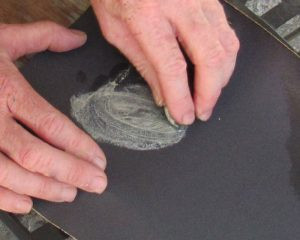
 Checking the progress after polishing with 500-grit and 1200-grit sandpaper. The shine is really starting to come out.
6. How Do You Achieve the Initial Shine on Rocks?
To remove lighter scratches and start polishing, use 1200-grit sandpaper with these steps:
- Wet Sandpaper: Moisten the 1200-grit sandpaper and place it grit-side up on a hard, flat surface.
- Buff the Surface: Rub the rock along the sandpaper to buff out tiny scratches on the stone’s surface.
- Keep Rock Wet: Ensure the rock remains wet throughout the process, rinsing it often to see the areas that need more attention.
- Check for Shine: During this step, you will notice the shine starting to form.
7. How Can You Polish Rocks Effectively with Toothpaste?
Toothpaste is an effective and readily available polishing compound. Here’s how to use it:
- Prepare the Cloth: Dampen a square of thick cloth, preferably denim or a similar material.
- Apply Toothpaste: Add a generous dab of toothpaste to the cloth.
- Work the Stone: Rub the stone through the toothpaste and over the fabric to create a beautiful luster.
- Add More Toothpaste: Depending on the stone, add more toothpaste several times until the desired shine is achieved.
- Rinse and Coat: Rinse off the toothpaste and coat the newly polished stone with mineral oil or commercial rock polish to enhance the luster.
According to Allen McGhee, a seasoned rockhound, “Toothpaste works just as well as many commercial polishing compounds and is more affordable.”
8. How Does Rockscapes.Net Recommend Augmenting the Polishing Process with a Dremel?
A Dremel is a versatile power tool that can significantly speed up the shaping and polishing process, especially for harder stones or those with intricate crevices.
- Versatile Tool: A Dremel is a motorized rotary tool perfect for grinding, smoothing sharp edges, and shaping hard stones, especially those with many crevices.
- Faster Results: Using a Dremel can help shape and polish rocks and gems faster.
- Specialized Heads: Dremel offers heads with different levels of grit for all stages of polishing.
- Safety First: Always wear protective eyewear, gloves, and a mask when using a Dremel.
9. What Safety Precautions Should You Take When Using a Dremel?
Safety is paramount when using a Dremel. Always wear protective gear to prevent injuries.
- Protective Eyewear: Essential to protect eyes from flying chips and debris.
- Gloves: To protect hands from sharp edges and the rotating tip of the Dremel.
- Mask: Prevents inhaling tiny particles produced during grinding.
10. How Do You Use a Dremel to Polish Rocks?
Here’s how to effectively use a Dremel for polishing rocks:
- Personal Preference: Decide how much shaping you want to do. Some prefer a more natural shape, while others aim for a perfectly smooth and rounded stone.
- Shaping and Smoothing: Use the Dremel to grind and smooth the rock, paying attention to any sharp edges or imperfections.
- Polishing: Switch to a polishing head and apply a polishing compound to bring out the shine.
- Final Touches: Finish with a soft cloth and polishing compound for the final luster.
11. What Are the Pros and Cons of Tumbling vs. Hand Polishing Rocks?
Both tumbling and hand polishing have their own advantages and disadvantages. Here’s a comparison to help you decide which method is best for you:
| Feature | Rock Tumbling | Hand Polishing |
|---|---|---|
| Time | Lengthy process, taking several days to weeks. | Faster turnaround, especially for softer rocks. |
| Labor | Less labor-intensive; the machine does most of the work. | More labor-intensive, requiring manual effort. |
| Control | Less control over the final product. | More control over the finished product, allowing for precise shaping and polishing. |
| Best For | Suitable for polishing a large number of rocks simultaneously. | Ideal for softer, delicate, rare, or expensive rocks and gems. |
| Stone Suitability | Works well for a variety of rocks but may not be ideal for very soft or fragile stones. | Best for softer stones like turquoise and amber that may not withstand tumbling. |
| Equipment | Requires a rock tumbler and various grits. | Requires sandpaper, polishing cloths, and compounds; a Dremel is optional. |
| Sense of Accomplishment | Less personal connection to the finished product. | Offers a greater sense of accomplishment due to the hands-on nature of the process. |
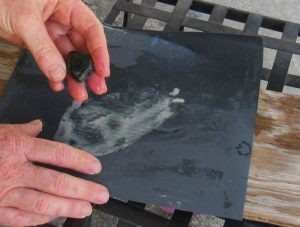
 Smoothing and polishing a piece of amber with 220-grit sandpaper.
12. What Are The Benefits of Polishing Rocks by Hand?
Hand polishing offers numerous benefits, particularly for valuable or delicate stones.
- More Control: Hand polishing provides greater control over the final appearance, which is crucial for valuable or rare specimens.
- Sense of Accomplishment: Many rockhounds find the process personally rewarding and enjoy the hands-on approach.
- Quick Turnaround: Hand polishing offers a quicker turnaround, especially for softer rocks.
13. What Are Some Advanced Hand Polishing Techniques?
For those looking to refine their hand polishing skills, here are some advanced techniques:
- Using a Lapidary Wheel: A lapidary wheel can speed up the polishing process and provide a more consistent finish.
- Diamond Polishing Compounds: These compounds can produce a higher level of shine on harder stones.
- Pre-Polishing: Consider pre-polishing using a series of increasingly fine abrasive compounds before the final polish. This can help remove any remaining scratches and create a smoother surface for the final polishing stage.
- Burnishing: Burnishing involves rubbing the stone with a smooth, hard tool (such as a steel burnisher or even the back of a spoon) to compress and smooth the surface, creating a lustrous shine. This technique is particularly effective for softer metals like silver and copper, but it can also be used on certain types of stones.
14. How Can You Care for Your Polished Rocks?
Proper care will keep your polished rocks looking their best for years to come.
- Gentle Cleaning: Use a soft cloth and mild soap to clean the rocks regularly.
- Avoid Harsh Chemicals: Keep the rocks away from harsh chemicals that can damage the polished surface.
- Protective Storage: Store the rocks in a soft cloth or padded container to prevent scratches.
- Re-Oiling: Occasionally re-oil the rocks with mineral oil or commercial rock polish to maintain their luster.
15. How Does the Mohs Hardness Scale Affect Polishing?
The Mohs Hardness Scale measures a mineral’s resistance to scratching, which directly impacts polishing.
- Softer Stones (Lower Mohs Value): Easier to polish by hand.
- Harder Stones (Higher Mohs Value): Require more time and effort, and may benefit from using a Dremel or lapidary wheel.
16. What Geological Factors Influence Rock Polishability?
Various geological factors affect how well a rock can be polished.
- Mineral Composition: Rocks with uniform mineral composition tend to polish more evenly.
- Grain Size: Fine-grained rocks typically polish better than coarse-grained rocks.
- Fractures and Inclusions: Rocks with numerous fractures or inclusions may be more difficult to polish.
17. What Are the Best Types of Rocks for Hand Polishing?
Some rocks are better suited for hand polishing than others. Here are some of the best options:
- Amber: A soft, fossilized resin that polishes easily.
- Turquoise: A beautiful blue-green mineral that develops a lovely shine.
- Obsidian: A volcanic glass that can be polished to a high luster.
- Malachite: A green copper carbonate mineral that polishes well but requires care.
- Soapstone: A soft, metamorphic rock that is easy to carve and polish.
- Opal: A hydrated amorphous form of silica that can display a stunning play of color when polished.
- Agate: A microcrystalline variety of quartz known for its colorful bands and patterns, which can be enhanced through polishing.
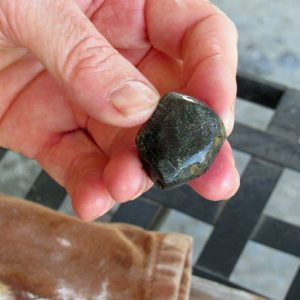 After four rounds of shaping and polishing, the dull stone is now shiny.
18. How Does Climate Impact Rock Selection for Polishing?
The climate in your area can influence the type of rocks you choose to polish.
- Arid Climates: Rocks from arid regions may be more resistant to weathering and thus easier to polish.
- Humid Climates: Rocks from humid areas may require more thorough cleaning before polishing.
- Freeze-Thaw Cycles: Rocks exposed to freeze-thaw cycles may have internal fractures that affect their polishability.
According to research from Arizona State University’s School of Earth and Space Exploration, rocks in arid climates like Arizona tend to retain their integrity better, making them excellent candidates for polishing.
19. Where Can You Find Rocks Suitable for Polishing in the USA?
The USA offers a wide variety of locations for finding rocks suitable for polishing.
- Arizona: Known for its abundance of turquoise, agate, and jasper.
Address: 1151 S Forest Ave, Tempe, AZ 85281, United States
Phone: +1 (480) 965-9011 - California: Offers a diverse range of rocks, including jade, serpentine, and various types of quartz.
- Oregon: Famous for its thunder eggs, petrified wood, and agates.
- Montana: Renowned for its sapphires and agates.
- Michigan: Home to the Isle Royale greenstone, also known as chlorastrolite.
- Texas: Known for its petrified wood and various types of agate.
20. What Are Some Common Mistakes to Avoid When Hand Polishing Rocks?
Avoid these common mistakes to ensure a successful polishing experience:
- Skipping Sandpaper Grits: Always use a progressive series of sandpaper grits to avoid deep scratches.
- Not Cleaning Rocks Thoroughly: Ensure rocks are completely clean before polishing to prevent contamination.
- Using Too Much Pressure: Apply gentle, even pressure to avoid damaging the stone.
- Rushing the Process: Take your time and be patient for the best results.
- Neglecting Safety Precautions: Always wear protective gear when using power tools.
21. What Are The Benefits Of Using Rockscapes.Net For Rock Polishing?
Rockscapes.net offers a wealth of resources to enhance your rock polishing endeavors. Here’s how you can benefit:
- Inspiration: Discover a diverse range of design ideas to inspire your rock polishing projects.
- Detailed Information: Access comprehensive details about various types of rocks, helping you make informed choices.
- Expert Tips: Learn valuable tips on effective construction techniques to achieve professional-quality results.
- Community: Engage with fellow enthusiasts and share your experiences, tips, and completed projects.
22. How Can Rockscapes.Net Help with Landscape Design Using Polished Rocks?
Rockscapes.net can assist you in incorporating polished rocks into your landscape design.
- Design Ideas: Explore creative ways to use polished rocks in gardens, pathways, and water features.
- Material Selection: Get advice on choosing the right types and sizes of polished rocks for your landscape.
- Installation Guides: Access step-by-step guides for installing polished rocks in various landscape applications.
- Expert Consultation: Receive personalized advice from landscape design experts on integrating polished rocks into your outdoor spaces.
23. What Are Some Innovative Ways to Display Polished Rocks?
Showcase your polished rocks in creative and visually appealing ways:
- Display Cases: Arrange the rocks in display cases to protect them from dust and damage.
- Shadow Boxes: Create shadow boxes to highlight individual specimens.
- Gardens: Incorporate polished rocks into garden beds and pathways.
- Water Features: Use polished rocks to enhance the beauty of ponds and fountains.
- Jewelry: Turn smaller polished rocks into unique pieces of jewelry.
- Home Decor: Integrate polished rocks into your home décor as paperweights, coasters, or decorative accents.
24. What Are The Environmental Considerations Of Rock Polishing?
Be mindful of the environmental impact of rock polishing and take steps to minimize it:
- Water Usage: Conserve water by using it sparingly during the polishing process.
- Waste Disposal: Dispose of used sandpaper and polishing compounds properly.
- Sourcing Rocks Sustainably: Collect rocks responsibly and avoid damaging natural habitats.
- Using Eco-Friendly Products: Opt for environmentally friendly polishing compounds and cleaning agents.
25. What Are Some Beginner Projects for Polishing Rocks by Hand?
Start with simple projects to build your skills and confidence:
- Polishing Small Stones: Practice polishing small, easily manageable stones.
- Creating Simple Jewelry: Turn polished stones into pendants or earrings.
- Decorating Plant Pots: Glue polished stones onto plant pots for a decorative touch.
- Making Paperweights: Create custom paperweights by polishing larger stones.
26. How Can You Enhance the Natural Color of Rocks Through Polishing?
Polishing can significantly enhance the natural color and patterns of rocks.
- Proper Cleaning: Thoroughly clean the rocks to remove any surface impurities.
- Progressive Sanding: Use a series of increasingly fine sandpaper grits to smooth the surface.
- Polishing Compounds: Apply polishing compounds that are specifically designed to bring out the color and luster of the stone.
- Sealing: Seal the polished surface to protect it from moisture and enhance the color.
27. What Types of Polishing Compounds Are Best for Different Rocks?
Choosing the right polishing compound is essential for achieving the best results.
- Aluminum Oxide: Suitable for a wide range of rocks, including quartz, agate, and jasper.
- Cerium Oxide: Ideal for polishing glass, obsidian, and other silica-based materials.
- Diamond Paste: Best for harder stones such as sapphires and diamonds.
- Tin Oxide: Works well for polishing softer stones like turquoise and malachite.
28. How Do You Restore the Shine to Rocks That Have Become Dull Over Time?
Over time, polished rocks can lose their shine due to exposure to the elements and handling. Here’s how to restore their luster:
- Cleaning: Start by cleaning the rocks with a soft cloth and mild soap to remove any dirt or grime.
- Re-Polishing: Re-polish the rocks using a polishing cloth and a small amount of polishing compound.
- Sealing: Seal the polished surface to protect it from moisture and maintain the shine.
- Oiling: Apply a thin coat of mineral oil to enhance the color and luster of the rocks.
29. What Are Some Common Myths About Rock Polishing?
Debunking common myths can help you avoid pitfalls and achieve better results:
- Myth: All rocks can be polished to a high shine.
- Fact: The polishability of a rock depends on its hardness, mineral composition, and other factors.
- Myth: Rock tumbling is the fastest way to polish rocks.
- Fact: While tumbling is less labor-intensive, it can take much longer than hand polishing, especially for softer stones.
- Myth: Any type of sandpaper can be used for rock polishing.
- Fact: Using the correct grades of sandpaper is crucial for achieving a smooth, polished surface.
- Myth: Polishing compounds are unnecessary for hand polishing.
- Fact: Polishing compounds are essential for achieving a high level of shine.
30. What Future Trends Can Be Expected In Rock Polishing?
Keep an eye on these emerging trends in rock polishing:
- Eco-Friendly Products: Increased use of environmentally friendly polishing compounds and techniques.
- DIY Kits: Growing popularity of DIY rock polishing kits for beginners.
- Online Communities: Expansion of online communities and forums for sharing tips and inspiration.
- Advanced Technology: Integration of advanced technologies such as 3D printing and laser cutting in rock polishing and shaping.
Ready to transform your rock collection? Visit rockscapes.net today for design inspiration, detailed information on various rock types, and expert tips to help you achieve professional-quality results! Contact us at +1 (480) 965-9011 or visit our address at 1151 S Forest Ave, Tempe, AZ 85281, United States.
FAQ: Polishing Rocks
- What is the best way to polish rocks by hand?
The best way to polish rocks by hand involves cleaning the rocks, shaping them with 220-grit sandpaper, refining with 500-grit sandpaper, and polishing with 1200-grit sandpaper, followed by a polishing compound like toothpaste. - Can I use regular sandpaper to polish rocks?
Yes, but it’s important to use the correct grades of sandpaper, starting with coarser grits like 220 and progressing to finer grits like 1200 for a smooth finish. - How long does it take to polish a rock by hand?
The time it takes to polish a rock by hand depends on its hardness and size, but it generally takes several hours to achieve a good shine. - What is the best polishing compound for rocks?
Aluminum oxide is a versatile polishing compound for many rocks, while cerium oxide is ideal for silica-based materials. - Is it safe to use a Dremel for rock polishing?
Yes, but always wear protective eyewear, gloves, and a mask to protect against dust and debris. - How do I clean polished rocks?
Clean polished rocks with a soft cloth and mild soap, avoiding harsh chemicals that can damage the surface. - Can I polish soft stones like amber and turquoise?
Yes, hand polishing is particularly well-suited for softer stones like amber and turquoise, which may be damaged in a rock tumbler. - How do I store polished rocks?
Store polished rocks in a soft cloth or padded container to prevent scratches and maintain their shine. - What should I do if my polished rocks become dull over time?
Restore the shine to dull rocks by cleaning them with mild soap, re-polishing with a polishing cloth and compound, and sealing the surface. - Where can I find more information about rock polishing?
Visit rockscapes.net for design inspiration, detailed information on rock types, and expert tips to help you achieve professional-quality results.