Sifting dirt from rocks is essential for landscaping and gardening projects, and at rockscapes.net, we provide the expertise and resources you need. This article explores effective methods for separating soil and stone, enhancing your outdoor spaces with quality materials. Whether you’re a homeowner or a professional, discover how to achieve the perfect rock-free soil for your next project. Explore innovative techniques and the best equipment for soil refinement, ensuring optimal results and a pristine landscape.
1. Why Sift Dirt From Rocks?
Sifting dirt from rocks is crucial for various landscaping and construction projects. You gain several benefits when you remove rocks from the soil, including improved soil quality and easier planting.
- Enhances Soil Quality: Removing rocks allows for better root growth and nutrient absorption.
- Facilitates Planting: Rock-free soil makes planting easier and more successful.
- Improves Drainage: Sifting prevents rocks from compacting the soil, improving drainage.
- Aesthetic Appeal: Clean soil enhances the overall look of your landscape projects.
- Prevents Damage: Rocks in the soil can damage equipment and infrastructure.
2. Understanding Your Soil Type
Before you begin sifting, understanding your soil type is essential. According to research from Arizona State University’s School of Earth and Space Exploration, different soil types require different sifting methods. The three primary soil types are sandy, silty, and clay soil.
- Sandy Soil: Sandy soil is coarse and drains quickly.
- Silty Soil: Silty soil is smooth and retains moisture better than sandy soil.
- Clay Soil: Clay soil is dense and can retain a lot of water, making it prone to compaction.
Knowing your soil type helps you choose the appropriate sifting method and tools, ensuring you don’t damage the soil structure.
3. Identifying Your Landscaping Needs
Consider your specific landscaping needs to determine the extent of sifting required. Are you preparing a garden bed, creating a pathway, or backfilling a construction project?
- Garden Beds: Require thorough sifting to ensure optimal growing conditions.
- Pathways: May need less intensive sifting, focusing on removing larger rocks.
- Backfilling: Demands clean, rock-free soil to protect underground structures.
Identifying your project needs allows you to tailor your sifting approach, saving time and effort.
4. Manual Sifting Methods
Manual sifting is a straightforward way to remove rocks from the dirt, ideal for smaller projects or when you prefer a hands-on approach.
4.1. Using a Soil Sieve
A soil sieve is a simple tool consisting of a mesh screen held within a frame.
- Preparation: Place the sieve over a wheelbarrow or container to catch the sifted soil.
- Loading: Shovel the soil onto the sieve.
- Sifting: Shake the sieve back and forth, allowing the dirt to fall through while the rocks remain on top.
- Collection: Dispose of the rocks and collect the sifted soil.
Soil sieves are available in various mesh sizes, allowing you to customize the sifting process based on the size of the rocks you want to remove.
4.2. Homemade Sifting Screen
You can create your own sifting screen using basic materials.
- Materials: Gather a wooden frame, wire mesh (such as hardware cloth), staples, and a staple gun.
- Construction: Attach the wire mesh to the wooden frame using the staple gun, ensuring the mesh is taut.
- Usage: Place the screen over a container and follow the same sifting steps as with a soil sieve.
A homemade sifting screen is a cost-effective option for smaller projects.
4.3. Shoveling and Picking
For areas with fewer rocks, you can manually pick them out while shoveling.
- Preparation: Spread the soil out in a thin layer.
- Inspection: Carefully inspect the soil for rocks.
- Removal: Pick out any visible rocks by hand.
- Collection: Gather the rock-free soil.
This method is labor-intensive but effective for small areas or when dealing with particularly large rocks.
 Manual soil sifting using a soil sieve
4.4. Pros and Cons of Manual Sifting
| Pros | Cons |
|---|---|
| Cost-effective | Labor-intensive |
| Suitable for small projects | Time-consuming for large areas |
| Simple and straightforward | Can be physically demanding |
| No need for electricity | May not remove all small rocks |
5. Mechanical Sifting Methods
For larger projects, mechanical sifting methods can save you time and effort. These methods use machinery to separate rocks from dirt efficiently.
5.1. Rotary Soil Separators
Rotary soil separators, also known as trommel screens, use a rotating drum with a mesh screen to sift soil.
- Loading: Load the soil into the drum.
- Rotation: The drum rotates, causing the soil to pass through the screen while the rocks remain inside.
- Collection: The sifted soil is collected below, and the rocks are discharged at the end of the drum.
Rotary soil separators are highly efficient and suitable for large-scale projects.
5.2. Vibrating Screens
Vibrating screens use a vibrating mesh screen to separate rocks from soil.
- Loading: The soil is loaded onto the vibrating screen.
- Vibration: The screen vibrates, causing the soil to pass through the mesh while the rocks remain on top.
- Collection: The sifted soil is collected below, and the rocks are removed from the screen.
Vibrating screens are effective for separating various materials, including soil and rocks.
5.3. Power Rock Pickers
Power rock pickers are tractor-mounted machines designed to pick rocks from fields and large areas.
- Operation: The machine drives over the field, picking up rocks with a rotating drum or rake.
- Separation: The rocks are separated from the soil and deposited into a hopper.
- Collection: The collected rocks can then be dumped elsewhere.
Power rock pickers are ideal for agricultural applications and large landscaping projects.
5.4. Pros and Cons of Mechanical Sifting
| Pros | Cons |
|---|---|
| Highly efficient for large projects | Higher initial cost |
| Saves time and labor | Requires electricity or fuel |
| Can handle large volumes of soil | May not be suitable for small areas |
| Provides consistent sifting results | Can be noisy |
6. Building Your Own Rock Sifter
Creating your own rock sifter can be a cost-effective and rewarding project, especially if you enjoy DIY tasks.
6.1. Simple Rock Sifter Using a Milk Crate
A milk crate can serve as a simple, readily available rock sifter.
- Materials: Milk crate.
- Preparation: Place the milk crate over a container or wheelbarrow.
- Sifting: Shovel soil into the crate and shake to allow dirt to fall through while retaining rocks.
This method is ideal for small-scale sifting needs.
6.2. DIY Rock Grizzly
A rock grizzly is a larger, more robust sifter designed to handle substantial volumes of soil.
- Materials: Lumber (2x4s or 2x6s), wire mesh or chain-link fencing, screws, and a saw.
- Construction: Build a frame with the lumber, creating a sloped surface. Attach the wire mesh or chain-link fencing to the frame.
- Usage: Prop the grizzly up at an angle and shovel soil onto the mesh. The dirt will sift through, while the rocks roll down.
6.3. Steps to Build a Rock Grizzly
- Frame Construction: Cut the lumber to the desired dimensions. A typical size is 4 feet wide by 6 feet long.
- Assembly: Assemble the frame using screws, ensuring it is sturdy.
- Mesh Attachment: Attach the wire mesh or chain-link fencing to the frame using staples or screws. Make sure the mesh is taut and secure.
- Support Structure: Add additional supports to the frame to prevent sagging under the weight of the soil and rocks.
- Testing: Test the grizzly by shoveling a small amount of soil onto it to ensure it functions correctly.
6.4. Tips for Building a Durable Rock Sifter
- Use Strong Materials: Opt for high-quality lumber and durable wire mesh or chain-link fencing.
- Reinforce the Frame: Add extra supports to the frame to handle heavy loads.
- Proper Mesh Tension: Ensure the mesh is taut to prevent sagging and improve sifting efficiency.
- Consider the Angle: Adjust the angle of the sifter to optimize the separation of soil and rocks.
7. Optimizing the Sifting Process
To make the sifting process more efficient, consider these optimization tips.
7.1. Pre-Screening Large Rocks
Remove large rocks before sifting to prevent damage to your equipment and speed up the process.
- Manual Removal: Pick up large rocks by hand and dispose of them.
- Equipment: Use a tractor with a front-end loader to move larger rocks.
Pre-screening reduces the load on your sifting equipment and makes the process more manageable.
7.2. Working in Dry Conditions
Sifting works best when the soil is dry. Wet soil tends to clump together, making it difficult to pass through the screen.
- Timing: Choose a dry day for sifting.
- Drying: Spread wet soil out in a thin layer to allow it to dry before sifting.
Dry soil flows more freely, resulting in faster and more efficient sifting.
7.3. Using Multiple Sieve Sizes
Using multiple sieve sizes allows you to separate rocks of different sizes, providing a more refined result.
- Coarse Sieve: Use a coarse sieve to remove large rocks.
- Medium Sieve: Use a medium sieve to remove medium-sized rocks.
- Fine Sieve: Use a fine sieve to remove small rocks and debris.
Multiple sieve sizes ensure that you achieve the desired level of soil refinement.
7.4. Proper Ergonomics
When sifting manually, use proper ergonomics to prevent strain and injury.
- Posture: Maintain good posture while sifting.
- Lifting: Lift with your legs, not your back.
- Breaks: Take frequent breaks to avoid fatigue.
Proper ergonomics will help you sift more comfortably and safely.
8. Applications of Sifted Soil
Sifted soil has numerous applications in landscaping and gardening.
8.1. Garden Beds
Sifted soil is ideal for creating garden beds, providing a rock-free environment for optimal plant growth.
- Preparation: Amend the sifted soil with compost and other organic matter.
- Planting: Plant your flowers, vegetables, or herbs in the prepared soil.
- Maintenance: Water and fertilize regularly to maintain healthy plant growth.
8.2. Lawns
Sifted soil can be used to level lawns and fill in bare spots.
- Leveling: Spread a thin layer of sifted soil over the lawn to level uneven areas.
- Seeding: Seed the bare spots with grass seed and cover with a thin layer of sifted soil.
- Watering: Water regularly to promote germination and growth.
8.3. Pathways and Walkways
Sifted soil provides a stable base for pathways and walkways.
- Base Layer: Spread a layer of sifted soil over the area where the pathway will be.
- Compaction: Compact the soil using a plate compactor or hand tamper.
- Material: Add your chosen pathway material, such as gravel, pavers, or stepping stones.
8.4. Backfilling
Sifted soil is essential for backfilling around foundations, pipes, and other underground structures.
- Placement: Carefully place the sifted soil around the structure, ensuring even distribution.
- Compaction: Compact the soil to prevent settling and protect the structure.
- Drainage: Ensure proper drainage to prevent water damage.
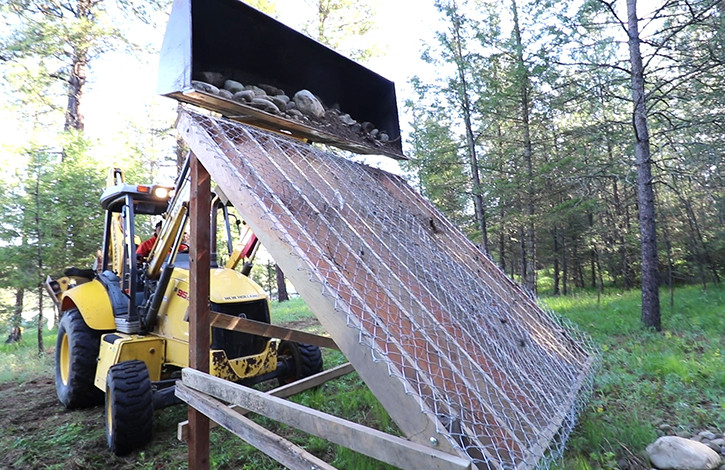 DIY rock grizzly for sifting soil
9. Dealing with Different Types of Rocks
Different types of rocks may require specific removal techniques.
9.1. Small Pebbles
Small pebbles can be challenging to remove manually. Using a fine-mesh sieve or screen is the most effective method.
- Fine Mesh: Use a sieve with a fine mesh to capture the pebbles.
- Agitation: Gently agitate the soil to allow the pebbles to separate.
- Collection: Collect the pebbles and dispose of them properly.
9.2. Large Boulders
Large boulders may require heavy equipment for removal.
- Excavator: Use an excavator to lift and move the boulders.
- Tractor: Use a tractor with a front-end loader to transport the boulders.
- Manual Labor: For smaller boulders, use a pry bar and manual labor to move them.
9.3. Embedded Rocks
Embedded rocks are rocks that are partially buried in the soil.
- Loosening: Use a shovel or pickaxe to loosen the soil around the rock.
- Prying: Use a pry bar to pry the rock out of the ground.
- Lifting: Lift the rock out of the hole and dispose of it.
10. The Role of Rockscapes.net
At rockscapes.net, we understand the importance of quality materials for landscaping projects. We offer a range of services and resources to help you achieve the perfect rock-free soil for your needs.
10.1. Providing Quality Information
We provide detailed guides and articles on various landscaping topics, including soil preparation, rock removal, and garden design.
- Expert Advice: Benefit from our team of experienced landscapers and soil scientists.
- Comprehensive Guides: Access in-depth information on different sifting methods and equipment.
- Latest Trends: Stay updated with the latest trends and techniques in landscaping.
10.2. Connecting You with Suppliers
We connect you with trusted suppliers of landscaping materials and equipment.
- Wide Network: Access a vast network of suppliers offering quality products.
- Competitive Pricing: Find the best prices on landscaping materials and equipment.
- Reliable Service: Work with suppliers known for their reliability and customer service.
10.3. Offering Design Inspiration
We offer a wealth of design inspiration to help you create stunning outdoor spaces.
- Project Ideas: Explore a variety of landscaping project ideas, from garden beds to pathways.
- Visual Examples: View high-quality images and videos of completed landscaping projects.
- Custom Designs: Work with our design team to create a custom landscaping plan tailored to your needs.
10.4. Expert Consultations
We offer expert consultations to help you plan and execute your landscaping projects.
- Personalized Advice: Receive personalized advice from our team of experts.
- Project Planning: Get assistance with project planning, from initial design to final installation.
- Problem Solving: Find solutions to common landscaping challenges.
11. Maintaining Your Sifted Soil
Once you have sifted your soil, proper maintenance is essential to keep it in optimal condition.
11.1. Adding Amendments
Adding amendments such as compost, manure, or peat moss can improve the soil’s structure and fertility.
- Compost: Adds organic matter and nutrients to the soil.
- Manure: Provides a slow-release source of nutrients.
- Peat Moss: Improves water retention and aeration.
11.2. Regular Tilling
Regular tilling helps to prevent soil compaction and maintain good drainage.
- Timing: Till the soil in the spring and fall.
- Depth: Till to a depth of 6-8 inches.
- Equipment: Use a tiller or garden fork to till the soil.
11.3. Weed Control
Controlling weeds is essential to prevent them from competing with your plants for nutrients and water.
- Manual Removal: Pull weeds by hand.
- Herbicides: Use herbicides to kill weeds.
- Mulching: Apply mulch to prevent weed growth.
11.4. Proper Watering
Proper watering is essential for maintaining healthy soil and plant growth.
- Frequency: Water deeply but infrequently.
- Timing: Water in the morning to reduce evaporation.
- Method: Use a sprinkler, soaker hose, or drip irrigation system.
12. Sustainable Sifting Practices
Embrace sustainable practices to minimize environmental impact while sifting dirt from rocks.
12.1. Soil Conservation
Implement measures to conserve soil during the sifting process, preventing erosion and nutrient loss.
- Avoid Sifting on Slopes: Choose flat areas for sifting to minimize soil runoff.
- Use Erosion Control Fabrics: Apply erosion control fabrics to contain soil and prevent erosion.
- Mulch Exposed Soil: Cover sifted soil with mulch to protect it from wind and water erosion.
12.2. Rock Reuse
Repurpose the rocks removed during sifting in landscaping projects, reducing waste and adding natural elements to your outdoor spaces.
- Rock Gardens: Create beautiful rock gardens using a variety of rock sizes and shapes.
- Pathways and Borders: Utilize rocks to define pathways, garden borders, and retaining walls.
- Drainage Solutions: Incorporate rocks into drainage systems to improve water flow and prevent soil erosion.
12.3. Composting Organic Matter
Enrich sifted soil with composted organic matter, enhancing its fertility and reducing the need for synthetic fertilizers.
- Compost Kitchen Waste: Compost kitchen scraps, yard waste, and paper products to create nutrient-rich compost.
- Incorporate Green Manures: Plant cover crops such as legumes and grasses to improve soil structure and fertility.
- Use Vermicomposting: Employ vermicomposting techniques to break down organic matter using worms, creating nutrient-rich castings for soil amendment.
12.4. Water Conservation
Employ water-efficient irrigation practices to conserve water and promote sustainable gardening.
- Drip Irrigation: Use drip irrigation systems to deliver water directly to plant roots, minimizing water loss through evaporation.
- Rainwater Harvesting: Collect rainwater in barrels or cisterns for irrigation purposes, reducing reliance on municipal water sources.
- Xeriscaping: Design landscapes with drought-tolerant plants that require minimal watering, reducing water consumption and maintenance.
13. Common Mistakes to Avoid When Sifting Dirt From Rocks
Avoid these common mistakes to ensure a successful and efficient sifting process.
13.1. Sifting Wet Soil
Sifting wet soil can be challenging and ineffective. Wet soil tends to clump together, making it difficult to pass through the screen and increasing the risk of clogging.
Solution: Allow the soil to dry completely before sifting. Spread the soil out in a thin layer and let it air dry, or use a fan or heater to expedite the drying process.
13.2. Using the Wrong Mesh Size
Using a mesh size that is too large or too small can result in inefficient sifting. If the mesh is too large, it may allow small rocks and debris to pass through, defeating the purpose of sifting. If the mesh is too small, it may clog easily and slow down the sifting process.
Solution: Choose the appropriate mesh size based on the size of the rocks you want to remove. Use a coarse mesh for larger rocks and a fine mesh for smaller pebbles and debris.
13.3. Overloading the Sieve
Overloading the sieve with too much soil can make it difficult to shake and sift effectively. It can also increase the risk of the sieve breaking or collapsing.
Solution: Load the sieve with a manageable amount of soil at a time. Shake the sieve gently and evenly to allow the soil to pass through, and avoid overloading it with too much weight.
13.4. Neglecting Safety Precautions
Neglecting safety precautions can result in injuries such as cuts, scrapes, and back strain. It’s essential to wear appropriate protective gear and use proper lifting techniques to prevent accidents.
Solution: Wear gloves, safety glasses, and sturdy shoes when sifting dirt from rocks. Use a shovel or other tools to lift heavy loads, and lift with your legs, not your back, to prevent strain.
13.5. Ignoring Soil Amendments
Ignoring soil amendments can result in poor soil quality and reduced plant growth. Sifting dirt from rocks is only the first step in preparing the soil for planting. It’s essential to amend the soil with organic matter and nutrients to improve its structure, fertility, and water-holding capacity.
Solution: Amend the sifted soil with compost, manure, or other organic matter to improve its quality and fertility. Conduct a soil test to determine the nutrient levels and add fertilizers as needed to ensure optimal plant growth.
14. Latest Trends in Soil Sifting Technology in the USA
Stay informed about the latest advancements in soil sifting technology in the United States, enhancing efficiency and sustainability.
| Trend | Description | Benefits |
|---|---|---|
| Automated Soil Sifters | Machines that automatically sift soil using robotic arms and sensors. | Increased efficiency, reduced labor costs, and precise separation of rocks and debris. |
| Portable Trommel Screens | Compact and mobile trommel screens for on-site soil sifting in construction and landscaping. | Enhanced mobility, reduced transportation costs, and efficient soil processing in remote locations. |
| Smart Soil Monitoring Systems | Sensors and data analytics to monitor soil composition, moisture levels, and nutrient content. | Real-time insights, optimized soil management, and improved crop yields. |
| Eco-Friendly Sifting Methods | Sifting techniques that minimize environmental impact through soil conservation and reuse. | Reduced soil erosion, conservation of natural resources, and sustainable landscaping practices. |
15. FAQ: Frequently Asked Questions About Sifting Dirt From Rocks
- What is the best way to sift dirt from rocks? The best method depends on the project size; manual sifting with a sieve works for small areas, while mechanical sifters are better for large projects.
- Can I use a homemade sifter for large projects? Homemade sifters are suitable for small to medium projects, but mechanical sifters are more efficient for larger tasks.
- How do I choose the right mesh size for my sifter? Select the mesh size based on the size of rocks you want to remove; a fine mesh is best for small pebbles, while a coarse mesh is suitable for larger rocks.
- What are the benefits of sifting dirt from rocks? Sifting improves soil quality, facilitates planting, enhances drainage, and prevents damage to equipment and infrastructure.
- Is it better to sift soil when it’s wet or dry? It’s best to sift soil when it’s dry because wet soil tends to clump together, making the process difficult.
- What can I do with the rocks I remove from the soil? You can reuse the rocks in landscaping projects such as rock gardens, pathways, and retaining walls.
- How often should I till my sifted soil? Till the soil in the spring and fall to prevent compaction and maintain good drainage.
- What kind of soil amendments should I add to my sifted soil? Add compost, manure, or peat moss to improve the soil’s structure, fertility, and water-holding capacity.
- How do I control weeds in my sifted soil? Control weeds by pulling them manually, using herbicides, or applying mulch to prevent weed growth.
- Where can I find quality landscaping materials and equipment? At rockscapes.net, we connect you with trusted suppliers offering quality products and competitive pricing for all your landscaping needs.
16. Conclusion
Sifting dirt from rocks is a vital step in preparing your landscape for successful gardening and construction projects. Whether you choose manual or mechanical methods, understanding the process and optimizing your techniques will yield the best results. Visit rockscapes.net for more information, expert advice, and quality materials to bring your landscaping visions to life. Transform your outdoor spaces with the pristine, rock-free soil you need for thriving plants and durable structures.
Ready to create the perfect landscape? Explore rockscapes.net today for design ideas, material sourcing, and expert consultations to make your dream a reality. Contact us at 1151 S Forest Ave, Tempe, AZ 85281, United States, or call +1 (480) 965-9011. Let rockscapes.net be your partner in achieving breathtaking and sustainable outdoor spaces.