Tying a rock climbing knot, specifically the figure eight follow-through, is a foundational skill for climbers. At rockscapes.net, we understand the importance of safety and precision in climbing, offering expert guidance and resources to help you master essential techniques. Mastering this knot ensures a secure connection to the rope, giving you the confidence to tackle any climb. From selecting the right climbing rope to understanding proper knot tying techniques, you’ll find valuable information for all your climbing adventures.
1. Why Mastering Rock Climbing Knots is Essential
Rock climbing is an exhilarating activity, yet safety is paramount. Mastering How To Tie Rock Climbing Knots is not just a skill, it’s a responsibility. Properly tied knots ensure your connection to the rope is secure, mitigating risks and fostering confidence on the wall.
1.1. The Foundation of Climbing Safety
Knots are the linchpin of climbing safety, acting as the primary connection between the climber and the belay system. A well-executed knot absorbs shock, distributes weight evenly, and remains reliable under extreme stress. Conversely, a poorly tied knot can lead to slippage, loosening, or complete failure, all of which have dire consequences.
1.2. Essential Knots for Climbers
While a variety of knots serve specific purposes in climbing, certain knots are indispensable for every climber’s repertoire:
- Figure Eight Follow-Through: The workhorse knot for tying into the harness.
- Bowline: An alternative tie-in knot, though less commonly used due to its potential to loosen.
- Double Fisherman’s Knot: Used to join two ropes together, often for rappelling.
- Clove Hitch: Versatile for anchoring and attaching gear to ropes.
- Prusik Hitch: Used in self-rescue scenarios and ascending ropes.
1.3. The Importance of Practice and Regular Inspection
Learning to tie knots is just the first step. Regular practice is essential to build muscle memory and ensure proficiency under pressure. Before each climb, meticulously inspect your knots and your partner’s knots to verify they are correctly tied, properly dressed (tightened and neat), and have adequate tail length.
2. Step-by-Step Guide: The Figure Eight Follow-Through Knot
The figure eight follow-through is the most common knot used by climbers to tie into the rope. It’s easy to learn, reliable, and strong.
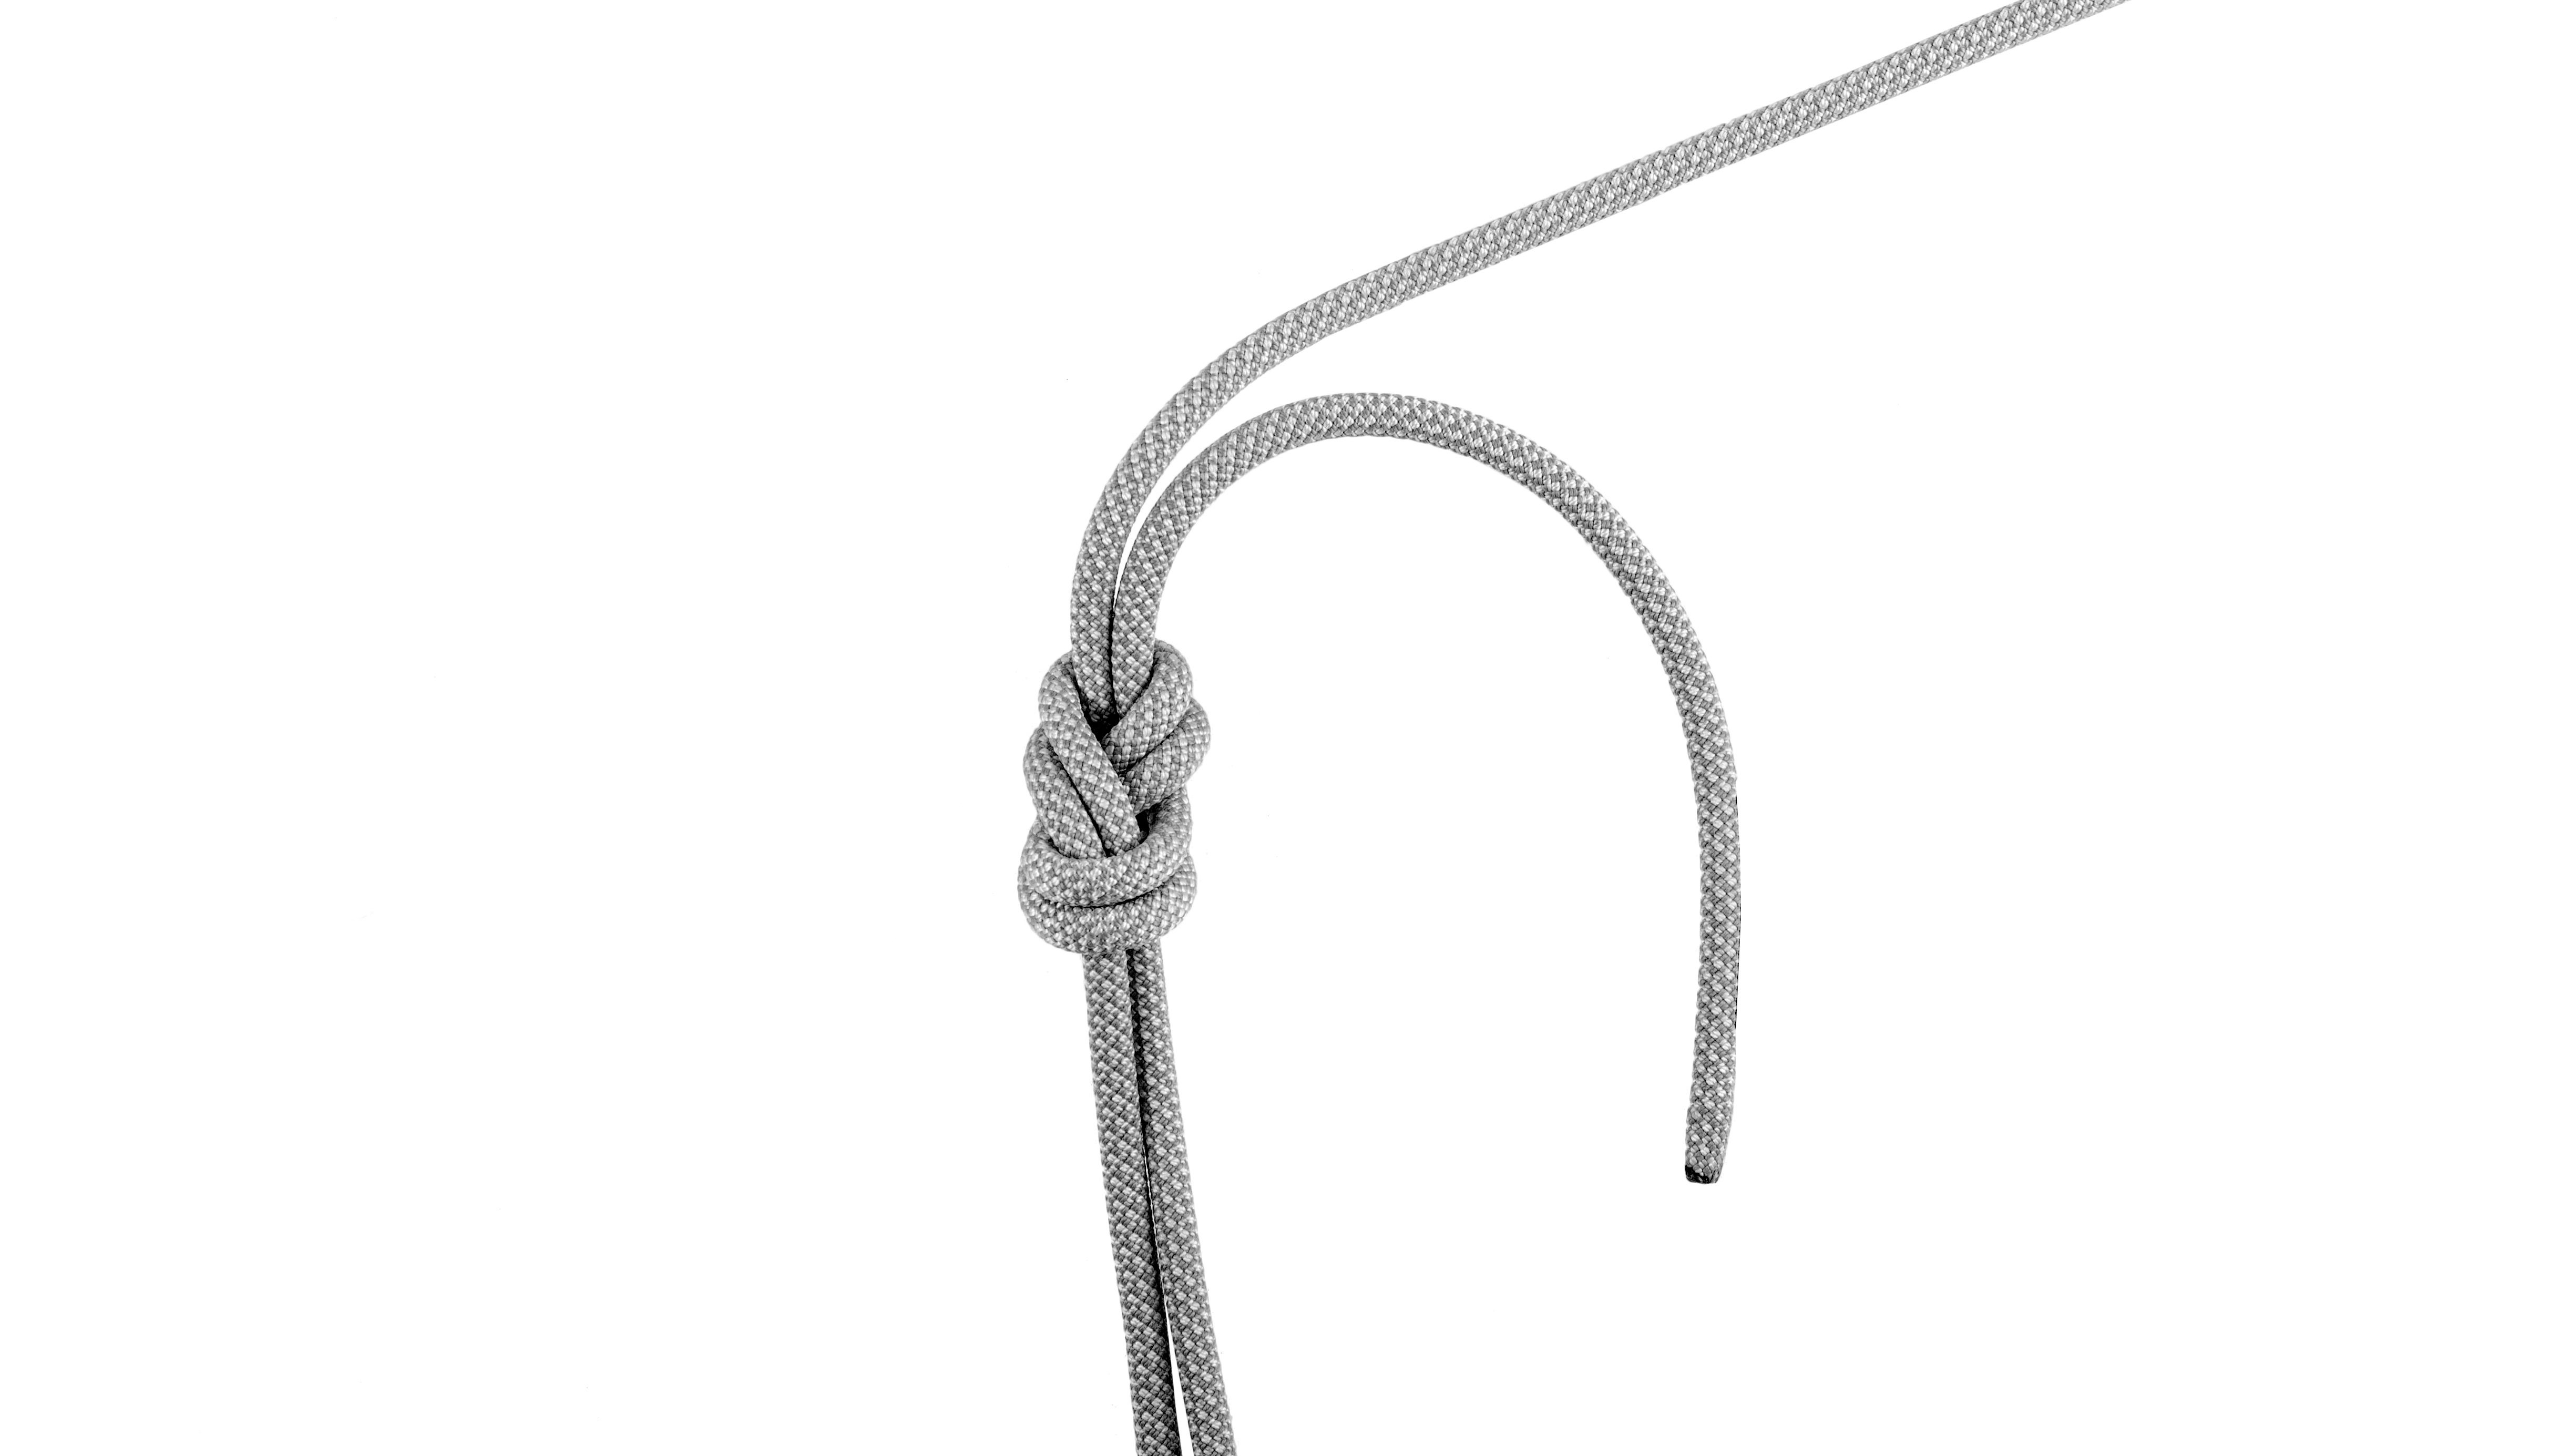
2.1. Step 1: Create a Bight
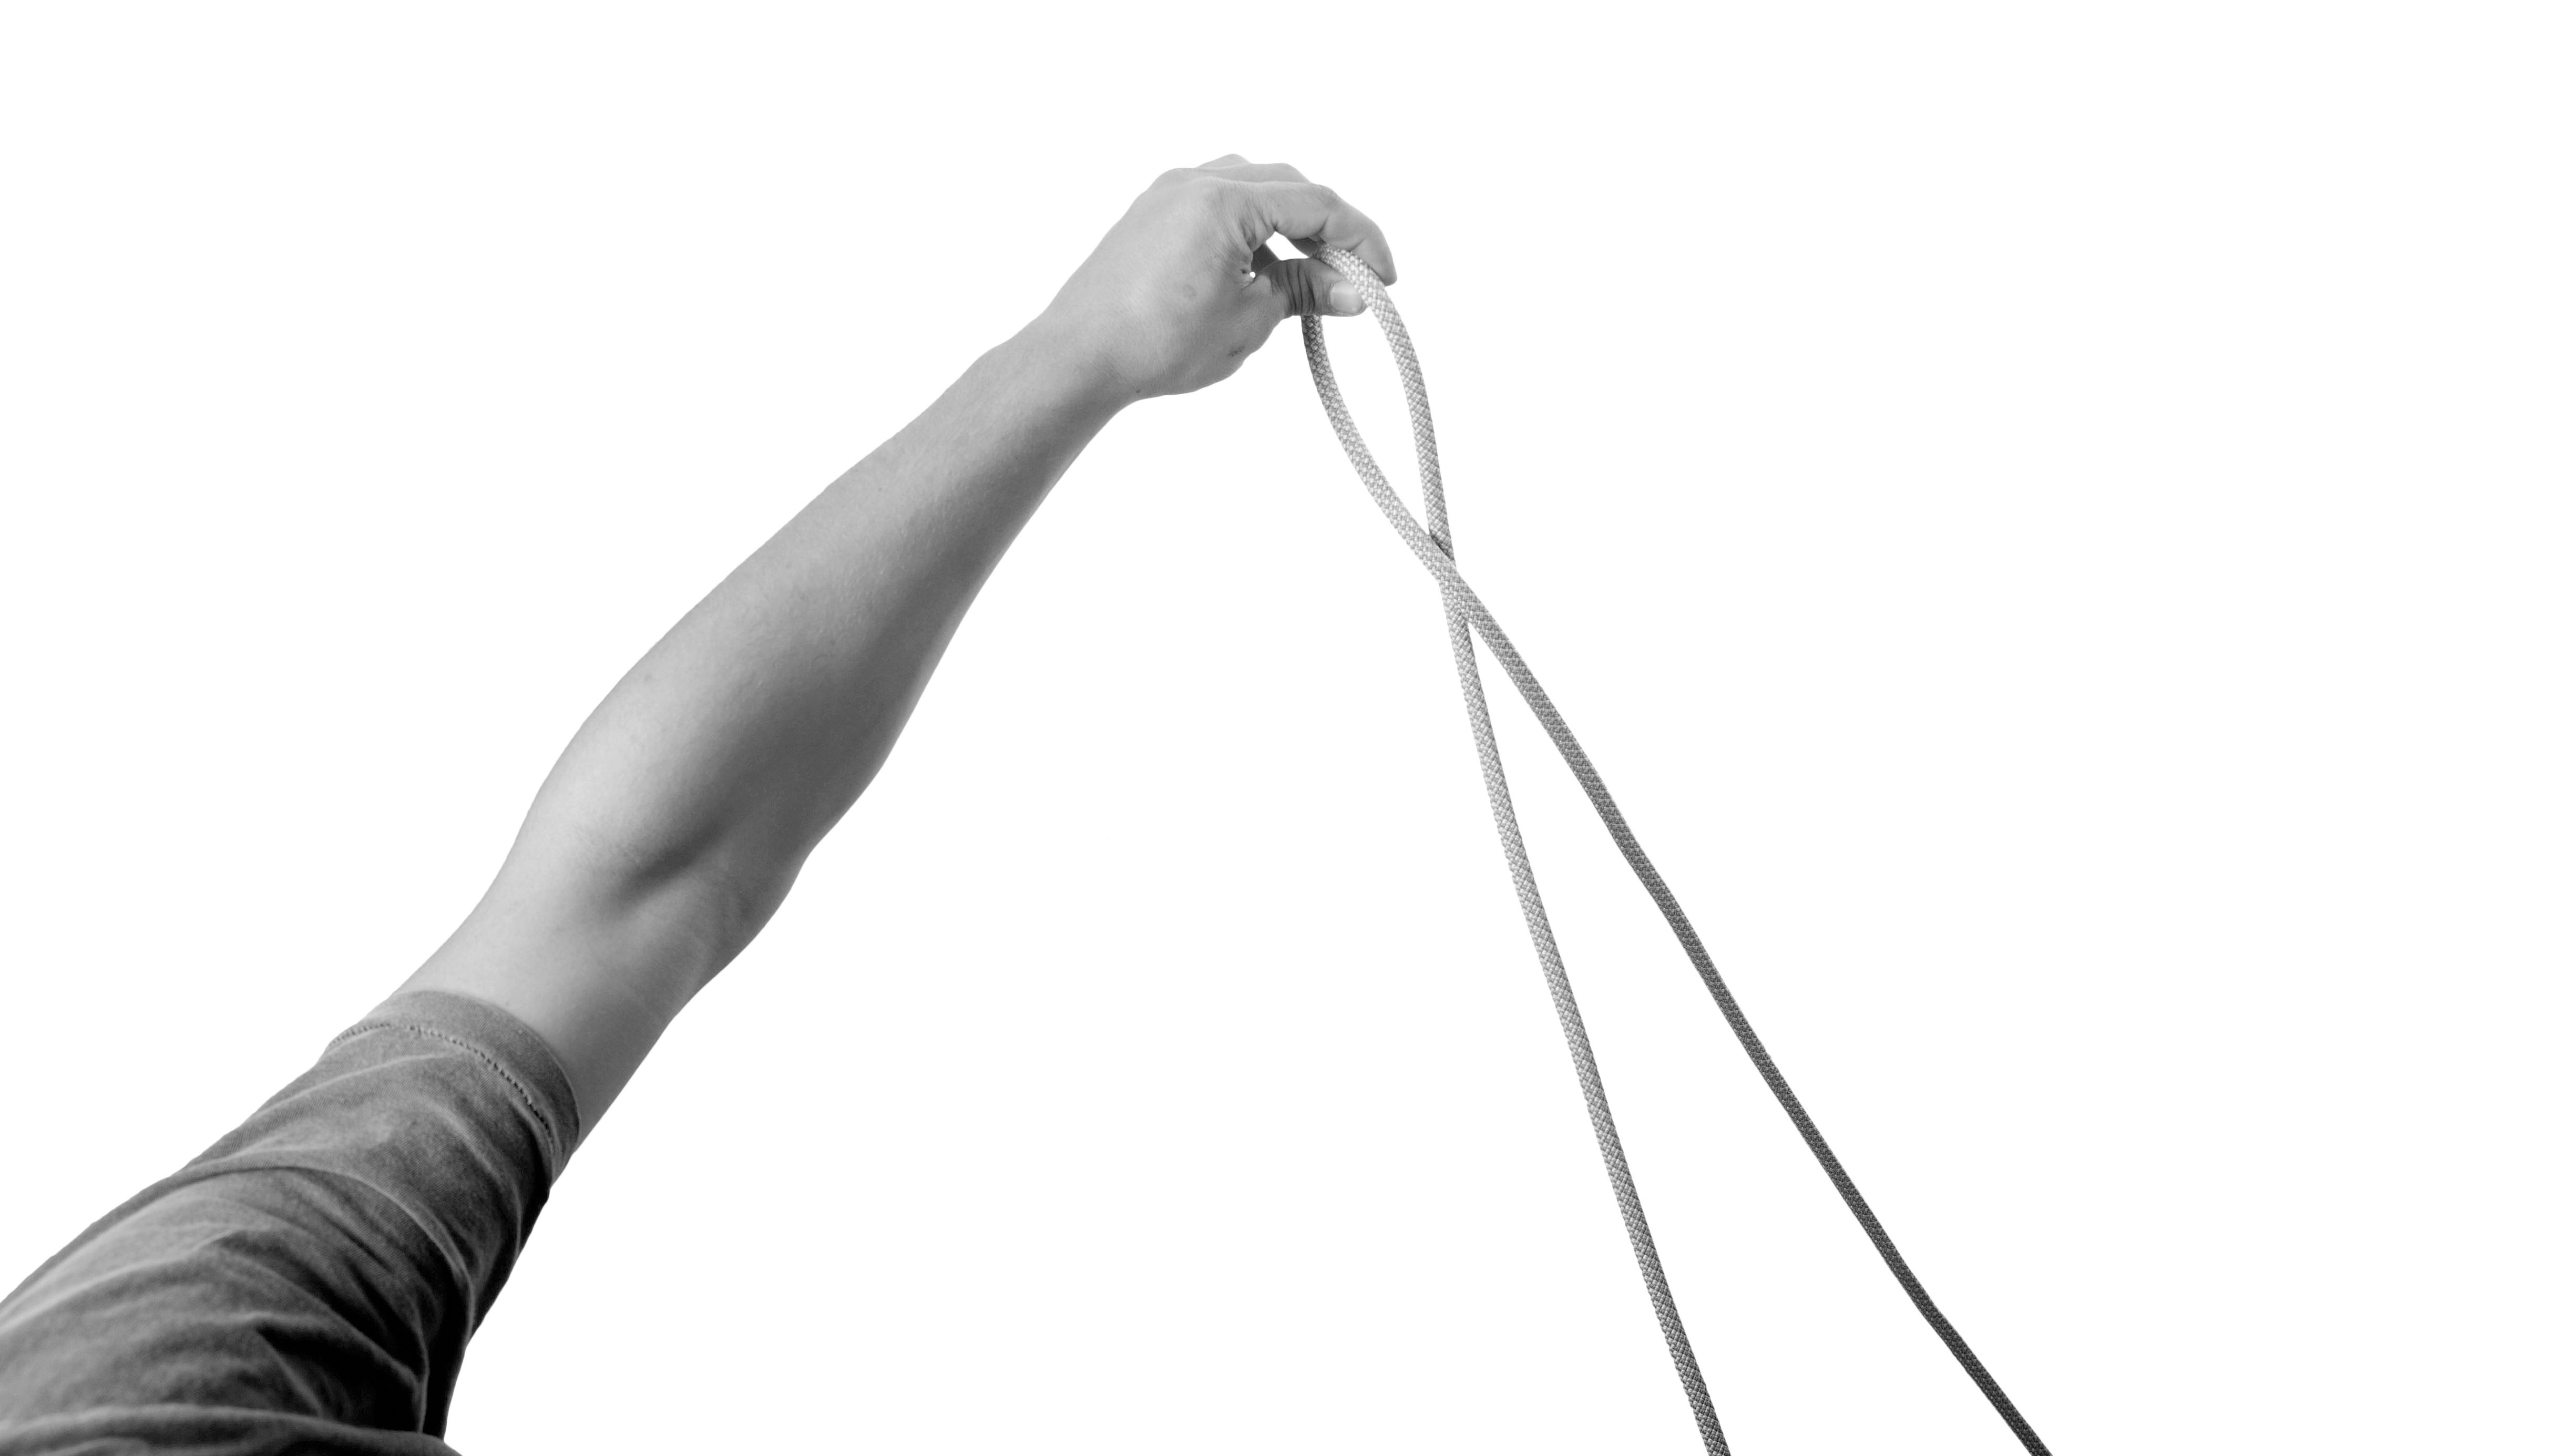 Bight in the rope for the figure eight follow through knot
Make a bight (a U-shaped bend) in the rope about three feet from the end. A simple way to measure is to hold the end of the rope in one outstretched hand and grab the rope near your nose. This ensures you have enough tail for the knot.
2.2. Step 2: Form the Figure Eight
 Forming figure eight for rock climbing
Take the rope tail and cross it over the standing part of the rope, then wrap it underneath. Pass the tail up through the loop you’ve created, from bottom to top. This creates a basic figure eight knot. Keep it somewhat loose for now.
2.3. Step 3: Thread Through Harness Loops
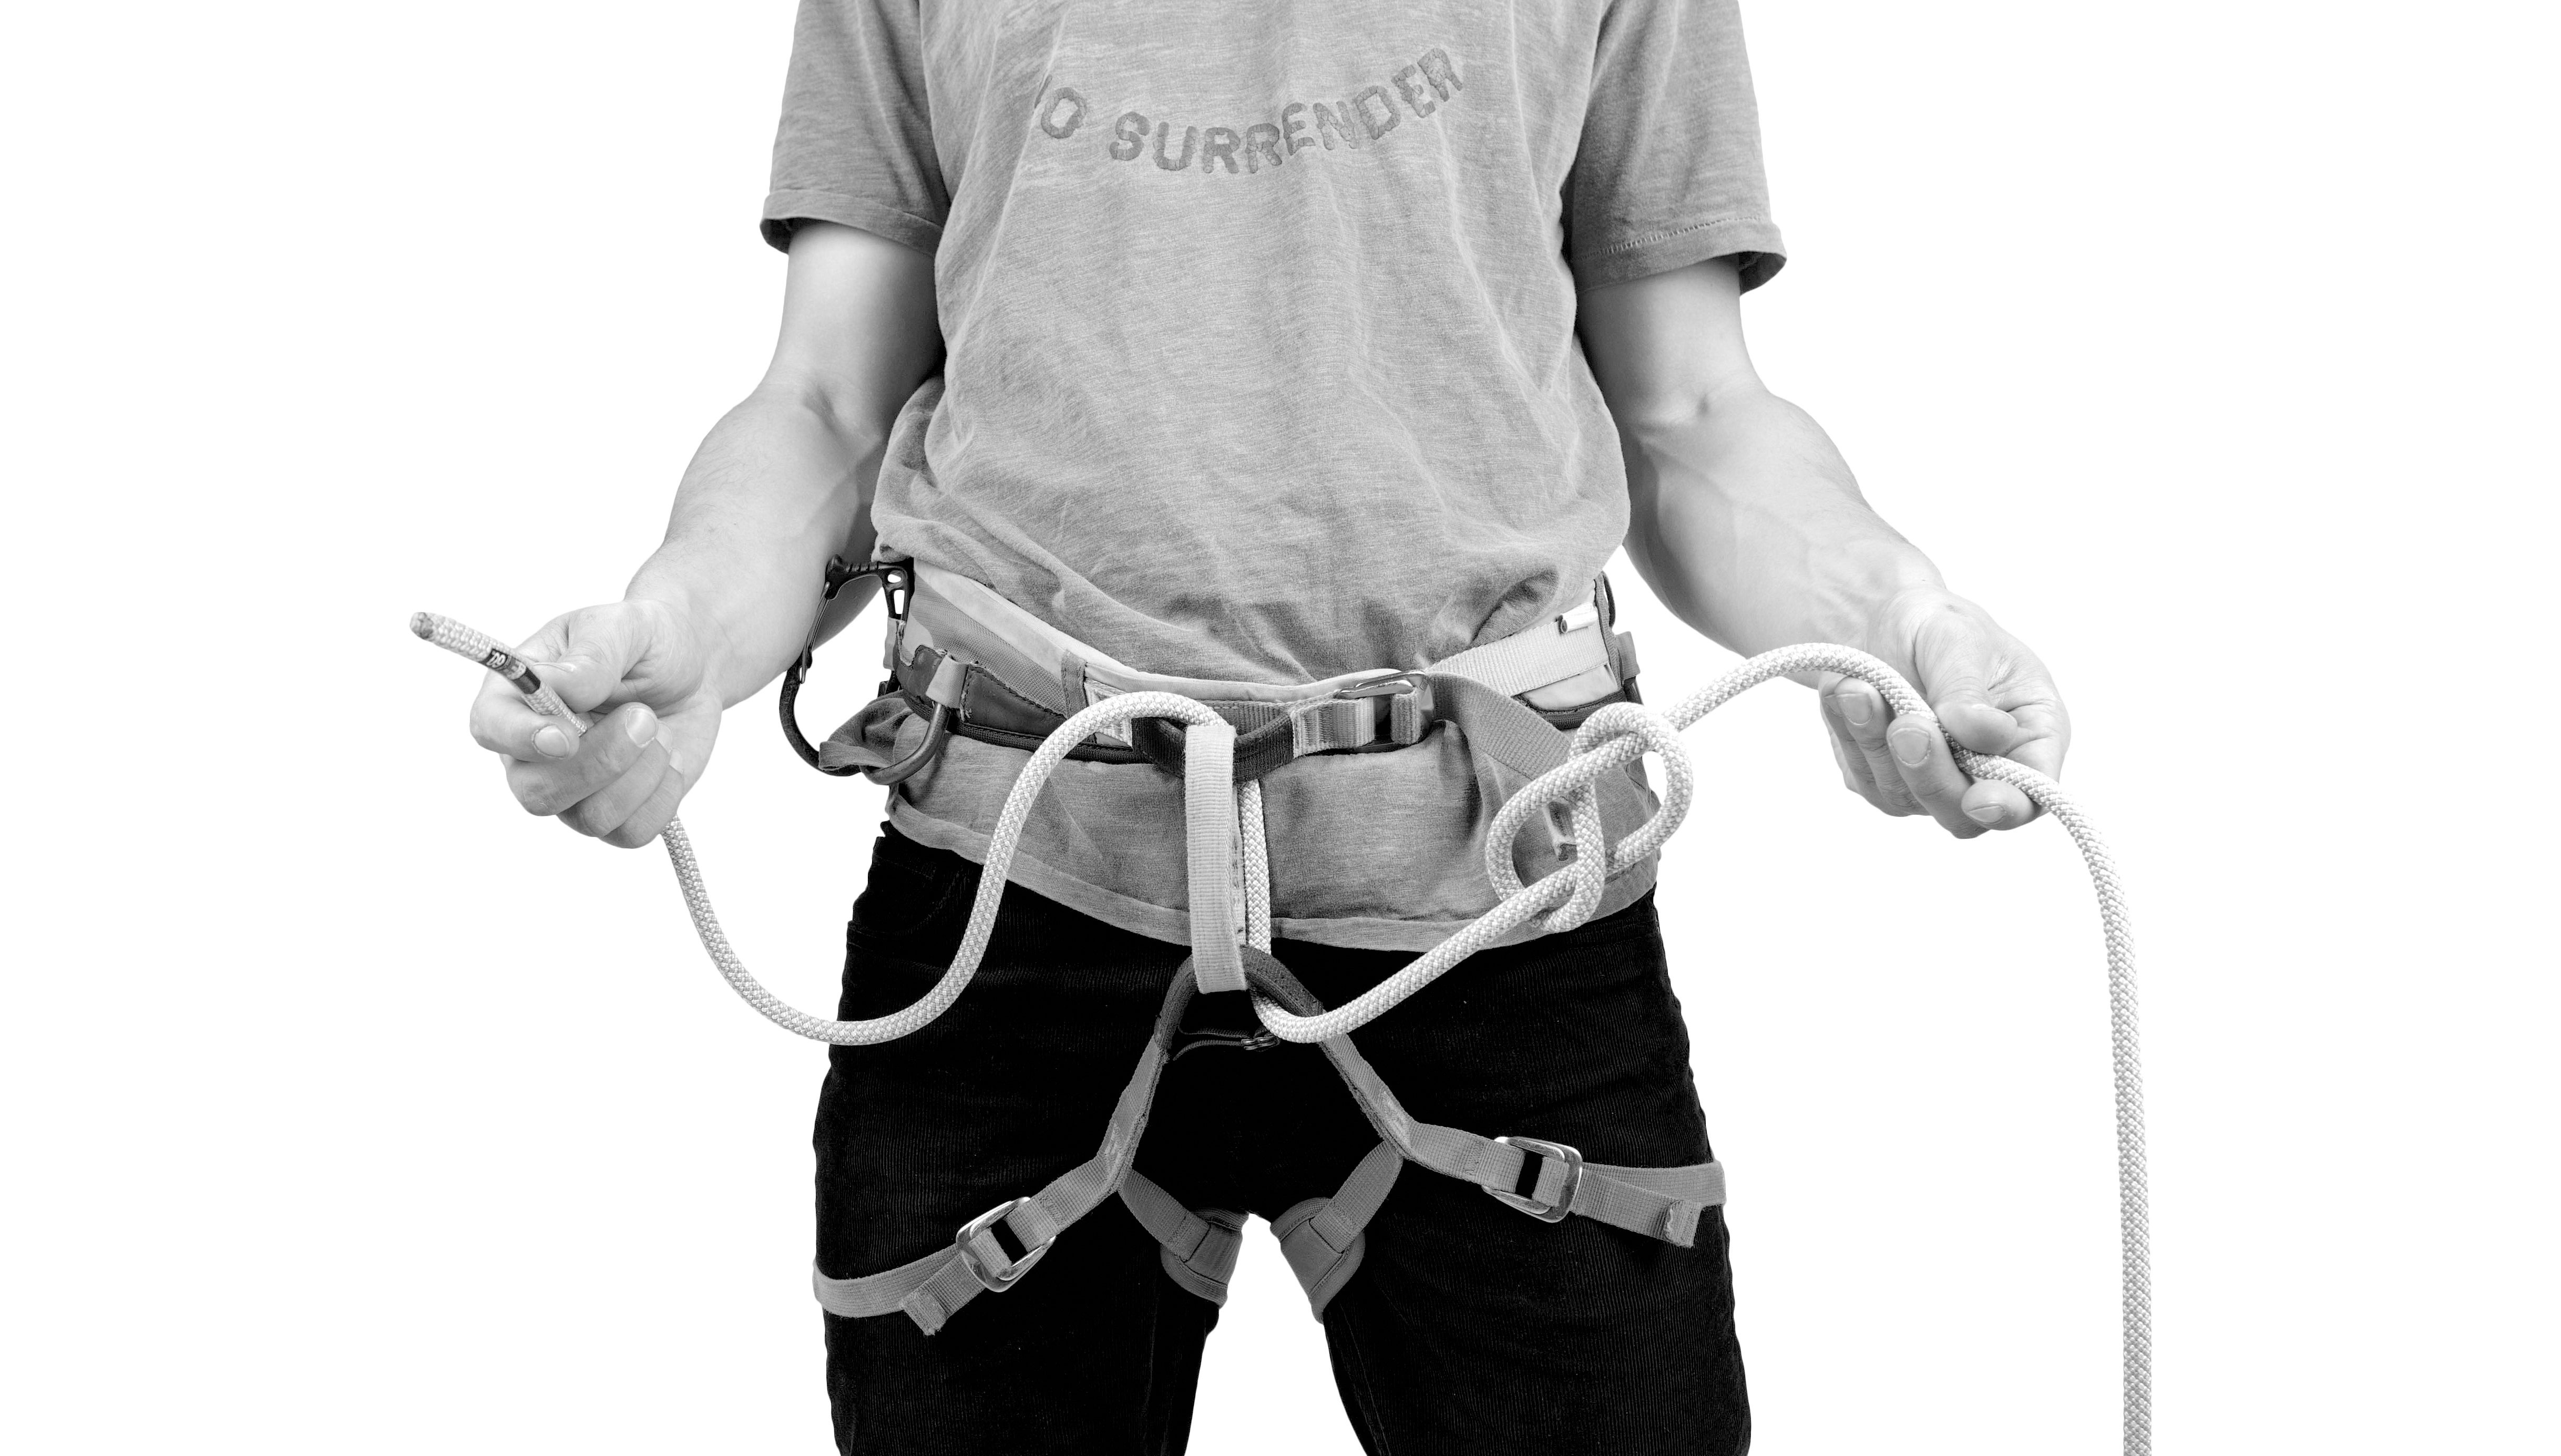 Threading rope through harness
Thread the tail through both tie-in loops of your harness. It doesn’t matter if you go from top to bottom or vice versa, but ensure you pass through both loops and not the belay loop. Pull the rope tail so the knot sits close to your harness.
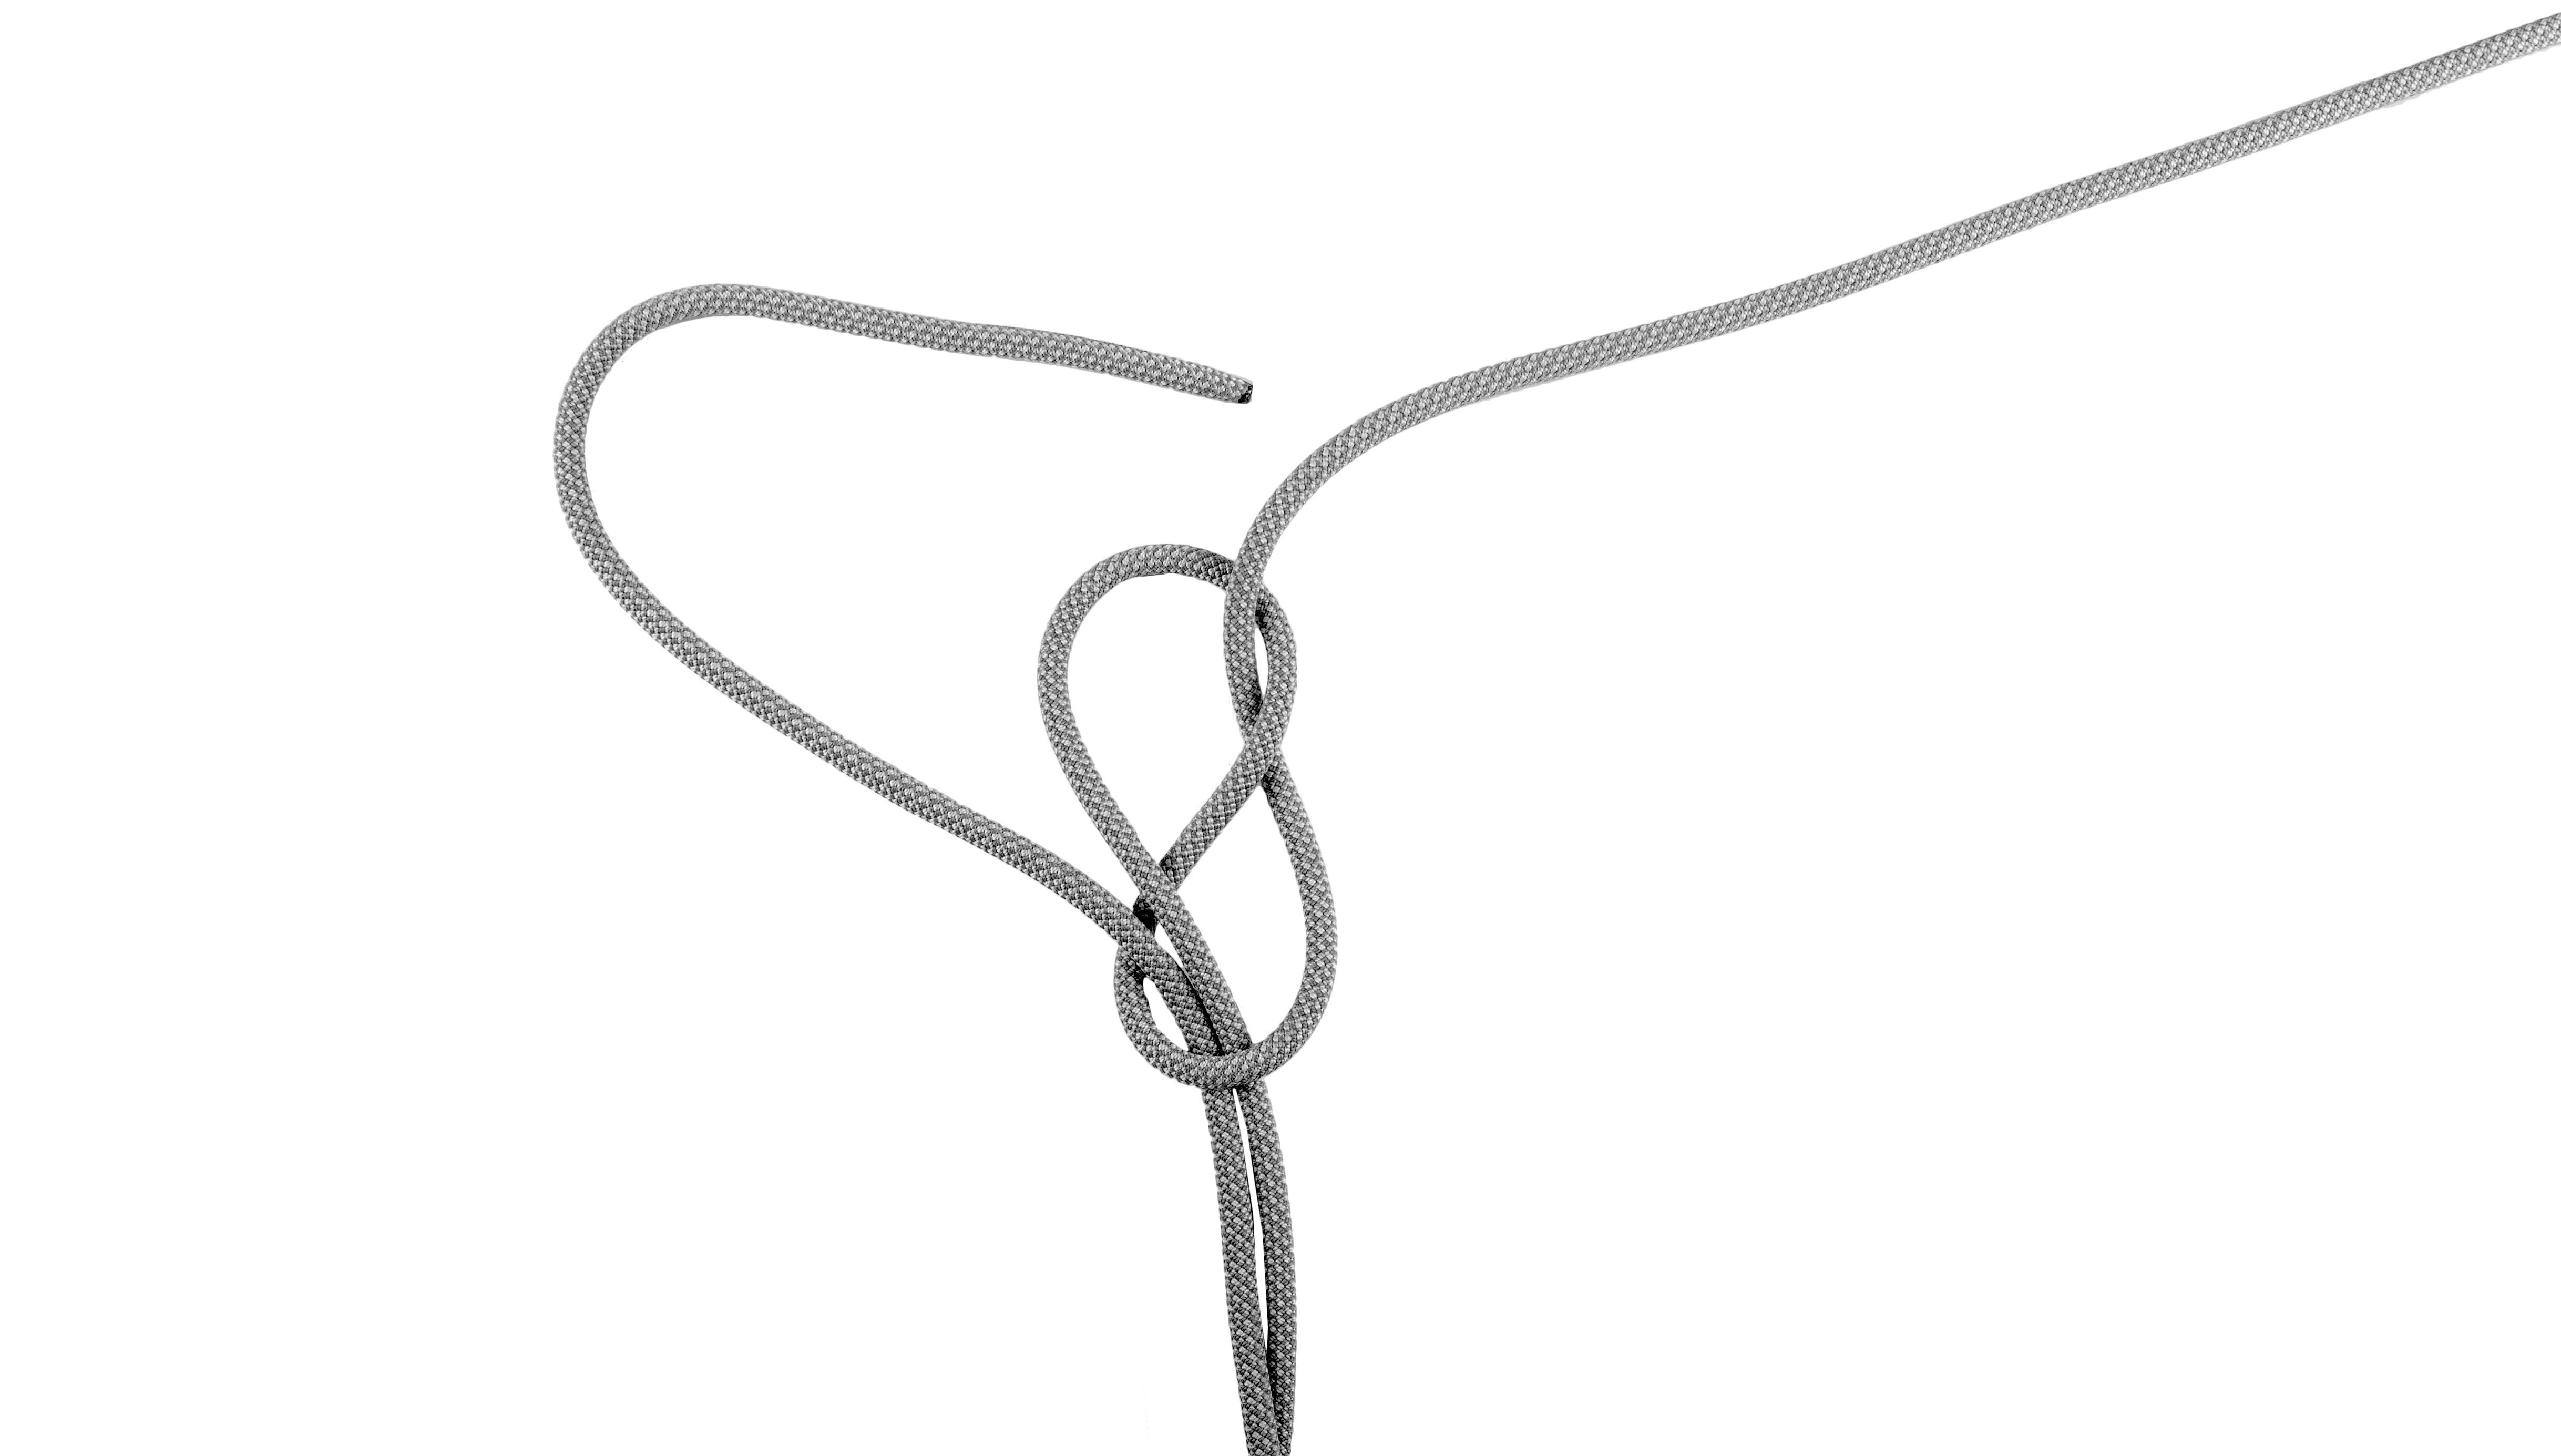
2.4. Step 4: Follow Through
 Starting follow through portion of rock climbing knot
This is the crucial “follow-through” portion. Retrace the figure eight knot you just made with the rope tail.
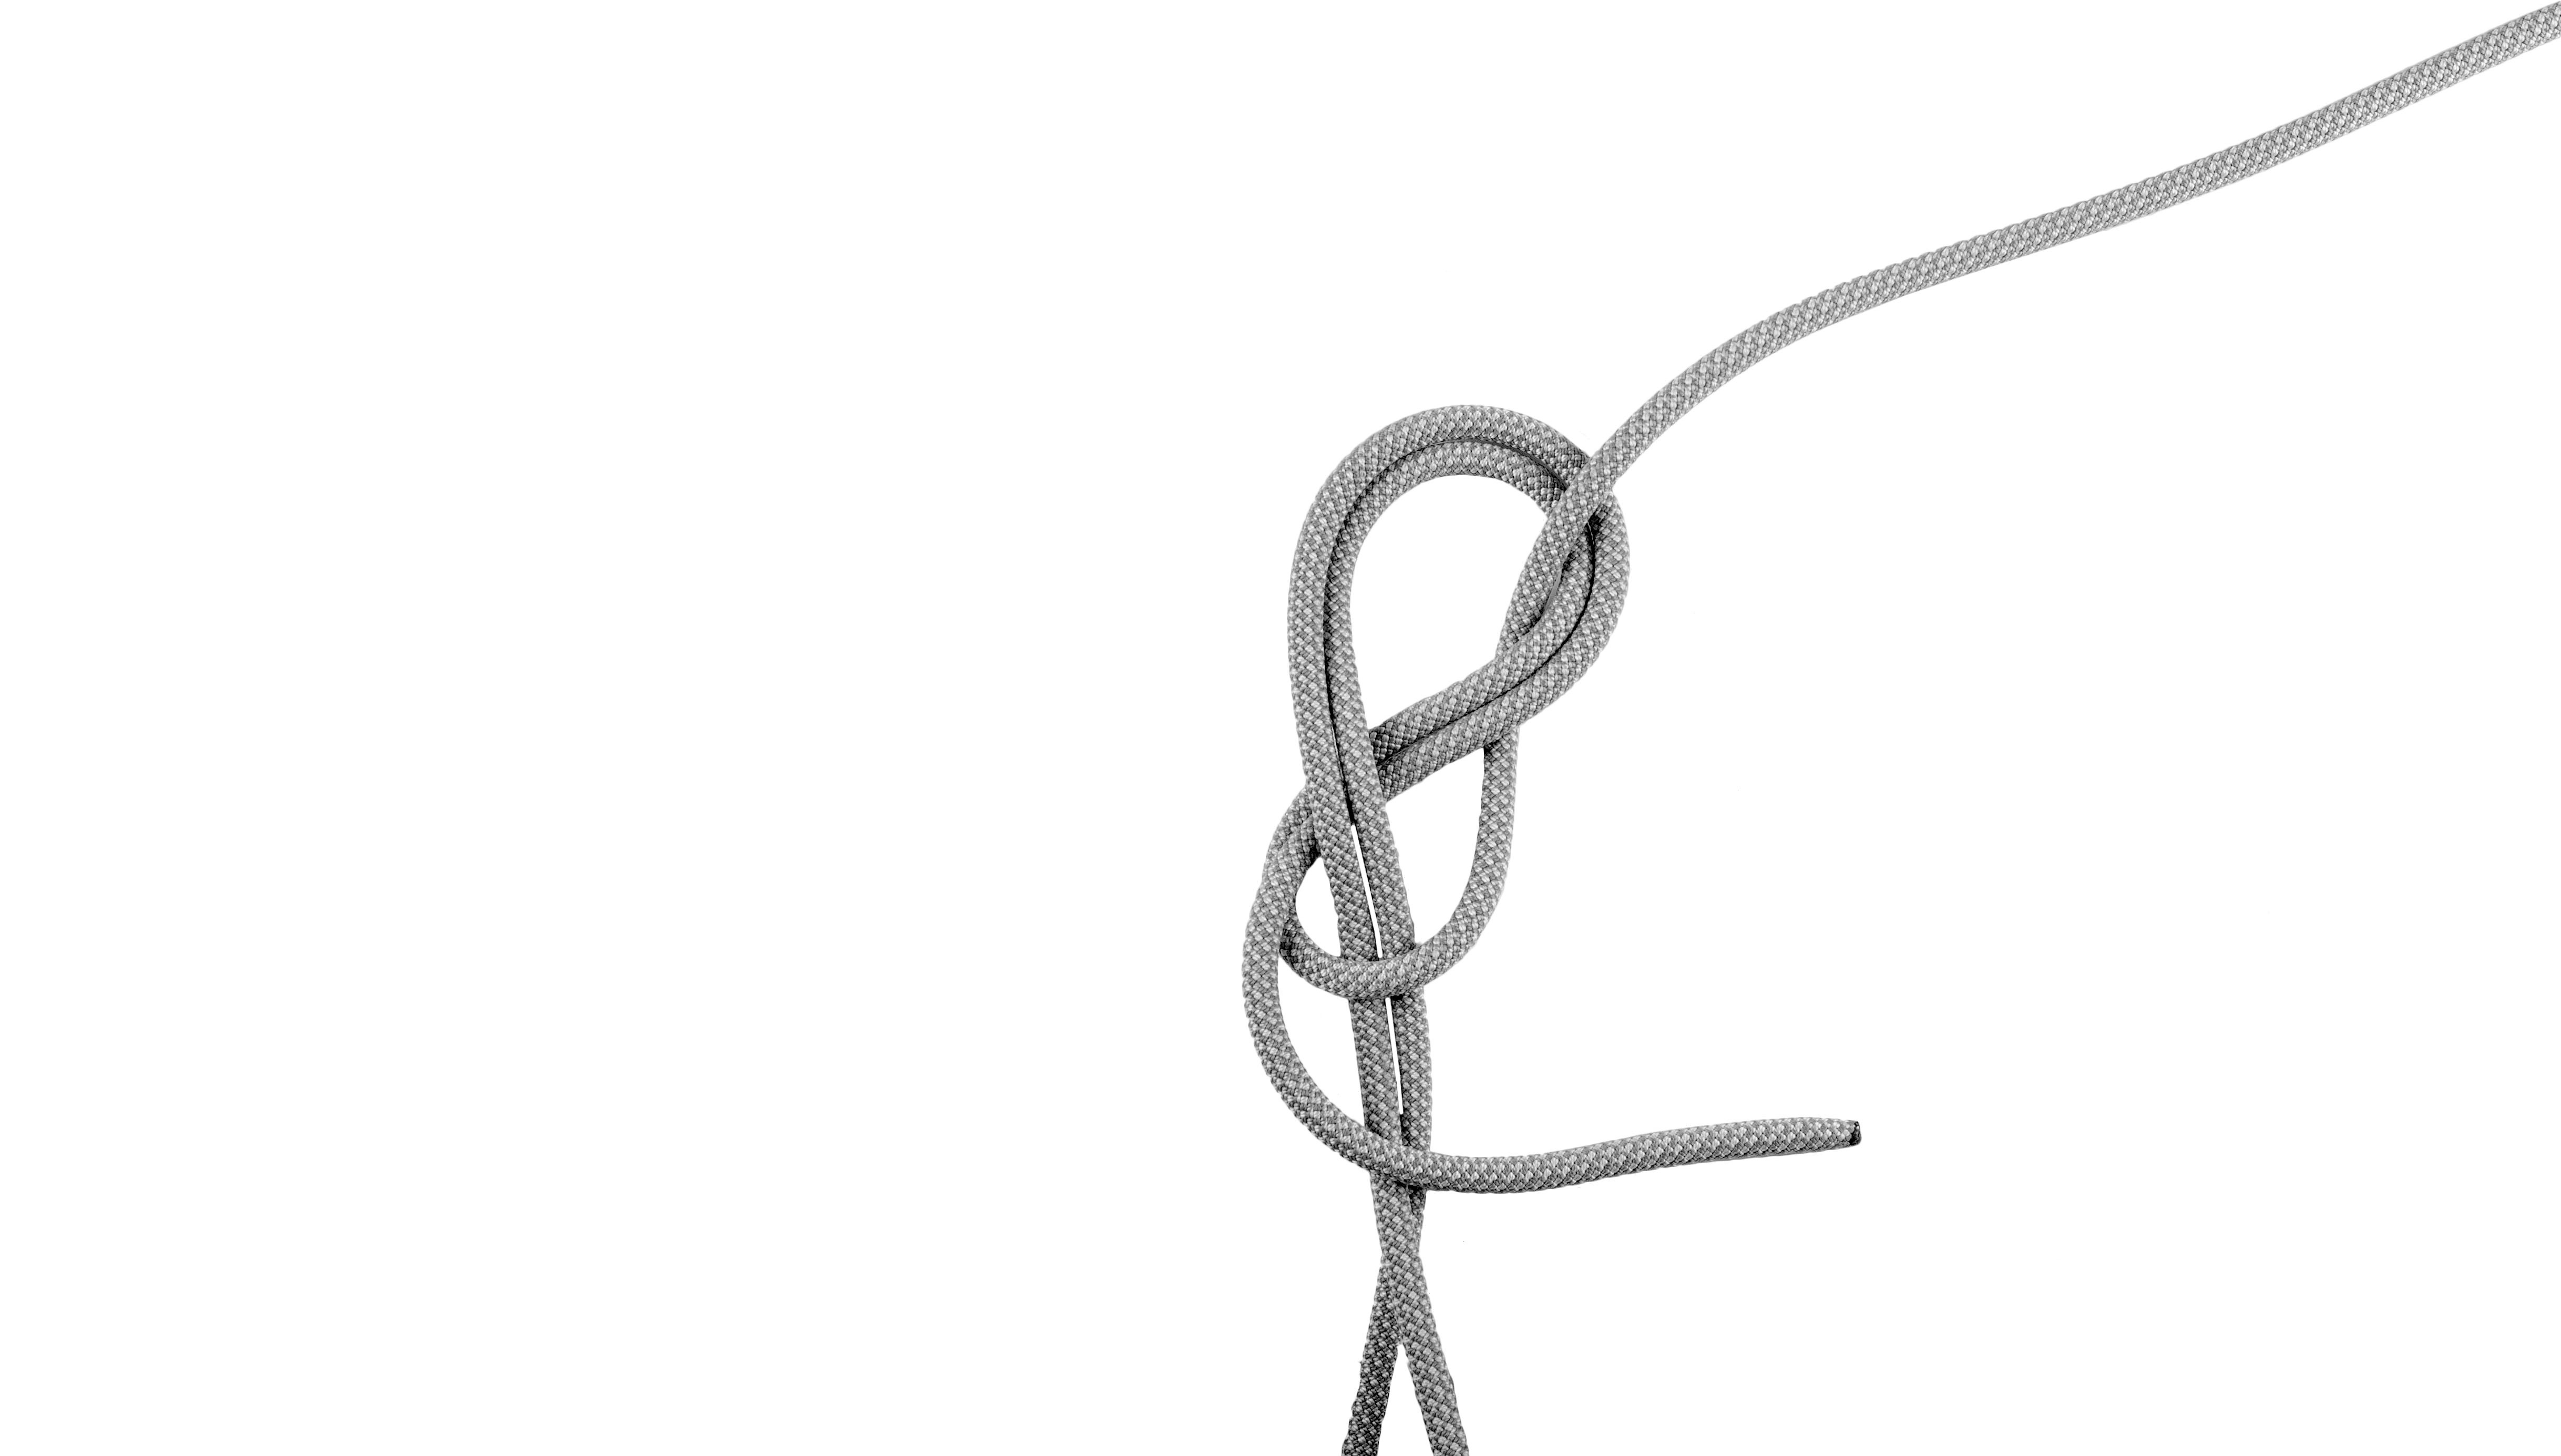
2.5. Step 5: Retrace the Knot
 Retracing the knot for rock climbing
Starting from where the rope exits the bottom of the knot, run the tail alongside the existing rope, following its path exactly (“around the racetrack” is a helpful mnemonic). Pay close attention to whether the tail goes under or over the rope in the existing knot, and whether it’s on the inside or outside. Accuracy is key.
2.6. Step 6: Complete and Tighten
 Finishing and tightening rock climbing knot
Once finished, the tail should exit the top of the knot with at least six inches of rope remaining. If the tail is too short, undo the knot and start again further from the rope’s end. Properly dress the knot by ensuring each strand is snugly nested against the others, without any crossed strands. Tighten the knot by pulling on all four strands that emerge from the finished knot—two on top, two on bottom.
2.7. Step 7: Visual Inspection
 Checking knot for safety before rock climbing
Before climbing, conduct a thorough visual inspection of your knot. Ensure it resembles a proper figure eight and has at least six inches of tail. Your climbing partner should also inspect your knot before each climb, regardless of whether you are leading or top-roping, indoors or outdoors.
3. Ensuring Climbing Knot Safety
3.1. Backup Knots: Are They Necessary?
The figure eight follow-through doesn’t require a backup knot if properly tied, dressed, and has a sufficient tail length (minimum 6 inches). The American Mountain Guides Association (AMGA) even recommends against backup knots because they can obstruct a partner’s visual inspection. However, some gyms require a backup knot, in which case a fisherman’s knot is a suitable choice.
3.2. Common Mistakes to Avoid
- Short Tail: Insufficient tail length is a common and dangerous mistake. Always ensure at least 6 inches of tail remains after tying the knot.
- Crossed Strands: Crossed strands can compromise the knot’s integrity. Double-check that all strands run parallel and are neatly nested.
- Incorrect Follow-Through: Deviating from the correct path during the follow-through can weaken the knot. Pay close attention to the original figure eight pattern.
- Forgetting to Tighten: A loose knot is a dangerous knot. Tighten all strands firmly before climbing.
3.3. Regular Rope Inspections
In addition to knot checks, regularly inspect your climbing rope for signs of wear, such as frays, cuts, discoloration, or soft spots. A damaged rope should be retired immediately. According to research from Arizona State University’s School of Earth and Space Exploration, in July 2025, consistent gear checking provides safety.
4. Mastering Other Essential Climbing Knots
While the figure eight follow-through is paramount, other knots play vital roles in climbing:
4.1. The Bowline: An Alternative Tie-In
The bowline forms a loop that’s easy to untie after loading. However, it has a tendency to loosen, making it less popular than the figure eight. If using a bowline, always use a backup knot.
4.2. The Double Fisherman’s Knot: Joining Ropes
The double fisherman’s knot (or grapevine knot) securely joins two ropes, often used in rappelling to create a rope long enough to reach the ground. Ensure the knot is neatly dressed and tightened before use.
4.3. The Clove Hitch: Versatile Anchoring
The clove hitch is useful for attaching carabiners to anchors or for creating adjustable anchor points. It’s relatively easy to tie and adjust, but it can slip under certain loading conditions.
4.4. The Prusik Hitch: Self-Rescue
The Prusik hitch is a friction hitch used to ascend a rope or create a backup in a rappel system. It requires a loop of cord that is smaller in diameter than the main rope. It’s a crucial knot for self-rescue scenarios.
5. Advanced Knot Tying Techniques and Tips
5.1. One-Handed Knot Tying
Proficiency in tying knots one-handed can be invaluable in emergency situations or when gear is limited. Practice tying essential knots with one hand until you can confidently execute them.
5.2. Tying Knots in the Dark
Climbing conditions can change rapidly, and you may find yourself needing to tie knots in low-light conditions. Practice tying knots with your eyes closed or in the dark to develop tactile familiarity.
5.3. Using Knot-Tying Tools
Several tools can aid in knot tying, particularly for complex knots or when working with stiff ropes. These tools can help you maintain tension and ensure proper knot formation.
6. Climbing Knot Best Practices: Do’s and Don’ts
6.1. Essential Dos for Climbing Knots
- Do Practice Regularly: Practice tying knots regularly to maintain proficiency and build muscle memory.
- Do Double-Check: Always double-check your knots and your partner’s knots before each climb.
- Do Use Adequate Tail: Ensure sufficient tail length (at least 6 inches) for all knots.
- Do Dress and Tighten: Properly dress and tighten all knots to ensure they are secure.
- Do Inspect Gear: Regularly inspect ropes, harnesses, and other gear for wear and damage.
6.2. Critical Don’ts for Climbing Knots
- Don’t Rush: Take your time when tying knots, especially when under pressure.
- Don’t Neglect Inspection: Never neglect to inspect your knots and gear before climbing.
- Don’t Use Damaged Ropes: Never use ropes that show signs of wear, cuts, or damage.
- Don’t Overcomplicate: Stick to essential knots and master them before learning advanced techniques.
- Don’t Trust Memory Alone: Always visually confirm that your knots are tied correctly, even if you’ve tied them many times before.
7. Understanding Rope Dynamics and Knot Strength
7.1. Impact Force and Knot Performance
Knots weaken the rope and reduce its overall strength. The degree of strength reduction depends on the knot type and how well it’s tied. Understanding how knots perform under impact force is crucial for selecting the right knot for the right situation.
7.2. Dynamic vs. Static Ropes
Climbing ropes are either dynamic or static. Dynamic ropes are designed to stretch under load, absorbing impact force during a fall. Static ropes have minimal stretch and are used for rappelling, hauling, and rescue operations. Using the wrong type of rope can compromise safety.
7.3. Knot Slippage and Creep
Some knots are prone to slippage or creep (gradual tightening or loosening) under sustained load. Regularly monitor knots for slippage and retie them as necessary. Using a backup knot can provide an extra margin of safety for knots prone to slippage.
8. Resources for Learning and Practicing Climbing Knots
8.1. Online Tutorials and Videos
Numerous online resources offer step-by-step tutorials and videos on tying climbing knots. Websites like rockscapes.net provide comprehensive guides and visual aids to help you learn and practice essential knots.
8.2. Climbing Courses and Workshops
Consider taking a climbing course or workshop from a certified instructor. These courses provide hands-on training and personalized feedback to help you master knot tying and other essential climbing skills.
8.3. Climbing Clubs and Communities
Join a local climbing club or online community to connect with experienced climbers, share tips and techniques, and learn from others. Climbing communities provide a supportive environment for learning and improving your skills.
9. Staying Updated on Climbing Safety Standards
9.1. Industry Best Practices
Climbing safety standards and best practices evolve over time. Stay informed about the latest guidelines and recommendations from organizations like the AMGA, the UIAA (International Climbing and Mountaineering Federation), and other reputable sources.
9.2. Gear Recalls and Safety Alerts
Manufacturers occasionally issue gear recalls and safety alerts for climbing equipment. Subscribe to industry newsletters and monitor websites for announcements about recalls and safety issues.
9.3. Continuous Learning and Improvement
Climbing is a dynamic activity that requires continuous learning and improvement. Stay open to new techniques, seek feedback from experienced climbers, and never stop honing your skills.
10. Addressing Common Concerns about Climbing Knots
10.1. Knot Tying Anxiety
Many new climbers experience anxiety about tying knots correctly. Practice, repetition, and building a solid understanding of knot mechanics can help alleviate this anxiety.
10.2. Forgetting Steps in a Knot
It’s common to forget steps in a knot, especially when learning. Carry a cheat sheet with diagrams of essential knots and refer to it as needed. With practice, you’ll eventually memorize the steps.
10.3. Tying Knots Too Tight or Too Loose
Tying knots too tight or too loose can compromise their integrity. Practice tying knots with the right amount of tension to ensure they are secure but not overly stressed.
11. Optimizing Knots for Different Climbing Styles
11.1. Sport Climbing Knots
Sport climbing often involves clipping into pre-placed bolts. Focus on knots that are easy to tie and untie, even after being loaded. The figure eight follow-through is an excellent choice for sport climbing.
11.2. Traditional Climbing Knots
Traditional climbing (trad) involves placing your own protection. In trad climbing, versatility and reliability are key. Master knots like the clove hitch and Prusik hitch for anchor building and self-rescue.
11.3. Big Wall Climbing Knots
Big wall climbing requires complex systems for hauling gear, fixing ropes, and sleeping on the wall. Learn advanced knots like the bowline with a Yosemite finish for creating secure loops that won’t come undone.
12. Incorporating Knots in Rescue Scenarios
12.1. Setting Up a Rappel System
Setting up a safe rappel system is critical in rescue scenarios. Use a reliable knot like the double fisherman’s knot to join ropes and a friction hitch like the autoblock or Prusik for backup.
12.2. Hauling Systems
Hauling systems are used to lift injured climbers or gear. Learn knots like the figure-of-nine loop and the butterfly knot for creating strong, reliable loops in a hauling system.
12.3. Improvised Rescue Techniques
In emergency situations, you may need to improvise rescue techniques using available materials. Practice tying knots with webbing, cord, and other materials to prepare for unexpected challenges.
13. The Future of Climbing Knot Technology
13.1. Advances in Rope Materials
Manufacturers are constantly developing new rope materials that are stronger, lighter, and more durable. Stay informed about the latest advances in rope technology to optimize your climbing performance.
13.2. Innovations in Knot-Tying Tools
New knot-tying tools and devices are emerging to simplify and improve knot tying. Explore these tools to see if they can enhance your knot-tying efficiency and accuracy.
13.3. Enhanced Safety Features
Manufacturers are incorporating enhanced safety features into climbing gear, such as built-in knot indicators and automated locking mechanisms. Keep an eye out for these innovations to further enhance your climbing safety.
14. Real-World Examples of Knots in Action
14.1. Successful Climbs Attributed to Knot Mastery
Many successful climbs, especially in challenging alpine and big wall environments, rely on climbers’ mastery of knots. Stories of climbers using their knot-tying skills to overcome obstacles and achieve summits are inspiring examples of the importance of this skill.
14.2. Rescue Missions Aided by Proper Knot Usage
Numerous rescue missions have been successful due to the proper use of knots. Search and rescue teams rely on knots to set up hauling systems, rappel down cliffs, and safely extract injured climbers.
14.3. Lessons Learned from Knot-Related Accidents
Unfortunately, there have also been accidents caused by improperly tied or inspected knots. Learning from these incidents can help prevent future accidents and reinforce the importance of knot safety.
15. Frequently Asked Questions (FAQs) about Climbing Knots
15.1. What is the strongest knot for climbing?
The figure eight follow-through is widely considered the strongest and most reliable knot for tying into a climbing harness.
15.2. How often should I replace my climbing rope?
Replace your climbing rope every 1-10 years, depending on frequency of use and any significant falls or damage, but inspect it before each use.
15.3. Can I use any rope for climbing?
No, always use a rope specifically designed for climbing that meets UIAA or CE standards.
15.4. What is a backup knot and why might I need one?
A backup knot is an additional knot tied at the end of the primary knot to prevent the rope from slipping. Some gyms and climbers prefer them for extra safety.
15.5. How do I choose the right climbing rope?
Consider rope length, diameter, type (single, double, twin), and intended use (sport, trad, ice climbing).
15.6. What are the signs of a worn-out climbing rope?
Fraying, discoloration, soft spots, cuts, and excessive stiffness are signs that a rope needs replacement.
15.7. Is it safe to climb alone?
Climbing alone is not recommended due to the inherent risks. Always climb with a partner or in a supervised setting.
15.8. What should I do if my knot comes loose while climbing?
Immediately stop climbing, secure yourself to the nearest anchor point, and assess the situation. If possible, retie the knot or descend safely.
15.9. Are there any apps to help me learn climbing knots?
Yes, several apps offer interactive tutorials and diagrams for learning and practicing climbing knots.
15.10. How can I practice knot tying when I’m not climbing?
Use spare rope or cord to practice tying knots at home. Visualize climbing scenarios to reinforce your learning.
16. Conclusion: The Art and Science of Knot Tying in Climbing
Mastering how to tie rock climbing knots is a blend of art and science. It requires a deep understanding of knot mechanics, attention to detail, and a commitment to safety. As you continue your climbing journey, embrace the challenge of learning new knots, refining your techniques, and sharing your knowledge with others.
Ready to elevate your climbing game and ensure your safety? Visit rockscapes.net today to explore our comprehensive resources on climbing knots, gear selection, and expert advice. Discover the beauty of rock climbing with confidence and skill. Contact us at 1151 S Forest Ave, Tempe, AZ 85281, United States. Call us at +1 (480) 965-9011. Visit our website at rockscapes.net.
Address: 1151 S Forest Ave, Tempe, AZ 85281, United States.
Phone: +1 (480) 965-9011.
Website: rockscapes.net.
