Tumbling rocks is a rewarding hobby that transforms rough stones into polished gems, and rockscapes.net is here to guide you through the process. By following a simple procedure and understanding a few key principles, you can achieve stunning results, turning ordinary rocks into beautiful, shiny treasures. With the right techniques and materials, you can unlock the hidden beauty within each stone.
1. Understanding the Basics of Rock Tumbling
What is rock tumbling, and why should you try it?
Rock tumbling is the process of smoothing and polishing rough rocks using a machine called a rock tumbler. This process simulates the natural erosion that occurs in rivers and streams over millions of years, but on a much faster timescale. Rock tumbling is a fun, educational, and creative hobby that appeals to people of all ages. According to research from Arizona State University’s School of Earth and Space Exploration, in July 2025, the popularity of lapidary arts has increased by 15% due to the accessibility of information and tools.
1.1. What You Need to Get Started
What are the essential supplies for rock tumbling?
To begin your rock tumbling journey, you will need a few essential supplies:
- A Rock Tumbler: Rotary tumblers are the most common type for beginners.
- Rough Rocks: Choose rocks with a Mohs hardness between 6 and 7 for the best results.
- Tumbler Grit: You’ll need coarse, medium, fine, and polish grits.
- Ceramic Media: These help to cushion the rocks and improve the tumbling action.
- Water: Distilled water is recommended for the best results.
- A Colander and Bucket: For rinsing the rocks between steps.
1.2. Understanding Mohs Hardness Scale
Why is Mohs hardness important for rock tumbling?
The Mohs hardness scale measures a mineral’s resistance to scratching. It ranges from 1 (talc) to 10 (diamond). Rocks with a Mohs hardness between 6 and 7 are ideal for tumbling because they are hard enough to withstand the process without breaking down too quickly, but soft enough to be polished effectively.
| Hardness | Mineral | Common Test |
|---|---|---|
| 1 | Talc | Easily scratched by a fingernail |
| 2 | Gypsum | Scratched by a fingernail |
| 3 | Calcite | Scratched by a copper coin |
| 4 | Fluorite | Easily scratched by a knife |
| 5 | Apatite | Scratched by a knife |
| 6 | Orthoclase Feldspar | Scratched by a steel file, difficult to scratch by a knife |
| 7 | Quartz | Scratches glass |
| 8 | Topaz | Scratches quartz |
| 9 | Corundum | Scratches topaz |
| 10 | Diamond | Scratches all other materials |
1.3. Suitable Rocks for Tumbling
What types of rocks are best for tumbling?
Some of the best rocks for tumbling include:
- Agate: A variety of chalcedony known for its vibrant colors and banding patterns.
- Jasper: An opaque form of chalcedony that comes in a wide range of colors and patterns.
- Quartz: A hard, durable mineral that can be found in many colors, including clear, rose, and smoky.
- Petrified Wood: Fossilized wood that has been replaced by minerals, often quartz or chalcedony.
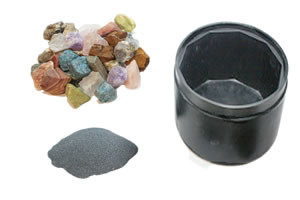
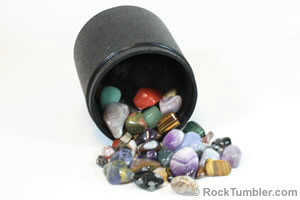 rock tumbler barrel and tumbled stones
2. The Four-Step Rock Tumbling Process
What are the four essential stages of rock tumbling?
The rock tumbling process typically involves four stages: coarse grind, medium grind, fine grind, and polish. Each step uses a different grit size to gradually smooth and polish the rocks.
2.1. Step 1: Coarse Grind
What happens during the coarse grind stage?
The coarse grind is the first and most aggressive step in rock tumbling. Its purpose is to remove any sharp edges, rough surfaces, and imperfections from the rocks. This step shapes the rocks and prepares them for the subsequent stages.
- Grit Used: 60/90 grit silicon carbide
- Duration: 7-14 days
- Procedure: Fill the tumbler barrel 1/2 to 2/3 full with rough rocks, add two tablespoons of coarse grit per pound of rock, and add water until the water line is just below the top of the rocks. Seal the barrel and run the tumbler for the specified duration.
- Inspection: After the coarse grind, rinse the rocks thoroughly and inspect them. If they still have sharp edges or rough surfaces, repeat the coarse grind for another week.
2.2. Step 2: Medium Grind
What is the purpose of the medium grind stage?
The medium grind stage further smooths the rocks and removes any scratches or imperfections left by the coarse grit. This step refines the shape of the rocks and prepares them for the fine grind.
- Grit Used: 120/220 grit silicon carbide
- Duration: 7 days
- Procedure: Clean the rocks, barrel, and lid thoroughly to remove any traces of coarse grit. Place the rocks back in the barrel, adding ceramic media if needed to bring the barrel up to the 1/2 to 2/3 full level. Add two tablespoons of medium grit per pound of rock (and ceramic media), and add water until the water line is just below the top of the rocks. Seal the barrel and run the tumbler for the specified duration.
- Inspection: After the medium grind, rinse the rocks thoroughly and inspect them. The rocks should have a smooth, frosted surface.
2.3. Step 3: Fine Grind
Why is the fine grind stage important?
The fine grind stage prepares the rocks for polishing by creating an extremely smooth surface. This step removes any remaining imperfections and gives the rocks a slight luster.
- Grit Used: 500F grit silicon carbide
- Duration: 7 days
- Procedure: Clean the rocks, barrel, and lid thoroughly to remove any traces of medium grit. Place the rocks back in the barrel, adding ceramic media if needed to bring the barrel up to the 1/2 to 2/3 full level. Add two tablespoons of fine grit per pound of rock (and ceramic media), and add water until the water line is just below the top of the rocks. Seal the barrel and run the tumbler for the specified duration.
- Inspection: After the fine grind, rinse the rocks thoroughly and inspect them. The rocks should be extremely smooth and may have a slight luster.
2.4. Step 4: Polish
How does the polish stage create shiny rocks?
The polish stage is the final step in rock tumbling. It uses a polishing compound to create a bright, shiny surface on the rocks. This step transforms the smooth, frosted rocks into beautiful, polished gems.
- Polish Used: TXP aluminum oxide powder
- Duration: 7 days
- Procedure: Clean the rocks, barrel, and lid thoroughly to remove any traces of fine grit. Place the rocks back in the barrel, adding ceramic media if needed to bring the barrel up to the 1/2 to 2/3 full level. Add two tablespoons of rock polish per pound of rock (and ceramic media), and add water until the water line is just below the top of the rocks. Seal the barrel and run the tumbler for the specified duration.
- Inspection: After the polish, rinse the rocks thoroughly and inspect them. The rocks should be bright and shiny.
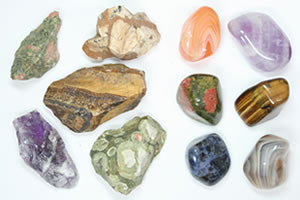 tumbler rough and polished stones
3. Tips for Successful Rock Tumbling
What are some key strategies for achieving the best results?
To achieve the best results in rock tumbling, it’s essential to follow some key strategies that enhance the process and ensure the quality of your polished stones.
3.1. The Golden Rules of Rock Tumbling
What are the fundamental principles to follow?
There are three “Golden Rules” of rock tumbling:
- “Garbage in means garbage out”: Start with high-quality rough rocks to get the best results.
- “Avoid contamination”: Thoroughly clean the rocks, barrel, and lid between each step to prevent grit contamination.
- “Great results take time”: Don’t rush the process; each step is essential for achieving a beautiful polish.
3.2. Selecting Quality Rough
How do you choose the best rough rocks for tumbling?
Starting with high-quality rough rocks is crucial for achieving beautiful tumbled stones. Look for rocks that are:
- Dense and non-porous: Porous rocks can trap grit and contaminate the subsequent steps.
- Free of fractures: Fractured rocks are likely to break during tumbling, scratching the other rocks in the barrel.
- Of similar hardness: Tumbling rocks of different hardnesses can lead to uneven wear.
3.3. Maintaining Cleanliness
Why is cleanliness so important in rock tumbling?
Cleanliness is paramount in rock tumbling. Even a small amount of grit contamination can ruin a batch of rocks. Be sure to:
- Thoroughly clean the rocks: Rinse the rocks thoroughly between each step to remove all traces of grit and mud.
- Clean the tumbler barrel and lid: Use a dedicated brush and plenty of water to scrub the barrel and lid.
- Avoid washing grit down the drain: Dispose of used grit and mud properly to prevent plumbing problems.
3.4. Using Ceramic Media
What are the benefits of using ceramic media in rock tumbling?
Ceramic media are small, non-abrasive cylinders that are added to the tumbler barrel to:
- Cushion the rocks: This helps to prevent bruising and chipping, especially with fragile materials like quartz.
- Improve tumbling action: The ceramic media act as roller bearings, ensuring that all of the rocks are evenly exposed to the grit.
- Fill the barrel: If you don’t have enough rocks to fill the barrel to the proper level, ceramic media can be used as filler.
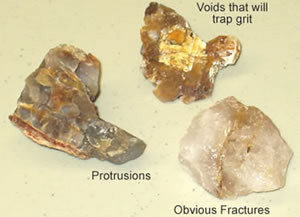 Inspect your rough
4. Troubleshooting Common Rock Tumbling Problems
What to do when things go wrong?
Even with the best preparation and techniques, you may encounter problems during the rock tumbling process. Here are some common issues and how to address them:
4.1. Scratches on Polished Stones
What causes scratches on finished stones?
Scratches on polished stones are usually caused by grit contamination. To prevent this:
- Thoroughly clean the rocks, barrel, and lid between each step.
- Avoid using porous rocks that can trap grit.
- Consider using a separate barrel for the polishing step.
4.2. Uneven Polishing
Why are some areas of the rock dull while others are shiny?
Uneven polishing can be caused by several factors:
- Rocks of different hardnesses: Softer rocks will wear away more quickly than harder rocks.
- Uneven distribution of grit: Make sure the grit is evenly distributed throughout the barrel.
- Insufficient tumbling time: Some rocks may require longer tumbling times to achieve a consistent polish.
4.3. Rocks Breaking Apart
Why are my rocks breaking during tumbling?
Rocks breaking apart during tumbling can be caused by:
- Fractured rocks: Discard any rocks with visible fractures before tumbling.
- Tumbling rocks that are too soft: Choose rocks with a Mohs hardness between 6 and 7.
- Overloading the tumbler barrel: Make sure the barrel is not too full, as this can put excessive stress on the rocks.
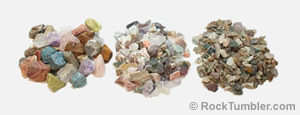 Rough particle sizes
5. Advanced Rock Tumbling Techniques
Ready to take your tumbling to the next level?
For those who have mastered the basics of rock tumbling, there are several advanced techniques that can further enhance your results.
5.1. Burnishing for Extra Shine
How does burnishing enhance the shine of tumbled stones?
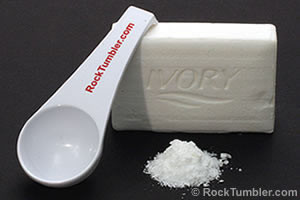
Burnishing is a technique used to enhance the shine of polished stones and remove any haze or residue left by the polishing compound. This involves tumbling the stones in soapy water for a short period.
- Procedure: Place the polished stones in the tumbler barrel with the normal amount of water. Add about 1/2 tablespoon of grated Ivory bar soap per pound of rock. Tumble for an hour or two.
- Benefits: Burnishing can significantly improve the luster of your tumbled stones, giving them a professional-quality finish.
5.2. Tumbling Soft Stones
Can you tumble softer stones, and how?
While rocks with a Mohs hardness between 6 and 7 are ideal for tumbling, it is possible to tumble softer stones with some adjustments to the process:
- Use a vibratory tumbler: Vibratory tumblers are gentler than rotary tumblers and are better suited for softer materials.
- Reduce tumbling times: Shorter tumbling times can help to prevent excessive wear on softer stones.
- Use cushioning media: Adding extra ceramic media can help to protect softer stones from damage.
5.3. Creating Unique Rock Combinations
How do you mix different rocks in one batch?
Creating unique rock combinations in a single batch can produce visually stunning results. However, it requires careful selection and preparation:
- Choose rocks with similar hardness: This will ensure that all of the rocks wear evenly.
- Consider color and pattern: Experiment with different color and pattern combinations to create interesting contrasts.
- Monitor the tumbling process closely: Check the rocks frequently to ensure that they are not wearing unevenly or damaging each other.
 rock tumbler media
6. The Allure of Rockscapes.net
What unique offerings does rockscapes.net provide for rock enthusiasts?
At rockscapes.net, we share your passion for rocks and landscaping. We offer a wide range of resources and services to help you create stunning rockscapes and bring the beauty of nature into your outdoor spaces.
6.1. Discovering Design Inspiration
How can rockscapes.net spark your creativity?
Looking for inspiration for your next landscaping project? Rockscapes.net is your go-to source for innovative design ideas. Browse our gallery of beautiful rockscapes, from serene Zen gardens to dramatic desert landscapes.
6.2. Accessing Expert Advice
How can rockscapes.net guide your landscaping projects?
Navigating the world of rock landscaping can be daunting. That’s why rockscapes.net provides access to expert advice and guidance. Our team of experienced landscape designers and geologists is here to answer your questions and help you create the rockscape of your dreams.
6.3. High-Quality Materials Sourcing
Where can you find premium landscaping rocks in the USA?
Sourcing high-quality landscaping rocks is essential for creating a lasting and beautiful rockscape. Rockscapes.net partners with trusted suppliers throughout the USA to bring you a wide selection of premium rocks, including granite, slate, river rock, and more.
Address: 1151 S Forest Ave, Tempe, AZ 85281, United States.
Phone: +1 (480) 965-9011.
Website: rockscapes.net.
 Tumbler rough, grit, and barrel
7. Ecological Considerations in Rock Tumbling
How can you tumble rocks responsibly?
Rock tumbling can be an environmentally friendly hobby if you take certain precautions. Here’s how to minimize your impact:
7.1. Responsible Waste Disposal
How do you properly dispose of used tumbling grit?
Never pour used tumbling grit down the drain. The grit can clog your plumbing system and contaminate local waterways. Instead, allow the grit to settle in a bucket of water, then carefully pour off the clear water. Dispose of the solid grit in a sealed container in your trash.
7.2. Water Conservation
How do you minimize water usage during rock tumbling?
Rock tumbling can use a significant amount of water, especially during the cleaning stages. To conserve water:
- Use a closed-loop system: Collect the rinse water in a bucket and reuse it for the initial cleaning stages.
- Use a spray nozzle: A spray nozzle can help you to rinse the rocks more efficiently.
- Consider using rainwater: If you have access to rainwater, use it for tumbling and cleaning.
7.3. Ethical Rock Sourcing
How do you ensure your rocks are ethically sourced?
Be mindful of where you source your rocks. Avoid collecting rocks from protected areas or private property without permission. Support suppliers who follow ethical and sustainable mining practices.
 DO NOT pour down the drain
8. Maximizing the Educational Value of Rock Tumbling
How can rock tumbling become a learning experience?
Rock tumbling isn’t just a fun hobby; it’s also an opportunity to learn about geology, mineralogy, and earth science. Here’s how to maximize the educational value of rock tumbling:
8.1. Rock Identification
How do you identify different types of rocks and minerals?
Learn to identify different types of rocks and minerals by studying their properties, such as color, hardness, luster, and crystal structure. Use field guides, online resources, and educational apps to expand your knowledge.
8.2. Understanding Geological Processes
What geological processes are simulated in rock tumbling?
Rock tumbling simulates the natural processes of erosion and weathering that occur over millions of years. By understanding these processes, you can gain a deeper appreciation for the forces that shape our planet.
8.3. Experimentation and Observation
How do you learn through experimentation?
Rock tumbling provides opportunities for experimentation and observation. Try tumbling different types of rocks, varying the tumbling times, and using different grits and polishes. Record your observations and analyze the results to improve your techniques.
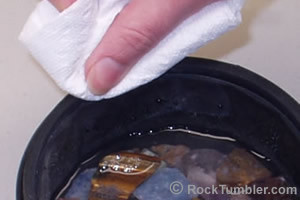
 washing tumbled stones
9. Safety Practices for Rock Tumbling
What safety measures should you take while tumbling rocks?
Safety should always be a top priority when rock tumbling. Follow these safety practices to protect yourself and others:
9.1. Protective Gear
What protective gear should you use?
Always wear safety glasses when handling rocks and grit to protect your eyes from splashes and flying debris. Consider wearing gloves to protect your hands from irritation.
9.2. Ventilation
Why is ventilation important?
Some tumbling grits and polishes can produce dust that can be harmful if inhaled. Work in a well-ventilated area or wear a dust mask to protect your respiratory system.
9.3. Machine Maintenance
How do you maintain your rock tumbler for safety?
Regularly inspect your rock tumbler for any signs of wear or damage. Keep the machine clean and lubricated according to the manufacturer’s instructions.
 clean tumbler barrel
10. Frequently Asked Questions (FAQs) About Rock Tumbling
Need quick answers?
Here are some frequently asked questions about rock tumbling:
10.1. How Long Does It Take to Tumble Rocks?
The rock tumbling process typically takes 3-4 weeks, depending on the type of rocks and the desired level of polish.
10.2. Can I Tumble Rocks of Different Sizes Together?
Yes, but it is best to have a mix of sizes to ensure proper tumbling action. Add ceramic media if needed to fill the barrel to the proper level.
10.3. Can I Use Soap to Clean My Rocks?
Yes, you can use a mild soap to clean your rocks between steps. Just be sure to rinse them thoroughly before moving on to the next step.
10.4. What Is the Best Grit for Polishing Rocks?
TXP aluminum oxide powder is a popular choice for polishing rocks in a rotary tumbler.
10.5. Can I Reuse Tumbling Grit?
No, it is not recommended to reuse tumbling grit. The grit becomes contaminated with rock particles and loses its effectiveness.
10.6. My Rocks Aren’t Shiny. What Am I Doing Wrong?
Make sure you are using the correct polishing compound and that you have thoroughly cleaned the rocks and barrel before the polishing step. You may also need to increase the tumbling time.
10.7. What Is Ceramic Media, and Why Should I Use It?
Ceramic media are small, non-abrasive cylinders that are added to the tumbler barrel to cushion the rocks, improve tumbling action, and fill the barrel to the proper level.
10.8. Can I Tumble Rocks I Find in My Backyard?
Yes, you can tumble rocks you find in your backyard, but be sure to identify the type of rock and its hardness before tumbling.
10.9. How Do I Know When to Move to the Next Step?
Inspect the rocks after each step. If they have reached the desired level of smoothness and shaping, you can move on to the next step.
10.10. Where Can I Buy Rock Tumbling Supplies?
You can buy rock tumbling supplies at rockscapes.net, lapidary supply stores, and online retailers.
Ready to transform your rough rocks into dazzling gems? Visit rockscapes.net today for expert advice, high-quality materials, and endless inspiration. Start your rock tumbling adventure now and discover the hidden beauty within every stone!
 burnishing tumbled stones
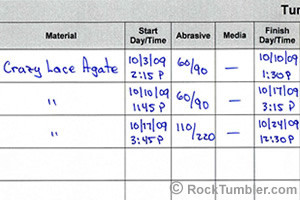 rock tumbler log