Wiring a rocker switch to a circuit is a task many homeowners encounter, especially when enhancing their outdoor spaces with landscape lighting. At rockscapes.net, we provide comprehensive guides on how to safely and effectively install these switches, ensuring your landscape lighting projects are both functional and aesthetically pleasing. Discover the ease of landscape enhancement with the right switch and wiring expertise!
1. What is a Rocker Switch and Why Use It in Landscape Lighting?
A rocker switch is an electrical switch that rocks back and forth, typically used to control the flow of electricity to a circuit. These switches are a great choice for landscape lighting due to their durability, ease of use, and modern appearance.
- Durability: Rocker switches are designed to withstand frequent use and environmental factors, making them ideal for outdoor applications.
- Ease of Use: The simple on/off mechanism is user-friendly, even in low-light conditions.
- Aesthetic Appeal: Rocker switches come in various styles and finishes, allowing them to blend seamlessly with your outdoor décor.
- Safety: Many rocker switches are designed with safety features like water resistance, crucial for outdoor electrical components.
Rockscapes.net helps you choose the best rocker switches for your landscape lighting, ensuring that they not only function efficiently but also complement the overall design of your outdoor space.
2. What Tools and Materials Do I Need to Wire a Rocker Switch?
Before you begin wiring a rocker switch, gather all the necessary tools and materials to ensure a smooth and safe installation process.
| Tool/Material | Description |
|---|---|
| Rocker Switch | Choose the right type (on/off, LED illuminated) for your needs. |
| Wire Strippers | To safely remove insulation from wires. |
| Wire Cutters | For cutting wires to the correct length. |
| Screwdrivers | Both Phillips and flathead, depending on the switch and wiring connections. |
| Electrical Tape | To insulate and secure wire connections. |
| Voltage Tester | To ensure the circuit is de-energized before working. |
| Pliers | For bending or manipulating wires. |
| Wiring Diagram | A visual guide to ensure correct wiring. |
| Safety Glasses | To protect your eyes during the process. |
| Gloves | To protect your hands from electrical shock. |
Having these tools on hand will make the wiring process efficient and safe. Always prioritize safety by turning off the power at the breaker before starting any electrical work.
3. How Do I Identify the Different Terminals on a Rocker Switch?
Understanding the terminals on a rocker switch is crucial for correct wiring. Terminals are the points where wires are connected to the switch.
- Common Terminal (COM): This is where the power supply (usually from the electrical panel) connects.
- Normally Open Terminal (NO): This is the terminal that connects to the load (e.g., landscape lights) when the switch is in the “on” position.
- Normally Closed Terminal (NC): This terminal connects to the load when the switch is in the “off” position. It’s less commonly used in standard on/off setups.
- LED Terminals (+/-): These are present in illuminated rocker switches and are used to power the LED indicator.
Most rocker switches have these terminals clearly labeled. If not, refer to the switch’s wiring diagram. Correctly identifying these terminals ensures your landscape lights function as expected and prevents electrical issues.
4. What is the Basic On/Off Rocker Switch Wiring Diagram?
Wiring a basic on/off rocker switch is straightforward. Here’s a simple wiring diagram to guide you:
- Turn off the Power: Always begin by turning off the circuit breaker that controls the landscape lighting circuit.
- Connect the Power Supply: Connect the wire from the power source (usually a black or red wire) to the common terminal (COM) on the rocker switch.
- Connect the Load Wire: Connect the wire leading to your landscape lights to the normally open terminal (NO) on the switch.
- Ground Wire: Ensure the ground wire (usually green or bare copper) is properly connected to the grounding system.
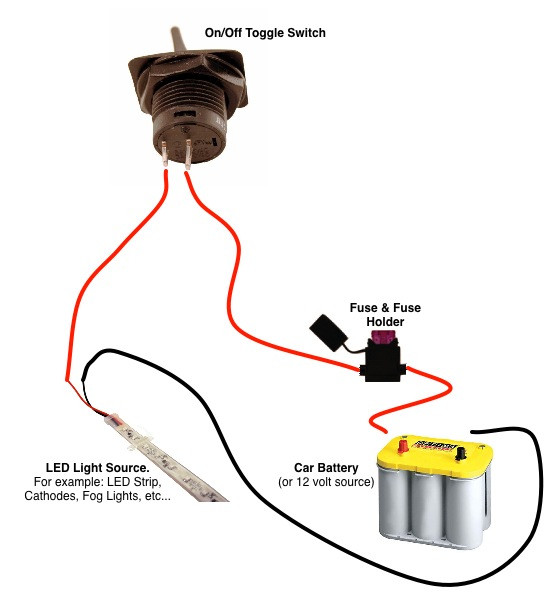 Basic On/Off Rocker Switch Wiring Diagram
Follow this diagram carefully to ensure your landscape lights turn on and off correctly with the rocker switch.
5. How Do I Wire an LED Illuminated Rocker Switch?
An LED illuminated rocker switch not only controls your landscape lights but also provides a visual indicator of its status. Here’s how to wire it:
- Turn off the Power: Begin by turning off the appropriate circuit breaker.
- Connect the Power Supply: Connect the power supply wire to the COM terminal.
- Connect the Load Wire: Connect the wire leading to your landscape lights to the NO terminal.
- Connect the Ground Wire: Connect the ground wire to the designated ground terminal.
- Connect the LED Power (+): Connect a wire from a 12V power source to the positive (+) terminal of the LED.
- Connect the LED Ground (-): Connect the negative (-) terminal of the LED to the ground.
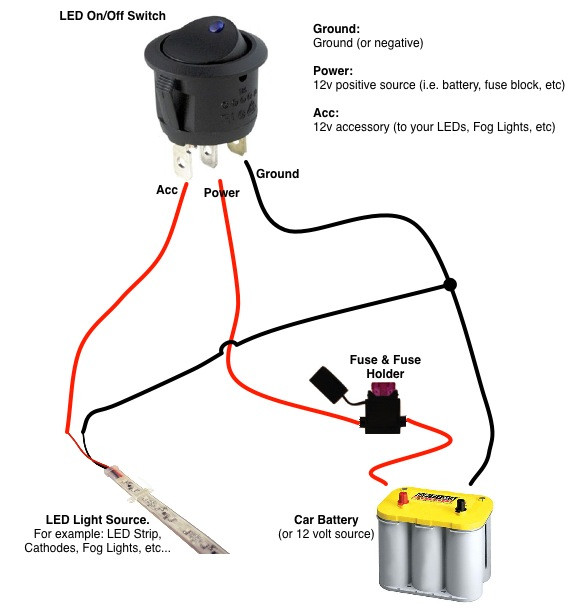 LED Rocker Switch Wiring Diagram
Wiring an LED rocker switch can enhance the functionality and safety of your landscape lighting. The illuminated indicator helps you easily locate and operate the switch, especially at night.
6. Can I Use a Rocker Switch for Low Voltage Landscape Lighting?
Yes, you can use a rocker switch for low voltage landscape lighting. Low voltage systems are common in outdoor lighting due to their safety and energy efficiency.
- Choose the Right Switch: Ensure the rocker switch is rated for low voltage (typically 12V or 24V).
- Connect the Transformer Output: Connect the output of the low voltage transformer to the COM terminal of the switch.
- Connect the Lights: Connect the wire leading to your landscape lights to the NO terminal.
- Grounding: Ensure proper grounding for safety.
Using a rocker switch with a low voltage system allows you to control your landscape lighting safely and effectively.
7. What Are Common Mistakes to Avoid When Wiring a Rocker Switch?
Avoiding common mistakes ensures a safe and functional installation. Here are some pitfalls to watch out for:
- Not Turning Off the Power: Always turn off the circuit breaker to prevent electric shock.
- Incorrect Terminal Connections: Double-check the wiring diagram to ensure wires are connected to the correct terminals.
- Loose Connections: Make sure all wire connections are tight and secure.
- Ignoring Grounding: Proper grounding is crucial for safety.
- Using the Wrong Type of Switch: Ensure the switch is rated for the voltage and current of your circuit.
- Overloading the Switch: Do not connect more lights than the switch is rated for.
- Skipping Wire Stripping: Use the right tool to strip the wire properly to avoid damages to the internal wire.
- Not Labeling Wires: Label the wires as needed for identification of the circuits.
By avoiding these mistakes, you can ensure a safe and reliable installation of your rocker switch.
8. How Do I Troubleshoot a Rocker Switch That Isn’t Working?
If your rocker switch isn’t working, follow these troubleshooting steps:
- Check the Power Supply: Ensure the circuit breaker is on and the power supply is functioning.
- Inspect the Wiring: Look for loose connections, damaged wires, or incorrect terminal connections.
- Test the Switch: Use a multimeter to test the continuity of the switch. It should show continuity when the switch is in the “on” position.
- Check the Load: Ensure the landscape lights are in good condition and properly connected.
- Replace the Switch: If the switch is faulty, replace it with a new one.
These steps will help you identify and resolve common issues with rocker switches, ensuring your landscape lights function as expected.
9. What is a 3-Way Rocker Switch and How is it Used in Landscape Lighting?
A 3-way rocker switch allows you to control landscape lights from two different locations. This is useful for pathways, large gardens, or any area where multiple control points are desired.
- Wiring: A 3-way switch setup involves two 3-way switches and a 4-wire cable running between them.
- Traveler Wires: The two traveler wires connect the two switches.
- Common Terminals: One switch has the power supply connected to its common terminal, while the other has the load (lights) connected to its common terminal.
- Functionality: Flipping either switch changes the state of the lights (on or off).
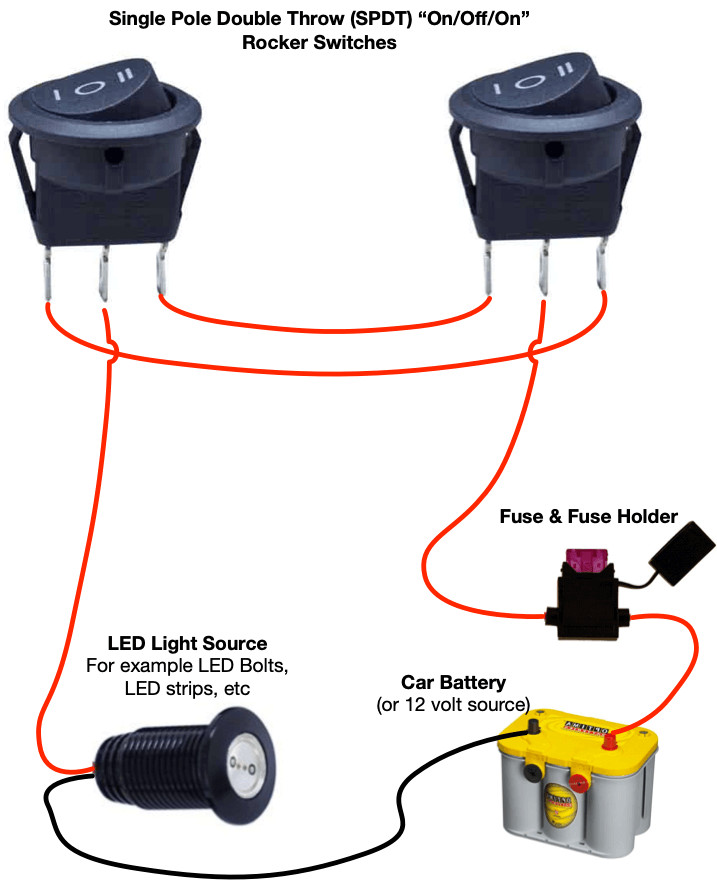 3-Way Rocker Switch Wiring Diagram
Implementing a 3-way switch setup can greatly enhance the convenience and usability of your landscape lighting.
10. How Can Rockscapes.net Help Me Choose the Right Rocker Switch for My Landscape?
At rockscapes.net, we provide a range of resources to help you choose the perfect rocker switch for your landscape lighting needs.
- Extensive Selection: We offer a variety of rocker switches, including on/off, LED illuminated, and 3-way switches.
- Detailed Product Information: Our product pages provide detailed specifications, wiring diagrams, and customer reviews to help you make an informed decision.
- Expert Advice: Our team of landscape lighting experts can provide personalized recommendations based on your specific needs and preferences.
- Installation Guides: We offer step-by-step installation guides and videos to ensure a smooth and safe installation process.
- Customer Support: Our customer support team is available to answer any questions you may have and provide assistance with your project.
By choosing rockscapes.net, you can be confident that you are getting high-quality products and expert support for your landscape lighting projects.
11. What are the Safety Precautions When Wiring a Rocker Switch?
Safety should always be your top priority when working with electrical components. Here are some essential safety precautions:
- Turn Off the Power: Always turn off the circuit breaker before starting any electrical work.
- Use Insulated Tools: Use tools with insulated handles to prevent electric shock.
- Wear Safety Glasses and Gloves: Protect your eyes and hands from potential hazards.
- Test for Voltage: Use a voltage tester to ensure the circuit is de-energized before touching any wires.
- Follow Wiring Diagrams: Always follow wiring diagrams to ensure correct connections.
- Inspect Wires: Check for damaged or frayed wires and replace them if necessary.
- Ground Properly: Ensure all ground connections are secure and functioning.
- Don’t Overload Circuits: Avoid connecting more lights or devices than the circuit is rated for.
- Check Local Codes: Ensure your installation complies with local electrical codes and regulations.
- Hire a Professional: If you are unsure about any aspect of the installation, hire a qualified electrician.
By following these safety precautions, you can minimize the risk of accidents and ensure a safe and successful installation.
12. What are the Benefits of Using LED Rocker Switches in Landscaping?
LED rocker switches offer several advantages over traditional switches, making them a popular choice for landscape lighting.
- Energy Efficiency: LEDs consume significantly less power than incandescent bulbs, saving you money on your electricity bill.
- Long Lifespan: LED bulbs last much longer than traditional bulbs, reducing the need for frequent replacements.
- Durability: LEDs are more resistant to shock and vibration, making them ideal for outdoor applications.
- Low Heat Output: LEDs produce very little heat, reducing the risk of fire hazards.
- Instant On/Off: LEDs turn on instantly, without any warm-up time.
- Variety of Colors: LEDs are available in a wide range of colors, allowing you to create custom lighting effects.
- Visibility: The illuminated indicator helps you easily locate and operate the switch, especially at night.
13. How Do Weather Conditions Affect Outdoor Rocker Switch Wiring?
Weather conditions can significantly impact the performance and safety of outdoor rocker switch wiring. Consider these factors:
- Moisture: Moisture can cause corrosion, short circuits, and electrical hazards. Use weatherproof enclosures and connectors to protect wiring from rain and humidity.
- Temperature: Extreme temperatures can damage wires and switches. Choose materials rated for outdoor use and temperature fluctuations.
- Sunlight: UV radiation can degrade plastic and rubber components. Use UV-resistant materials and protect wiring from direct sunlight.
- Wind: High winds can cause wires to move and rub against surfaces, leading to damage. Secure wiring properly to prevent movement.
- Freezing: Freezing temperatures can cause water to expand and crack enclosures and wiring. Use freeze-resistant materials and ensure proper drainage.
A weather-resistant rocker switch suitable for outdoor landscape lighting applications.
By considering these weather conditions and using appropriate materials and installation techniques, you can ensure the longevity and safety of your outdoor rocker switch wiring.
14. Can I Automate My Landscape Lighting with a Rocker Switch and a Timer?
Yes, you can automate your landscape lighting using a rocker switch in conjunction with a timer. This allows you to control your lights manually or set them to turn on and off automatically at specific times.
- Wiring: Connect the timer between the power supply and the rocker switch. The timer will control the flow of electricity to the switch, which in turn controls the lights.
- Timer Settings: Set the timer to turn on and off at the desired times.
- Manual Override: Use the rocker switch to manually turn the lights on or off, overriding the timer if needed.
Automating your landscape lighting can save energy, enhance security, and provide added convenience.
15. How Do I Maintain My Rocker Switch and Wiring for Longevity?
Proper maintenance is essential to ensure the longevity and reliability of your rocker switch and wiring. Here are some tips:
- Regular Inspections: Periodically inspect the switch and wiring for damage, corrosion, or loose connections.
- Clean the Switch: Clean the switch with a dry cloth to remove dirt and debris.
- Tighten Connections: Ensure all wire connections are tight and secure.
- Replace Damaged Components: Replace any damaged or worn components immediately.
- Protect from Moisture: Keep the switch and wiring protected from moisture and weather elements.
- Lubricate Moving Parts: Lubricate any moving parts of the switch with a silicone-based lubricant.
- Test Regularly: Test the switch regularly to ensure it is functioning properly.
By following these maintenance tips, you can extend the lifespan of your rocker switch and wiring and ensure your landscape lighting continues to function reliably.
16. What Are the Latest Trends in Landscape Lighting and Rocker Switch Designs?
Staying up-to-date with the latest trends in landscape lighting and rocker switch designs can help you create a modern and stylish outdoor space.
- Smart Lighting: Integration with smart home systems for remote control and automation.
- Color-Changing LEDs: Use of RGB LEDs to create custom lighting effects and scenes.
- Energy-Efficient Designs: Focus on energy-efficient LED lighting and low-voltage systems.
- Minimalist Designs: Sleek and minimalist rocker switch designs that blend seamlessly with outdoor décor.
- Weatherproof Materials: Use of durable and weather-resistant materials for outdoor applications.
- Solar-Powered Lighting: Increased use of solar-powered landscape lighting systems.
- Decorative Rocker Switches: Rocker switches with decorative finishes and custom designs.
17. How Do I Choose the Right Wire Gauge for My Rocker Switch Wiring?
Choosing the right wire gauge is crucial for safety and performance. The wire gauge determines the amount of current the wire can safely carry.
- Determine the Current: Calculate the total current (amps) that will flow through the circuit.
- Consult a Wire Gauge Chart: Use a wire gauge chart to determine the appropriate wire gauge for the current and the length of the wire run.
- Consider Voltage Drop: For long wire runs, consider voltage drop and use a larger wire gauge to minimize voltage loss.
- Check Local Codes: Ensure your wire gauge selection complies with local electrical codes and regulations.
Using the correct wire gauge ensures the safe and efficient operation of your landscape lighting system.
18. How Do I Protect My Outdoor Rocker Switch from Vandalism?
Protecting your outdoor rocker switch from vandalism is essential to prevent damage and ensure continued functionality. Here are some strategies:
- Install in a Secure Location: Place the switch in a location that is not easily accessible or visible.
- Use a Tamper-Proof Enclosure: Install the switch in a tamper-proof enclosure that is difficult to open or damage.
- Use Vandal-Resistant Switches: Choose rocker switches that are specifically designed to resist vandalism.
- Install Security Lighting: Install security lighting to deter vandals.
- Use Security Cameras: Install security cameras to monitor the area and record any vandalism attempts.
- Report Vandalism: Report any vandalism incidents to the authorities.
19. What Are the Different Types of Rocker Switches Available?
Rocker switches come in a variety of types to suit different applications and preferences. Here are some common types:
| Switch Type | Description |
|---|---|
| On/Off Rocker Switch | A simple switch with two positions: on and off. |
| LED Illuminated | Features an LED indicator that lights up when the switch is on, providing visual confirmation. |
| 3-Way Rocker Switch | Allows you to control a light from two different locations. |
| Momentary Rocker Switch | Returns to its original position when released, often used for momentary functions. |
| DPDT Rocker Switch | Double Pole Double Throw, used for switching two separate circuits or changing the polarity of a circuit. |
| SPDT Rocker Switch | Single Pole Double Throw, used for switching a single circuit between two different connections. |
| Weatherproof Rocker | Designed for outdoor use and resistant to moisture, dust, and other environmental factors. |
| Rocker Switch with Icons | They come with different options, for example with the USB icon, winch icon or other equipment icons on them. |
20. Where Can I Find Inspiration for Landscape Lighting Designs Using Rocker Switches?
Finding inspiration for landscape lighting designs can help you create a beautiful and functional outdoor space. Here are some resources:
- Rockscapes.net: Browse our website for a wide range of landscape lighting ideas, tips, and inspiration.
- Pinterest: Explore Pinterest for countless landscape lighting designs and rocker switch setups.
- Houzz: Discover professional landscape designs and find local landscape contractors.
- Magazines: Read landscape design magazines for the latest trends and ideas.
- Garden Tours: Attend local garden tours to see real-life examples of landscape lighting designs.
- Online Forums: Participate in online forums and communities to share ideas and get feedback.
- Social Media: Follow landscape designers and lighting professionals on social media for inspiration.
By exploring these resources, you can gather ideas and inspiration to create a landscape lighting design that meets your needs and reflects your personal style.
Remember, rockscapes.net is your go-to resource for all things landscape lighting. Explore our website for detailed product information, expert advice, and inspiring design ideas. Let us help you create the outdoor space of your dreams!
Address: 1151 S Forest Ave, Tempe, AZ 85281, United States
Phone: +1 (480) 965-9011
Website: rockscapes.net
FAQ: Rocker Switches
1. What is the purpose of a rocker switch?
A rocker switch controls the flow of electricity to a device or circuit, typically used for turning lights or equipment on and off.
2. How does a rocker switch differ from a toggle switch?
Unlike a toggle switch that uses a lever, a rocker switch uses a rocking motion, making it easier to operate and visually appealing.
3. What does COM stand for on a rocker switch?
COM stands for common, indicating the terminal where the power supply connects to the switch.
4. Can I use a rocker switch for both AC and DC circuits?
Yes, but ensure the rocker switch is rated for the appropriate voltage and current of the circuit you are using.
5. What is an LED illuminated rocker switch used for?
An LED illuminated rocker switch provides a visual indication of whether the switch is on or off, enhancing usability in dark conditions.
6. How do I test if a rocker switch is working correctly?
Use a multimeter to check for continuity between the terminals when the switch is in the on position.
7. What is the significance of the wire gauge in wiring a rocker switch?
The wire gauge determines the amount of current the wire can safely carry, preventing overheating and potential fire hazards.
8. How do I choose a weatherproof rocker switch for outdoor use?
Look for switches labeled as weatherproof or waterproof, designed with sealed construction to protect against moisture and environmental elements.
9. What is a 3-way rocker switch typically used for?
A 3-way rocker switch is used to control a single light fixture from two different locations, providing convenience in larger spaces.
10. How often should I replace rocker switches in my landscape lighting system?
Depending on usage and environmental conditions, rocker switches should be inspected annually and replaced every 5-10 years, or as needed, to ensure optimal performance and safety.