Wiring a three-prong rocker switch might seem daunting, but with the right guidance, it’s a manageable DIY project; at rockscapes.net, we’re here to simplify the process for you, ensuring you achieve safe and functional results. This guide will help you understand the essentials of electrical circuits and switch installation for various applications. Explore our site for more inspiration and practical tips on landscape design and stone selection.
1. What Is a Three Prong Rocker Switch and When Should I Use It?
A three-prong rocker switch is an electrical component designed to control the flow of electricity in a circuit, often used when you need more than a simple on/off function. It’s commonly used in landscape lighting and other outdoor applications where you might want to control different light settings or zones.
A three-prong rocker switch, sometimes referred to as a Single Pole Double Throw (SPDT) switch, essentially offers three connection points for wiring. Unlike a simple two-prong on/off switch, the three-prong switch provides greater flexibility in how you control an electrical circuit. This type of switch is useful for applications where you need to select between two different circuits or functions. This switch is particularly handy in landscape lighting where you might want to switch between different lighting zones or effects.
2. What Are the Benefits of Using a Three-Prong Rocker Switch?
Three-prong rocker switches provide enhanced control, versatility, and safety compared to simpler switch types. They are especially useful in complex electrical setups.
- Enhanced Control: Allows for switching between two different circuits or functions from a single point.
- Versatility: Suitable for a wide range of applications, from controlling landscape lighting zones to managing different settings on a device.
- Safety: When wired correctly, it can provide a safer way to manage electrical circuits, reducing the risk of overloads or shorts.
- Convenience: Simplifies the user interface by combining multiple controls into a single switch.
- Customization: Offers the ability to create customized electrical systems tailored to specific needs, such as dimming lights or switching between power sources.
3. What Tools and Materials Do I Need To Wire A Three Prong Rocker Switch?
To safely and effectively wire a three-prong rocker switch, gather essential tools and materials for a smooth installation. Preparation is key to a successful DIY electrical project.
- Three-Prong Rocker Switch: Choose a switch that matches your project’s voltage and current requirements.
- Wire Strippers: For safely removing insulation from wires without damaging them.
- Screwdrivers: Both flathead and Phillips head screwdrivers might be needed, depending on the switch and wiring setup.
- Pliers: Useful for bending or twisting wires to fit around the switch terminals.
- Electrical Tape: To insulate and secure wire connections, preventing shorts.
- Wire Connectors: Such as wire nuts or crimp connectors, to create secure and insulated connections between wires.
- Voltage Tester: To ensure the power is off before you start working on the circuit.
- Safety Glasses: To protect your eyes from debris or accidental sparks.
- Gloves: Insulated gloves to protect you from electrical shock.
- Wiring Diagram: A clear diagram specific to your switch and application to guide your wiring.
- Appropriate Gauge Wire: Ensure the wire you use is rated for the current and voltage of the circuit.
- Flashlight or Work Light: To provide adequate lighting in the work area.
4. What Are the Safety Precautions Before Starting the Wiring Process?
Safety is paramount when working with electricity. Always follow these precautions to protect yourself and prevent accidents.
- Turn Off the Power: The most crucial step is to turn off the circuit breaker or fuse that controls the circuit you’ll be working on.
- Verify Power is Off: Use a voltage tester to confirm that the power is indeed off before touching any wires.
- Wear Safety Gear: Always wear safety glasses and insulated gloves to protect yourself from potential hazards.
- Work in a Dry Area: Avoid working in damp or wet conditions, as water increases the risk of electric shock.
- Inform Others: Let people in the vicinity know that you will be working on electrical circuits, so they don’t accidentally turn the power back on.
- Read the Instructions: Carefully read the instructions that come with your switch and any other components you’ll be using.
- Use the Right Tools: Ensure your tools are insulated and in good condition.
- Avoid Distractions: Concentrate fully on the task at hand and avoid distractions.
- Don’t Work Alone: It’s always a good idea to have someone nearby in case of an emergency.
- If in Doubt, Call a Professional: If you’re not comfortable or confident with any part of the process, it’s best to call a qualified electrician.
5. How Do I Identify the Terminals on a Three Prong Rocker Switch?
Understanding the terminals on your switch is crucial for correct wiring. Misidentifying them can lead to improper function or even damage to the circuit.
- Common Terminal: This is typically the center terminal and is where the power source (usually the hot wire) is connected. It’s often marked with “COM” or “Common.”
- Normally Open (NO) Terminal: This terminal is not connected to the common terminal in the switch’s default state. When the switch is activated, the common terminal connects to this one.
- Normally Closed (NC) Terminal: This terminal is connected to the common terminal in the switch’s default state. When the switch is activated, the connection is broken.
- Visual Indicators: Some switches have visual indicators next to the terminals, such as symbols or labels, to help you identify them.
- Manufacturer’s Diagram: Always refer to the wiring diagram provided by the switch manufacturer, as terminal configurations can vary between brands and models.
- Testing with a Multimeter: If the terminals aren’t clearly marked, you can use a multimeter to test continuity and determine which terminals are connected in each switch position.
6. What Are the Different Wiring Configurations for a Three Prong Rocker Switch?
The versatility of a three-prong rocker switch lies in its various wiring configurations, each serving different purposes in electrical circuits. Understanding these configurations helps you apply the switch effectively in different scenarios.
- Single Pole Double Throw (SPDT): In this configuration, the switch can connect a single input (common terminal) to one of two outputs (NO and NC terminals). This is useful for selecting between two different circuits or functions.
- Two Separate Circuits: You can wire the switch to control two completely separate circuits. The common terminal acts as the power source, and each of the other terminals controls a different circuit.
- Reversing Polarity: This configuration is often used in motor control to change the direction of the motor. By switching the polarity of the power supply, the motor can be made to run in reverse.
- Center Off Position: Some three-prong rocker switches have a center-off position, where none of the terminals are connected. This can be useful for turning off a circuit completely or for creating a safety interlock.
- Lighting Control: In landscape lighting, you can use the switch to control different zones or effects. For example, one position might turn on all the lights, while the other position only turns on accent lights.
7. How To Wire A Three-Prong Rocker Switch: Step-by-Step Guide
Wiring a three-prong rocker switch can be straightforward if you follow a systematic approach. Here’s a step-by-step guide to help you through the process.
- Turn Off the Power: Go to your circuit breaker box and switch off the breaker that controls the circuit you’ll be working on. Verify that the power is off by using a voltage tester on the wires.
- Prepare the Wires: Use wire strippers to carefully remove about 3/4 inch of insulation from the ends of the wires. Be careful not to nick or damage the copper strands.
- Identify the Wires: Typically, you’ll have a hot wire (usually black or red), a neutral wire (usually white), and a ground wire (usually green or bare copper). For a three-prong switch, you’ll primarily be working with the hot wire.
- Connect the Common Wire: Connect the hot wire from your power source to the common terminal on the switch. This is usually the center terminal and is often marked with “COM.” Secure the wire tightly to the terminal screw.
- Connect the First Output Wire: Connect the wire for your first circuit or function to the normally open (NO) terminal on the switch. This is the terminal that will be connected to the common terminal when the switch is in one position.
- Connect the Second Output Wire: Connect the wire for your second circuit or function to the normally closed (NC) terminal on the switch. This is the terminal that will be connected to the common terminal when the switch is in the other position.
- Connect the Ground Wire: If there is a ground wire, connect it to the grounding screw on the switch or to a grounding point in the electrical box.
- Secure the Switch: Carefully tuck the wires back into the electrical box and mount the switch.
- Test the Switch: Turn the circuit breaker back on and test the switch to ensure that it is functioning correctly. Verify that each position of the switch controls the correct circuit or function.
8. What Are the Common Mistakes To Avoid When Wiring A Three Prong Rocker Switch?
Avoiding common mistakes is crucial for ensuring the safety and functionality of your wiring. Here are some pitfalls to watch out for.
- Forgetting to Turn Off the Power: This is the most dangerous mistake. Always turn off the power at the circuit breaker before working on any electrical circuit.
- Misidentifying Wires: Incorrectly identifying the hot, neutral, and ground wires can lead to short circuits or other problems. Always double-check your wire identification.
- Loose Connections: Loose wire connections can cause arcing, overheating, and even fires. Make sure all connections are tight and secure.
- Over-Tightening Screws: Over-tightening terminal screws can damage the switch and lead to loose connections over time.
- Using the Wrong Gauge Wire: Using wire that is too thin for the circuit’s current can cause overheating and fires. Always use the correct gauge wire for the application.
- Ignoring the Wiring Diagram: Not following the wiring diagram provided by the switch manufacturer can lead to incorrect wiring and potential damage.
- Skipping the Ground Wire: The ground wire is a critical safety feature that helps prevent electric shock. Never skip connecting the ground wire.
- Working in Wet Conditions: Water is an excellent conductor of electricity, so avoid working on electrical circuits in wet or damp conditions.
- Not Testing After Installation: Always test the switch after installation to ensure that it is functioning correctly and that all connections are secure.
- Ignoring Local Codes: Failing to comply with local electrical codes can result in fines or safety hazards. Always make sure your wiring complies with all applicable codes.
9. How Can I Test The Wiring After Installation?
Testing your wiring after installation is essential to ensure safety and proper function. Here’s how to do it effectively.
- Visual Inspection: Before turning the power back on, visually inspect your wiring to make sure that all connections are tight, wires are properly insulated, and there are no exposed conductors.
- Continuity Test: Use a multimeter to perform a continuity test between the switch terminals to verify that the switch is making and breaking connections as expected.
- Voltage Test: After turning the power back on, use a voltage tester to check that the correct voltage is present at the switch terminals and at any connected devices.
- Functional Test: Operate the switch in each of its positions and verify that it is controlling the correct circuits or functions.
- Ground Fault Test: Use a ground fault tester to ensure that the grounding system is working correctly and will trip the circuit breaker in the event of a ground fault.
- Insulation Resistance Test: Use a megohmmeter to measure the insulation resistance of the wiring to ensure that there are no insulation faults that could cause leakage current or short circuits.
- Thermal Imaging: Use a thermal imaging camera to check for hot spots in the wiring, which could indicate loose connections or overloaded circuits.
- Professional Inspection: If you are not comfortable performing these tests yourself, or if you have any concerns about the safety of your wiring, it’s best to have a qualified electrician inspect your work.
10. What Are Some Advanced Applications of Three Prong Rocker Switches?
Beyond basic on/off control, three-prong rocker switches can be used in more sophisticated applications to enhance functionality and convenience.
- Motor Reversing: In applications involving electric motors, a three-prong rocker switch can be used to reverse the direction of the motor. This is commonly used in winches, electric gates, and other devices where directional control is needed.
- Dimming Control: By wiring a three-prong rocker switch in conjunction with a dimmer module, you can control the brightness of lights. One position of the switch can turn the lights on at full brightness, while the other position activates the dimmer.
- Multi-Speed Fan Control: In ceiling fans or other multi-speed fans, a three-prong rocker switch can be used to select between different fan speeds. Each position of the switch corresponds to a different speed setting.
- Transfer Switch: In backup power systems, a three-prong rocker switch can be used as a transfer switch to switch between the main power source and a backup generator or battery. This ensures a seamless transition during power outages.
- Security Systems: In security systems, a three-prong rocker switch can be used to arm or disarm different zones or sensors. This allows you to customize the security coverage based on your needs.
- HVAC Systems: In HVAC systems, a three-prong rocker switch can be used to control different modes of operation, such as heating, cooling, or fan-only. This provides greater flexibility in managing your indoor climate.
- Robotics: In robotics projects, a three-prong rocker switch can be used to control different functions of the robot, such as movement, sensor activation, or actuator control. This allows for precise control over the robot’s actions.
11. How To Choose the Right Three Prong Rocker Switch for My Project?
Selecting the right switch involves considering several factors to ensure it meets your project’s specific requirements and safety standards.
- Voltage and Current Rating: Ensure that the switch is rated for the voltage and current of your circuit. Using a switch with a lower rating can cause it to overheat or fail.
- Switch Type: Determine whether you need a Single Pole Double Throw (SPDT) switch or another type of switch. SPDT switches are the most common type of three-prong rocker switch, but other options may be available depending on your application.
- Mounting Style: Consider how the switch will be mounted. Rocker switches are typically mounted in panels or enclosures, so make sure that the switch you choose is compatible with your mounting method.
- Terminal Type: Choose a switch with the appropriate terminal type for your wiring. Common terminal types include screw terminals, quick-connect terminals, and solder terminals.
- Environmental Conditions: If the switch will be used in a harsh environment, such as outdoors or in a humid location, choose a switch that is rated for those conditions. Look for switches that are waterproof, dustproof, or corrosion-resistant.
- Certifications: Look for switches that are certified by reputable organizations, such as UL, CSA, or CE. These certifications indicate that the switch has been tested and meets certain safety standards.
- Aesthetics: Consider the appearance of the switch and choose one that matches the style of your project. Rocker switches are available in a variety of colors, shapes, and materials.
- Durability: Choose a switch that is durable and will withstand the wear and tear of regular use. Look for switches that are made from high-quality materials and have a robust construction.
12. How Do Environmental Factors Affect the Choice and Installation of a Three-Prong Rocker Switch?
Environmental conditions play a significant role in the longevity and safety of your electrical installations, especially for outdoor applications.
- Moisture: In damp or wet environments, choose a switch that is rated for wet locations. Look for switches that have waterproof seals and corrosion-resistant materials.
- Temperature: Extreme temperatures can affect the performance and lifespan of a switch. Choose a switch that is rated for the temperature range in your area.
- Dust and Debris: In dusty or dirty environments, choose a switch that is dustproof. Look for switches that have sealed enclosures and dust-resistant materials.
- UV Exposure: Exposure to ultraviolet (UV) radiation from the sun can cause plastic materials to degrade over time. Choose a switch that is UV-resistant if it will be exposed to direct sunlight.
- Vibration: In applications where there is vibration, choose a switch that is designed to withstand vibration. Look for switches that have robust construction and secure connections.
- Corrosion: In coastal areas or other environments where there is salt spray, choose a switch that is corrosion-resistant. Look for switches that are made from stainless steel or other corrosion-resistant materials.
- Altitude: At high altitudes, the air is thinner, which can affect the performance of electrical components. Choose a switch that is rated for use at high altitudes if necessary.
- Chemical Exposure: In environments where there is exposure to chemicals, choose a switch that is resistant to those chemicals. Look for switches that are made from chemical-resistant materials.
13. What Are the Latest Innovations in Three-Prong Rocker Switch Technology?
Advancements in technology have led to innovative features in three-prong rocker switches, enhancing their functionality and user experience.
- Smart Switches: Smart rocker switches can be controlled remotely via smartphone or voice commands. They can also be integrated with home automation systems to create customized lighting scenes and schedules.
- LED Indicators: Many modern rocker switches feature built-in LED indicators that show the switch’s status. These indicators can be useful for quickly determining whether a circuit is on or off.
- Touch-Sensitive Switches: Touch-sensitive rocker switches offer a sleek and modern alternative to traditional mechanical switches. They respond to touch rather than physical movement.
- Wireless Switches: Wireless rocker switches can be installed without running new wires. They communicate wirelessly with a receiver that controls the circuit.
- Energy-Efficient Switches: Energy-efficient rocker switches are designed to minimize energy consumption. They may use low-power components or have built-in energy-saving features.
- Customizable Switches: Some manufacturers offer customizable rocker switches that can be configured to meet specific requirements. These switches may have adjustable voltage and current ratings, different terminal types, or custom labeling.
- Self-Powered Switches: Self-powered rocker switches generate their own power from the motion of the switch. They do not require an external power source.
- Biometric Switches: Biometric rocker switches use fingerprint or other biometric technology to control access to a circuit. This can be useful for security applications.
14. How Can I Troubleshoot Common Issues with a Three Prong Rocker Switch?
Troubleshooting can help identify and resolve problems quickly, ensuring your electrical systems function correctly.
- Switch Doesn’t Work: If the switch doesn’t seem to be working at all, the first thing to check is the power supply. Make sure that the circuit breaker is turned on and that there is power to the switch.
- Circuit Breaker Trips: If the circuit breaker trips when you turn on the switch, there is likely a short circuit in the wiring. Turn off the power and carefully inspect the wiring for any damaged or exposed wires.
- Switch Gets Hot: If the switch gets hot to the touch, it is likely overloaded. This can happen if the switch is not rated for the current that is flowing through it. Replace the switch with one that has a higher current rating.
- Lights Flicker: If the lights flicker when you turn on the switch, there may be a loose connection in the wiring. Turn off the power and carefully inspect all of the connections to make sure that they are tight.
- Switch is Noisy: If the switch makes a loud buzzing or humming noise when you turn it on, there may be a problem with the switch itself. Replace the switch with a new one.
- LED Indicator Doesn’t Work: If the LED indicator on the switch doesn’t light up, there may be a problem with the LED or with the switch’s internal circuitry. Replace the switch with a new one.
- Switch Sticks: If the switch sticks in one position or is difficult to move, there may be dirt or debris inside the switch. Try cleaning the switch with compressed air or a contact cleaner.
- Switch Breaks: If the switch breaks or becomes damaged, it will need to be replaced. Be sure to turn off the power before replacing the switch.
15. What Are the Code Requirements and Regulations for Wiring a Three Prong Rocker Switch in the USA?
Adhering to electrical codes and regulations is not just a legal requirement, but a critical measure to ensure safety and prevent hazards.
- National Electrical Code (NEC): The NEC is the primary standard for electrical wiring in the United States. It sets forth the minimum requirements for safe electrical installations.
- Local Codes: In addition to the NEC, many states and municipalities have their own electrical codes that may be more stringent than the NEC. Be sure to check with your local authorities to determine the applicable codes in your area.
- Permits: In many jurisdictions, you will need to obtain a permit before performing any electrical work. This is to ensure that the work is done in compliance with the applicable codes.
- Inspections: After the electrical work is completed, it will need to be inspected by a qualified electrical inspector. This is to verify that the work was done correctly and that it meets all of the code requirements.
- Wiring Methods: The NEC specifies the approved wiring methods for different types of electrical installations. Be sure to use the appropriate wiring method for your project.
- Grounding: Grounding is an essential safety measure that helps to prevent electric shock. The NEC has specific requirements for grounding electrical systems.
- Overcurrent Protection: Overcurrent protection devices, such as circuit breakers and fuses, are designed to protect electrical circuits from overloads and short circuits. The NEC has specific requirements for overcurrent protection.
- Wiring Devices: Wiring devices, such as switches and receptacles, must be listed by a recognized testing laboratory, such as UL. This is to ensure that they meet certain safety standards.
16. How Do I Integrate a Three Prong Rocker Switch Into a Landscape Lighting System?
Integrating a three-prong rocker switch into a landscape lighting system offers enhanced control and flexibility, allowing you to create customized lighting effects and zones.
- Zone Control: Use the switch to control different zones of your landscape lighting. For example, one position could turn on all of the lights, while the other position only turns on the accent lights.
- Effect Switching: Use the switch to switch between different lighting effects, such as color-changing lights or twinkling lights.
- Timer Override: Use the switch to override a timer that controls your landscape lighting. This can be useful if you want to turn on the lights manually for a special event.
- Security Lighting: Use the switch to control security lights that are triggered by motion sensors.
- Seasonal Lighting: Use the switch to switch between different seasonal lighting displays, such as Christmas lights or Halloween lights.
- Water Feature Control: Use the switch to control a water feature, such as a fountain or waterfall.
- Pathway Lighting: Use the switch to control pathway lighting, making it easy to turn on the lights when you need to walk around your property at night.
- Accent Lighting: Use the switch to control accent lighting, highlighting specific features of your landscape, such as trees, shrubs, or sculptures.
17. Can I Use a Three Prong Rocker Switch for Low Voltage Applications?
Yes, a three-prong rocker switch can be effectively used in low voltage applications, offering the same versatility as in higher voltage setups, but with specific considerations.
- Wiring a 12V System: One common use for three-prong switches in low-voltage systems is to control different zones or features. For example, in a garden railway layout powered by 12V DC, a three-prong switch can select power to different track sections, isolating areas for maintenance or selectively activating lighting in miniature buildings. The center or “common” terminal of the switch connects to the 12V power source. One of the outer terminals connects to wiring for Zone A (perhaps track section 1 and building lights), and the other outer terminal connects to Zone B (track section 2 and additional accessory lights).
- Controlling an LED Light Array: Another popular low-voltage application is controlling LED lighting, which often runs on 12V or 24V DC. With a three-prong switch, you can select between different LED arrays or brightness levels. The “common” terminal connects to the positive (+) of the 12V power supply. One outer terminal connects to a set of white LEDs, while the other connects to a set of colored LEDs. Depending on the switch position, either the white or colored LEDs will illuminate.
18. How Do I Maintain a Three Prong Rocker Switch to Ensure Longevity?
Proper maintenance can significantly extend the lifespan of your three-prong rocker switches, ensuring reliable performance and preventing costly replacements.
- Regular Cleaning: Dust and debris can accumulate inside the switch, causing it to stick or malfunction. Clean the switch regularly with compressed air or a contact cleaner.
- Check Connections: Loose connections can cause arcing, overheating, and even fires. Check the connections regularly to make sure that they are tight.
- Lubricate the Switch: If the switch is difficult to move, lubricate it with a small amount of silicone grease.
- Protect from Moisture: Moisture can damage the switch and cause it to corrode. Protect the switch from moisture by installing it in a dry location or by using a waterproof enclosure.
- Avoid Overloading: Overloading the switch can cause it to overheat and fail. Make sure that the switch is rated for the current that is flowing through it.
- Replace Damaged Switches: If the switch is damaged, replace it immediately. Damaged switches can be dangerous and can cause fires or electric shock.
- Inspect Regularly: Inspect the switch regularly for any signs of wear or damage. This will help you to identify problems early and prevent them from becoming more serious.
19. What Are Some Creative DIY Projects Using a Three Prong Rocker Switch?
Unleash your creativity with these DIY projects that utilize the versatility of a three-prong rocker switch for unique and functional applications.
- Custom Lighting Controller: Build a custom lighting controller for your desk or workbench. Use the switch to select between different light sources, such as a bright task light and a soft ambient light.
- Model Railroad Control Panel: Create a control panel for your model railroad. Use the switch to control different sections of track, signals, and accessories.
- Remote Control Car: Convert a toy car into a remote control car. Use the switch to control the direction of the car and the speed of the motor.
- Homemade Game Console: Build your own game console. Use the switch to control the player’s movement, actions, and other game functions.
- Interactive Art Installation: Create an interactive art installation. Use the switch to control different elements of the installation, such as lights, sounds, or moving parts.
- Automated Plant Watering System: Build an automated plant watering system. Use the switch to control the pump and the water flow.
- Custom Guitar Effects Pedal: Build a custom guitar effects pedal. Use the switch to select between different effects or to turn the effects on and off.
- Solar-Powered Charger: Build a solar-powered charger for your phone or other devices. Use the switch to select between different charging modes or to turn the charger on and off.
20. Where Can I Find More Resources and Expert Advice on Wiring and Landscape Design?
For more in-depth information and expert advice, several reliable resources can guide you in your wiring and landscape design endeavors.
- Rockscapes.net: Rockscapes.net provides information and resources for using stone in landscape design. Explore our site for design ideas, stone selection guides, and tips for installing stone features.
- Address: 1151 S Forest Ave, Tempe, AZ 85281, United States
- Phone: +1 (480) 965-9011
Wiring a three-prong rocker switch offers numerous possibilities for controlling electrical circuits in both simple and complex applications. Whether you’re managing landscape lighting, creating custom controls, or exploring DIY projects, understanding the principles and safety measures is essential. Remember to visit rockscapes.net for more inspiration and resources to enhance your landscape and design projects with the beauty and versatility of natural stone.
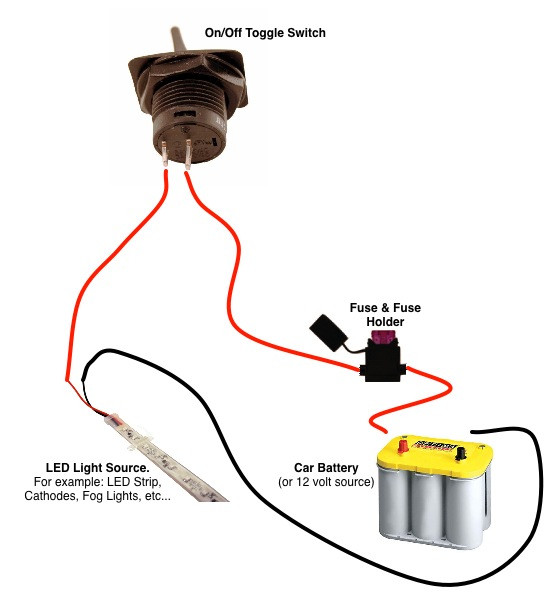 Three-prong rocker switch wiring diagram
Proper connection to oznium’s rocker switches to any 12 volt source.
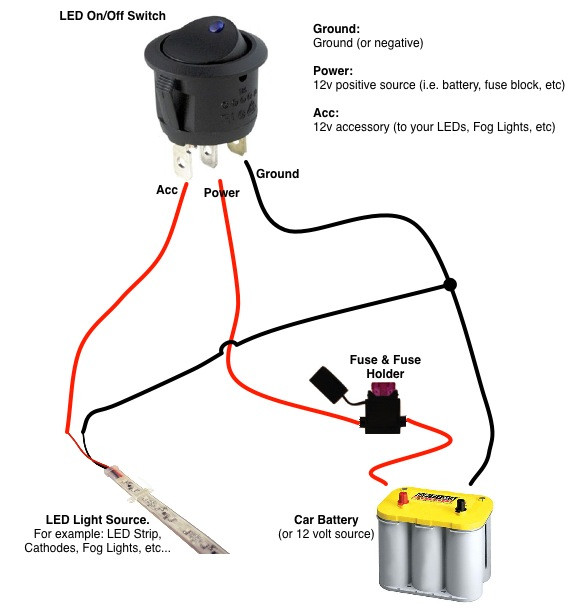 LED rocker switch wiring diagram
Connection diagrams for LED round rocker switch from Oznium.
FAQ About Wiring Three-Prong Rocker Switches
1. What is the primary function of a three-prong rocker switch?
A three-prong rocker switch controls electrical flow with an on/off function and switching between circuits.
2. What are the main advantages of using a three-prong rocker switch over a two-prong?
Three-prong switches offer enhanced control and versatility, allowing users to switch between two different circuits from one point.
3. What safety measure should be taken before I begin the wiring process?
The most important safety precaution is to turn off power to the circuit at the breaker and verify it is off with a voltage tester.
4. How do I properly identify the terminals on a three-prong rocker switch?
Terminals are typically marked; the common terminal connects to the power source, and the others are for separate circuits.
5. What are the common mistakes to avoid when installing a three-prong rocker switch?
Common mistakes include not turning off power, misidentifying wires, and not securing connections properly.
6. How can I test the switch’s wiring after installation to ensure it works safely?
Test the switch by performing a visual inspection and using a multimeter.
7. What are the more advanced applications for a three-prong rocker switch in electrical systems?
Advanced applications include motor reversing, dimming control, and multi-speed fan control, among others.
8. What factors should influence my decision when selecting a three-prong rocker switch for a specific project?
Consider voltage, current rating, switch type, mounting style, and environmental conditions.
9. How does the environment affect which three-prong rocker switch I use, and the way I install it?
In moist environments, use a switch rated for wet locations; for extreme temperatures, select a switch designed to withstand them.
10. Are there any new technologies available for three-prong rocker switches that make them more efficient or easier to use?
Innovations include smart switches, LED indicators, touch-sensitive switches, and wireless options that enhance functionality.