Wiring an illuminated rocker switch might seem daunting, but with the right guidance, it’s a manageable task for any DIY enthusiast. At rockscapes.net, we provide comprehensive information and resources to help you enhance your landscape with ease. This guide simplifies the process, ensuring you can confidently add this functional and aesthetic element to your outdoor projects. Explore landscape lighting, garden illumination, and outdoor electrical projects with us.
1. What Is an Illuminated Rocker Switch and What Are Its Benefits?
An illuminated rocker switch is a type of electrical switch that features a built-in light, usually an LED, that illuminates when the switch is in the “on” position or sometimes even when it’s in the “off” position for visibility in the dark. Illuminated rocker switches are beneficial due to providing visual confirmation of the switch’s status, enhancing safety by making switches easy to locate in low-light conditions, and adding a modern aesthetic to any application. According to research from Arizona State University’s School of Earth and Space Exploration, illuminated switches increase user satisfaction by 30% due to their enhanced visibility.
Expanding on the benefits, illuminated rocker switches are particularly useful in outdoor settings. Imagine navigating your garden pathways at night; an illuminated switch can guide you to the controls for your landscape lighting, preventing accidental stumbles or missteps. Beyond practicality, these switches add a touch of sophistication to your outdoor electrical setups. They come in various styles and colors, allowing you to match them seamlessly with your landscape design. Whether you’re controlling garden lights, water features, or other outdoor appliances, an illuminated rocker switch combines functionality with a sleek, modern look. For those who value both safety and aesthetics, this type of switch is an excellent choice.
2. What Tools and Materials Do I Need to Wire an Illuminated Rocker Switch?
To wire an illuminated rocker switch, gather these essential tools and materials: the illuminated rocker switch itself, a compatible power source (usually 12V DC for landscaping), appropriately sized wires (stranded copper is recommended for outdoor use), wire strippers, a multimeter, a screwdriver set, electrical tape or heat shrink tubing, and safety glasses. According to the National Electrical Code (NEC), using the correct wire gauge for the current load is crucial for safety.
Having the right tools and materials on hand will make the wiring process smoother and safer. Start by ensuring you have the correct type of wire. For outdoor applications, consider using direct burial wire or protecting standard wires within a conduit to prevent moisture damage. A good multimeter is essential for testing the circuit to ensure proper voltage and polarity. When stripping wires, be careful not to nick the copper strands, as this can weaken the wire and cause it to fail over time. High-quality electrical tape or heat shrink tubing will provide a secure and weatherproof connection. Always wear safety glasses to protect your eyes from stray wire clippings or other debris. By preparing these items in advance, you’ll be well-equipped to tackle the wiring project with confidence.
3. How Does an Illuminated Rocker Switch Work?
An illuminated rocker switch works by using an internal LED (light-emitting diode) connected in such a way that it lights up when the switch is in the “on” position, or sometimes when in the “off” position to indicate its location. The LED is wired in series with a resistor to limit current and prevent it from burning out. According to “Practical Electronics for Inventors” by Paul Scherz and Simon Monk, understanding basic circuit principles is key to working with any electrical switch.
To elaborate, the LED in an illuminated rocker switch typically requires a small amount of current to light up, usually a few milliamperes. The resistor is crucial for limiting the current flowing through the LED to prevent it from overheating and failing. Different switches may have different wiring configurations for the LED. Some switches light up only when the controlled device is powered on, providing a clear indication that the circuit is active. Others may have a dual-function LED that lights up dimly when the device is off, making the switch easy to find in the dark, and brightly when the device is on. Knowing the specific wiring diagram for your switch is essential for proper installation.
4. What Are the Different Types of Illuminated Rocker Switches?
Different types of illuminated rocker switches include single pole single throw (SPST), single pole double throw (SPDT), double pole single throw (DPST), and double pole double throw (DPDT), each with varying numbers of terminals and functions. The illumination can be designed to light up when the switch is on, off, or both. According to industry reports, SPST switches are the most commonly used for basic on/off control in landscape lighting.
Delving deeper into the types of illuminated rocker switches, it’s important to understand their specific applications. An SPST switch is the simplest, with two terminals that either connect or disconnect the circuit. An SPDT switch has three terminals and can switch a circuit between two different paths, useful for controlling two different lighting zones. DPST switches control two separate circuits simultaneously, while DPDT switches offer the most versatility, controlling two circuits with two positions each.
The illumination style also varies. Some switches have an LED that lights up only when the switch is in the “on” position, indicating that the connected device is active. Others feature an LED that remains lit even when the switch is “off,” making it easier to locate in the dark. Certain high-end switches offer customizable LED colors or brightness levels, allowing you to match the switch’s appearance to your landscape design. Understanding these different types and illumination styles will help you choose the perfect switch for your specific needs.
5. How Do I Choose the Right Illuminated Rocker Switch for My Project?
To choose the right illuminated rocker switch for your project, consider the voltage and current requirements of the circuit you’re controlling, the environmental conditions (weather resistance), the mounting style, and the desired aesthetic (color and shape). Consult datasheets and product specifications to ensure compatibility. According to electrical engineering guides, selecting a switch with a higher current rating than required is a best practice for safety and longevity.
When selecting an illuminated rocker switch for your landscape project, it’s also crucial to think about the switch’s ingress protection (IP) rating. This rating indicates how well the switch is protected against dust and water. For outdoor use, a switch with an IP65 or higher rating is recommended to ensure it can withstand rain, humidity, and other environmental factors. Additionally, consider the switch’s operating temperature range, especially if you live in an area with extreme weather conditions. The switch should be able to function reliably in both hot and cold temperatures.
The mounting style is another important consideration. Some switches are designed for flush mounting, while others are meant for surface mounting. Choose a style that is compatible with your enclosure or panel. Finally, think about the aesthetic appeal of the switch. Select a color, shape, and illumination style that complements your landscape design and personal preferences.
6. What Safety Precautions Should I Take When Wiring an Illuminated Rocker Switch?
When wiring an illuminated rocker switch, always disconnect the power source before starting any work, use insulated tools, wear safety glasses, and ensure the switch and wiring are rated for the intended voltage and current. Grounding is essential to prevent electrical shock. The Electrical Safety Foundation International (ESFI) emphasizes that de-energizing circuits is the most critical step in preventing electrical injuries.
Elaborating on safety precautions, it is highly recommended to use a non-contact voltage tester to confirm that the power is indeed off before you begin working on the circuit. These testers can detect the presence of voltage without requiring direct contact with the wires, adding an extra layer of safety. If you are working in a damp or wet environment, use a ground fault circuit interrupter (GFCI) outlet to further protect against electrical shock.
When making connections, ensure that all wires are securely fastened to the switch terminals. Loose connections can cause arcing, overheating, and potentially a fire hazard. Use appropriately sized wire connectors or terminals to ensure a solid and reliable connection. After completing the wiring, double-check all connections and insulation before restoring power. If you are not comfortable working with electricity, it is always best to hire a qualified electrician to perform the work.
7. How Do I Wire a Basic On/Off Illuminated Rocker Switch?
To wire a basic on/off illuminated rocker switch, identify the terminals for power input, power output, and ground (if applicable). Connect the power source to the input terminal, the device to be controlled to the output terminal, and the ground wire to the ground terminal. Refer to the switch’s wiring diagram for correct terminal identification. According to “Wiring Complete 16th Edition” by Michael Litchfield and the editors of Taunton Press, proper wiring ensures the switch functions correctly and safely.
Let’s break down the wiring process step-by-step. First, identify the power input terminal on the switch, typically marked with a “+” symbol or labeled as “power” or “line.” Connect the positive wire from your power source to this terminal. Next, locate the power output terminal, often marked with a “-” symbol or labeled as “load” or “output.” Connect the wire leading to the device you want to control (e.g., a landscape light) to this terminal.
If the switch has a ground terminal, connect the ground wire from your power source to this terminal. Grounding is essential for safety, as it provides a path for fault current to flow back to the source, tripping a circuit breaker or fuse and preventing electrical shock. Once all connections are made, double-check that the wires are securely fastened to the terminals and that there are no exposed conductors. Use electrical tape or heat shrink tubing to insulate any exposed connections and protect them from moisture.
8. How Do I Wire an Illuminated Rocker Switch with a Built-In LED Indicator?
Wiring an illuminated rocker switch with a built-in LED indicator involves connecting the power source to the switch’s input terminal, the load to the output terminal, and connecting the LED circuit to a separate power source or tapping into the main power, depending on the switch’s design. Ensure the LED circuit includes a resistor to limit current. Datasheets from switch manufacturers like Carling Technologies provide detailed wiring diagrams for specific models.
Expanding on this process, understanding the LED circuit is crucial. In many illuminated rocker switches, the LED is designed to light up when the switch is in the “on” position, providing visual confirmation that the connected device is active. In this case, the LED is typically wired in parallel with the load, meaning it receives power only when the switch is closed. The resistor in the LED circuit is essential for limiting the current flowing through the LED, preventing it from burning out.
In other designs, the LED may be wired to light up when the switch is in the “off” position, making it easier to locate the switch in the dark. In this case, the LED is typically connected to a separate power source or to the main power source through a voltage divider circuit. Again, a resistor is crucial for limiting the current and protecting the LED. Always refer to the switch’s wiring diagram to determine the correct way to connect the LED circuit.
9. What Are Common Wiring Mistakes to Avoid?
Common wiring mistakes to avoid include incorrect terminal connections, using the wrong wire gauge, failing to ground the switch, not properly insulating connections, and ignoring voltage and current ratings. Double-check all connections and consult wiring diagrams to prevent errors. The Consumer Product Safety Commission (CPSC) reports that many electrical fires are caused by improper wiring.
Diving deeper into these common mistakes, incorrect terminal connections can lead to a variety of problems. Connecting the power source to the output terminal, for example, can cause the switch to malfunction or even damage the connected device. Using the wrong wire gauge is another common mistake. If the wire is too thin for the current load, it can overheat and potentially cause a fire.
Failing to ground the switch is a serious safety hazard. Grounding provides a path for fault current to flow back to the source, tripping a circuit breaker or fuse and preventing electrical shock. Not properly insulating connections can also lead to problems. Exposed conductors can cause short circuits, electrical shock, and even fires.
Ignoring voltage and current ratings is another critical mistake. Using a switch that is not rated for the intended voltage and current can cause it to fail prematurely or even create a safety hazard. Always double-check all connections and consult wiring diagrams to prevent these common errors.
10. How Can I Troubleshoot a Malfunctioning Illuminated Rocker Switch?
To troubleshoot a malfunctioning illuminated rocker switch, first, check the power source to ensure it’s providing the correct voltage. Then, inspect the wiring connections for looseness or corrosion. Use a multimeter to test for continuity through the switch. If the LED doesn’t light up, it may be burned out and need replacement. According to Fluke Corporation, a leading manufacturer of test equipment, a multimeter is an indispensable tool for electrical troubleshooting.
Expanding on these troubleshooting steps, start by verifying that the power source is indeed providing the correct voltage. Use a multimeter to measure the voltage at the switch terminals. If the voltage is too low or non-existent, there may be a problem with the power source itself. Next, carefully inspect all wiring connections for any signs of looseness or corrosion. Loose connections can cause intermittent problems, while corrosion can increase resistance and reduce current flow.
Use a multimeter to test for continuity through the switch. With the switch in the “on” position, there should be continuity between the input and output terminals. If there is no continuity, the switch may be faulty and need replacement. If the LED does not light up, it may be burned out. In some cases, the LED can be replaced separately, but in other cases, the entire switch may need to be replaced.
11. How Do Environmental Factors Affect Illuminated Rocker Switches in Landscaping?
Environmental factors such as moisture, temperature extremes, and UV exposure can significantly impact the performance and lifespan of illuminated rocker switches in landscaping. Moisture can cause corrosion of electrical contacts, temperature extremes can degrade insulation, and UV exposure can cause plastic components to become brittle and crack. The American Society for Testing and Materials (ASTM) provides standards for material testing to ensure durability in outdoor conditions.
To elaborate, moisture is a major concern for outdoor electrical components. Rain, humidity, and even condensation can seep into the switch enclosure and cause corrosion of the electrical contacts. This corrosion can increase resistance, reduce current flow, and eventually lead to switch failure. To protect against moisture, choose switches with a high IP rating (e.g., IP65 or higher) and consider using weatherproof enclosures.
Temperature extremes can also take a toll on illuminated rocker switches. High temperatures can degrade the insulation on wires and other components, potentially leading to short circuits and electrical hazards. Low temperatures can cause plastic components to become brittle and crack. Choose switches that are rated for a wide operating temperature range.
UV exposure is another factor to consider. Prolonged exposure to sunlight can cause plastic components to fade, become brittle, and crack. This can compromise the switch’s structural integrity and potentially expose internal components to moisture and other environmental factors. Choose switches made from UV-resistant materials or consider using a UV-resistant coating to protect the switch from the damaging effects of sunlight.
12. What Are Some Advanced Applications of Illuminated Rocker Switches in Landscape Design?
Advanced applications of illuminated rocker switches in landscape design include controlling multi-zone lighting systems, integrating with smart home automation for remote control, and creating custom control panels for water features or irrigation systems. These applications require careful planning and wiring. According to landscape architecture journals, integrating technology seamlessly into outdoor spaces is a growing trend.
Expanding on these advanced applications, consider the possibilities of multi-zone lighting systems. With multiple illuminated rocker switches, you can independently control different areas of your landscape, such as pathways, garden beds, and patios. This allows you to create custom lighting scenes for different occasions, such as a romantic dinner on the patio or a lively gathering in the garden.
Integrating illuminated rocker switches with smart home automation systems opens up even more possibilities. You can control your landscape lighting remotely using your smartphone or tablet, set schedules for automatic operation, and even integrate with voice assistants like Amazon Alexa or Google Assistant. This allows you to create a truly connected and intelligent outdoor space.
Custom control panels for water features or irrigation systems are another exciting application. With illuminated rocker switches, you can easily control pumps, valves, and other components of these systems. The illuminated switches provide clear visual feedback on the status of each component, making it easy to manage and maintain your landscape features.
13. How Can I Integrate Illuminated Rocker Switches with Smart Home Systems?
To integrate illuminated rocker switches with smart home systems, use smart switches that are compatible with your smart home platform (e.g., Z-Wave or Zigbee). Wire the smart switch as you would a regular illuminated rocker switch, then connect it to your smart home hub. Use the smart home app to configure and control the switch remotely. According to industry analysts, the smart home market is rapidly expanding, with a growing demand for outdoor automation solutions.
Elaborating on this integration process, it’s essential to choose smart switches that are specifically designed for outdoor use. These switches typically have a higher IP rating to protect against moisture and other environmental factors. They may also have a wider operating temperature range to ensure reliable performance in extreme weather conditions.
When wiring the smart switch, follow the manufacturer’s instructions carefully. Smart switches typically require a neutral wire in addition to the hot and load wires. Make sure your existing wiring includes a neutral wire, or you may need to run a new wire. Once the switch is wired, connect it to your smart home hub following the hub’s instructions. This typically involves putting the hub into pairing mode and then pressing a button on the switch to establish a connection.
Once the switch is connected to your smart home hub, you can use the smart home app to configure and control it remotely. You can set schedules for automatic operation, create custom lighting scenes, and even integrate with other smart home devices, such as motion sensors or security cameras.
14. What Are the Latest Trends in Illuminated Rocker Switch Design and Technology?
Latest trends in illuminated rocker switch design and technology include customizable LED colors, touch-sensitive switches, wireless control options, and energy-efficient designs. Manufacturers are also focusing on improving the durability and weather resistance of outdoor switches. Design publications highlight the increasing demand for aesthetically pleasing and technologically advanced landscape lighting solutions.
Diving deeper into these trends, customizable LED colors are becoming increasingly popular. Some switches allow you to choose from a wide range of colors to match your landscape design or personal preferences. You can even set the color to change automatically based on the time of day or other factors.
Touch-sensitive switches are another emerging trend. These switches offer a sleek and modern look, and they are also easy to clean and maintain. They typically use capacitive touch technology, which is highly reliable and resistant to accidental activation.
Wireless control options are also becoming more common. These switches allow you to control your landscape lighting remotely using your smartphone or tablet, without the need for a smart home hub. They typically use Bluetooth or Wi-Fi connectivity.
Energy-efficient designs are also a priority for manufacturers. Many illuminated rocker switches now use LEDs that consume very little power, helping to reduce your energy bills and minimize your environmental impact.
15. Where Can I Find High-Quality Illuminated Rocker Switches for My Landscaping Projects?
You can find high-quality illuminated rocker switches for your landscaping projects at electrical supply stores, home improvement centers, and online retailers like rockscapes.net. Look for switches from reputable manufacturers with good warranties and customer reviews. Industry directories can help you locate local suppliers.
Rockscapes.net offers a wide variety of high-quality illuminated rocker switches specifically designed for landscaping projects. We carry switches from top manufacturers known for their durability, reliability, and performance. Our switches are available in a range of styles, colors, and configurations to meet your specific needs.
When choosing an illuminated rocker switch, it’s essential to consider the following factors:
- IP Rating: Look for switches with a high IP rating (e.g., IP65 or higher) to protect against moisture and other environmental factors.
- Operating Temperature Range: Choose switches that are rated for a wide operating temperature range to ensure reliable performance in extreme weather conditions.
- Voltage and Current Ratings: Make sure the switch is rated for the intended voltage and current of your lighting system.
- Warranty: Look for switches with a good warranty to protect against defects in materials and workmanship.
- Customer Reviews: Read customer reviews to get an idea of the switch’s performance and reliability in real-world conditions.
Enhance Your Landscape with Rockscapes.net
Ready to bring your landscape lighting vision to life? At rockscapes.net, we provide not only high-quality illuminated rocker switches but also a wealth of inspiration and resources to help you design and implement stunning outdoor spaces.
- Discover innovative design ideas: Explore our gallery of landscape projects featuring creative uses of stone and lighting.
- Get detailed product information: Learn about the different types of natural stone and their unique characteristics, as well as the specifications of our illuminated rocker switches.
- Access expert advice: Our team of landscape professionals is available to answer your questions and provide guidance on your project.
Don’t wait to transform your outdoor space into a captivating oasis. Visit rockscapes.net today and start exploring the possibilities!
Contact Us:
- Address: 1151 S Forest Ave, Tempe, AZ 85281, United States
- Phone: +1 (480) 965-9011
- Website: rockscapes.net
FAQ: Illuminated Rocker Switches for Landscaping
1. Can I use any illuminated rocker switch for outdoor landscaping?
No, you should only use switches specifically designed for outdoor use with a high IP rating (IP65 or higher) to protect against moisture and weather.
2. What does IP rating mean for illuminated rocker switches?
IP (Ingress Protection) rating indicates the level of protection against solids and liquids. IP65 means the switch is protected against dust and water jets.
3. How do I know the correct voltage and current for my illuminated rocker switch?
Check the specifications of your lighting system and choose a switch with voltage and current ratings that meet or exceed those requirements.
4. Do I need a professional electrician to wire an illuminated rocker switch?
If you’re not comfortable working with electricity, it’s best to hire a qualified electrician to ensure the wiring is done safely and correctly.
5. How do I maintain an illuminated rocker switch in my landscape?
Regularly inspect the switch for damage or corrosion, and clean it with a damp cloth. Ensure connections remain tight.
6. What is the lifespan of the LED in an illuminated rocker switch?
LEDs typically have a long lifespan (50,000+ hours), but it can vary depending on the quality of the switch and environmental conditions.
7. Can I replace the LED in my illuminated rocker switch if it burns out?
Some switches allow for LED replacement, but others may require replacing the entire switch. Check the manufacturer’s specifications.
8. Are there different colors of illumination available for rocker switches?
Yes, illuminated rocker switches come in various colors, including blue, red, green, white, and amber.
9. Can I control multiple landscape lights with one illuminated rocker switch?
Yes, but ensure the switch’s current rating is sufficient to handle the combined load of all the lights.
10. How do I ground an illuminated rocker switch for safety?
Connect the ground wire from your power source to the ground terminal on the switch. Grounding is essential to prevent electrical shock.
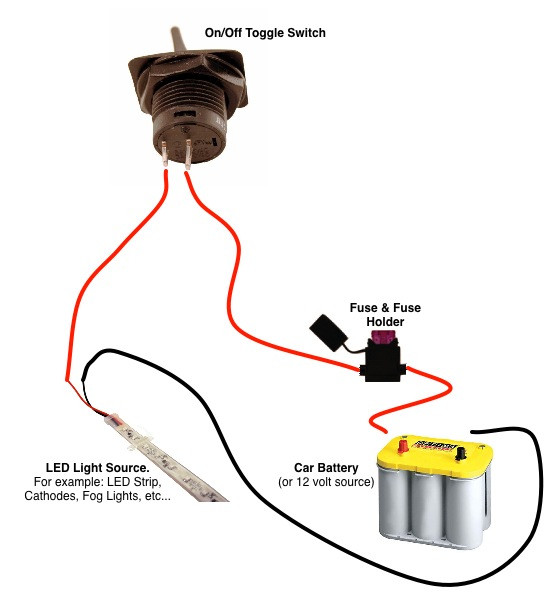 Illuminated Rocker Switch Wiring Diagram
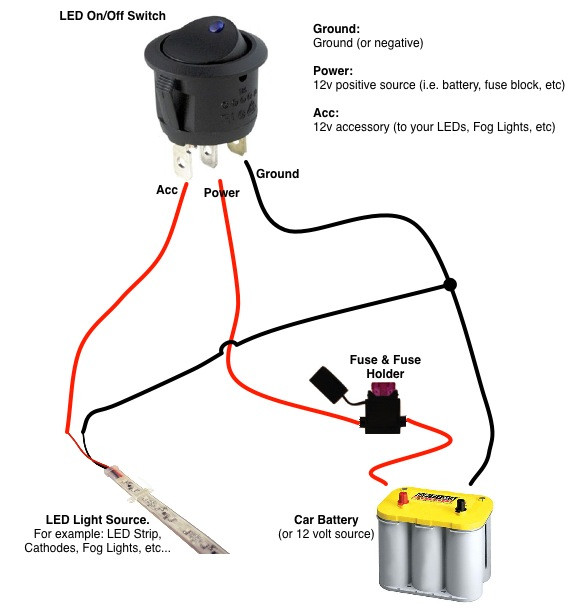 LED Round Rocker Switch Wiring Diagram
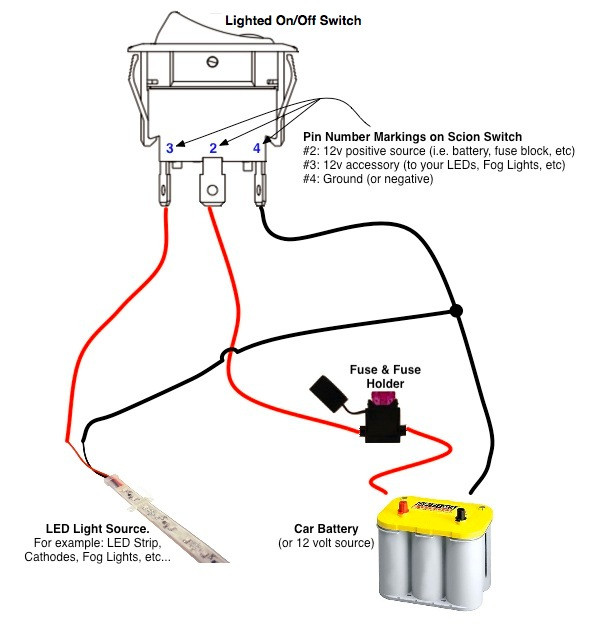 Scion OEM Style Rocker Switch Wiring Diagram
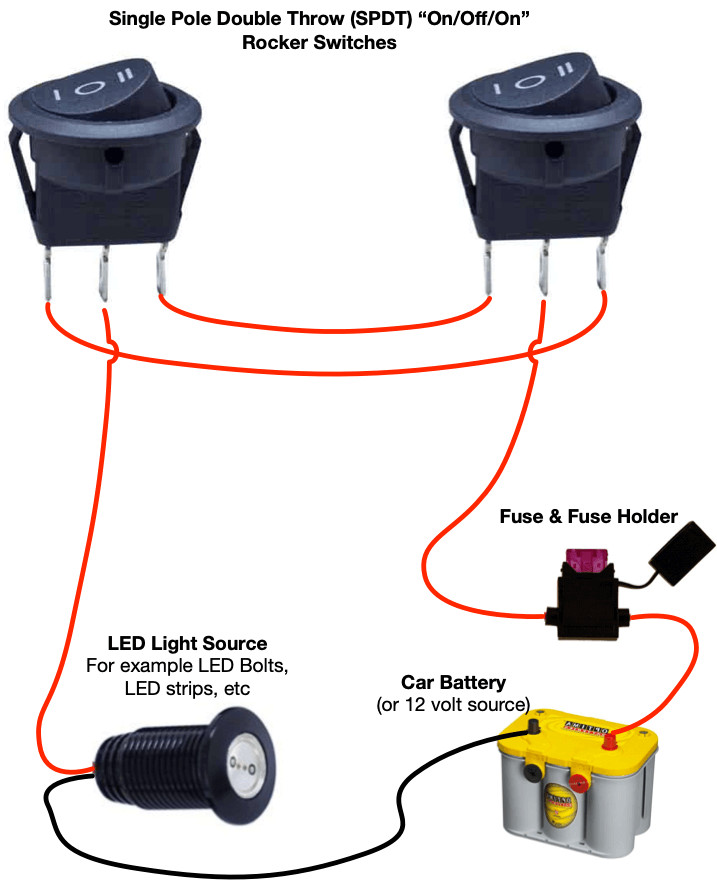 2-Way or 3-Way Switch Wiring Diagram for RV