Wrapping a rock in wire is an artful technique that combines the beauty of natural stones with the intricate designs crafted from wire. At rockscapes.net, we’re passionate about helping you discover the endless possibilities of incorporating rocks into your life, whether it’s for creating stunning jewelry or adding a unique touch to your landscape. This guide will walk you through the steps of wire wrapping a rock, enhancing its natural allure and transforming it into a wearable piece of art or a decorative accent for your home.
1. Understanding the Art of Wire Wrapping Rocks
Wire wrapping rocks involves securing a stone within a framework of wire, creating a cage-like structure that both protects and showcases the rock’s unique characteristics. This technique is not only aesthetically pleasing but also allows for a personal connection with the earth’s natural elements.
1.1. What is Wire Wrapping?
Wire wrapping is a jewelry-making technique that uses wire to create structures and designs, often incorporating beads, stones, or other decorative elements. It involves bending, twisting, and shaping wire to form intricate patterns and secure the focal piece.
1.2. Why Wrap a Rock in Wire?
Wrapping a rock in wire offers several benefits:
- Enhances Natural Beauty: Highlights the unique color, texture, and shape of the rock.
- Creates Wearable Art: Transforms ordinary rocks into stunning pendants, earrings, or other jewelry pieces.
- Adds Personal Touch: Allows for creative expression through various wire wrapping styles and designs.
- Provides Protection: Secures fragile stones, preventing damage and ensuring longevity.
- Versatile Decoration: Turns rocks into decorative items for home, garden, or special events.
2. Identifying Your Search Intent
Before diving into the process, let’s address the core intentions behind the search query “How To Wrap A Rock In Wire”:
- DIY Jewelry Making: Users want to learn how to create their own wire-wrapped rock pendants or jewelry.
- Craft Projects: Individuals are seeking instructions for a unique and engaging craft project using rocks and wire.
- Stone Protection: Some may be looking for a way to protect a precious or sentimental stone by encasing it in wire.
- Decorative Purposes: Users aim to create decorative items for their home or garden using wire-wrapped rocks.
- Selling Crafts: Some might want to learn the skill to create and sell wire-wrapped rock jewelry or decorative items.
3. Gathering Your Materials and Tools
To get started with wire wrapping rocks, you’ll need to gather the following materials and tools:
3.1. Essential Materials
- Rocks: Select rocks with interesting shapes, colors, and textures. Tumbled stones are ideal for beginners due to their smooth surfaces.
- Wire: Choose a flexible, malleable wire that is easy to work with. Copper, silver, and gold-filled wires are popular choices.
- Beads (Optional): Add beads for extra embellishment and visual interest.
3.2. Essential Tools
- Wire Cutters: For cutting the wire to the desired length.
- Round Nose Pliers: For creating loops and curves in the wire.
- Chain Nose Pliers: For gripping, bending, and manipulating the wire.
- Nylon Jaw Pliers (Optional): For straightening wire without scratching it.
- Ruler or Measuring Tape: To measure wire length accurately.
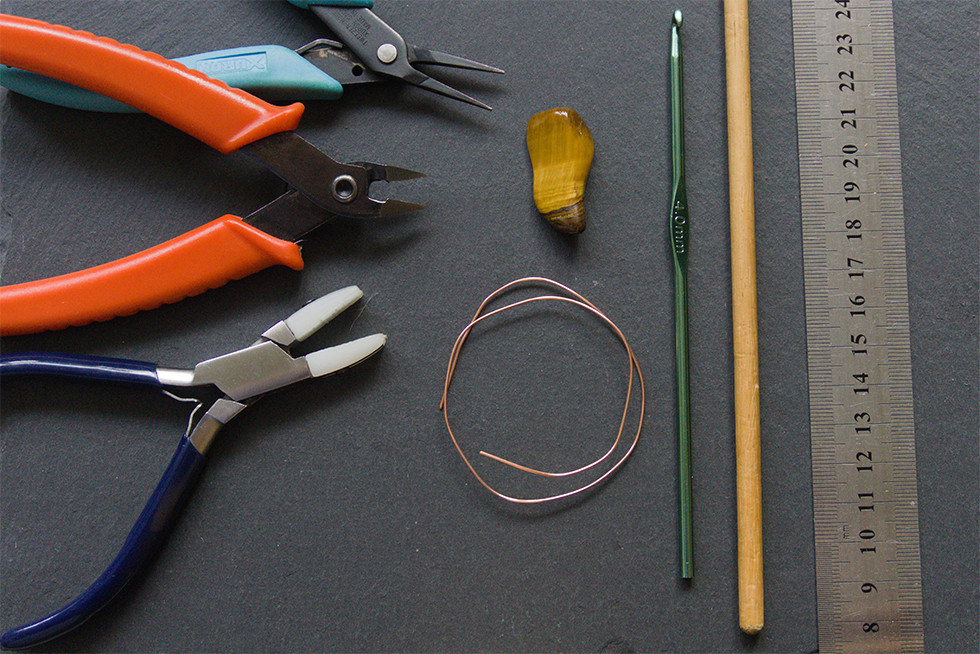
 Tools and materials for wire wrapping, including pliers, wire, and various stones
3.3. Choosing the Right Rock
The type of rock you choose will significantly impact the final outcome of your wire-wrapped piece. Here’s what to consider:
- Shape: Opt for rocks with interesting shapes and contours that will enhance the design.
- Size: Select a rock that is comfortable to hold and work with. Smaller rocks are easier for beginners.
- Texture: Smooth, polished rocks are ideal for wire wrapping as they provide a clean and refined look.
- Durability: Choose a sturdy rock that won’t easily break or crumble during the wrapping process.
According to research from Arizona State University’s School of Earth and Space Exploration, the hardness and durability of the rock significantly affect its suitability for crafting and wire wrapping.
3.4. Selecting the Appropriate Wire
The type of wire you choose will affect the appearance, durability, and overall quality of your wire-wrapped rock. Here are the key factors to consider:
- Material: Common wire materials include copper, silver, gold, and brass. Each material offers a unique aesthetic and level of durability.
- Gauge: Wire gauge refers to the thickness of the wire. Thicker gauges (e.g., 18-20 gauge) are sturdier and ideal for structural elements, while thinner gauges (e.g., 24-28 gauge) are more flexible and suitable for intricate designs.
- Temper: Wire temper refers to its hardness or softness. Dead soft wire is the most malleable and easiest to work with, while half-hard wire is more rigid and holds its shape better.
- Color: Choose a wire color that complements the rock’s natural tones. Copper wire enhances warm-toned rocks, while silver wire complements cool-toned stones.
3.5. Essential Tools for Rock Wire Wrapping
Having the right tools can make the wire-wrapping process easier and more enjoyable. Here’s a list of must-have tools:
| Tool | Description | Purpose |
|---|---|---|
| Wire Cutters | Sharp blades for precise wire cutting. | Trimming excess wire and creating clean ends. |
| Round Nose Pliers | Conical jaws for creating consistent loops and curves. | Forming loops for connecting wire segments and adding decorative elements. |
| Chain Nose Pliers | Flat, smooth jaws for gripping and manipulating wire. | Bending wire, closing loops, and securing wire ends. |
| Nylon Jaw Pliers | Jaws covered in nylon to prevent scratching the wire. | Straightening and shaping wire without causing damage. |
| Ruler/Measuring Tape | Accurate measuring for consistent wire lengths. | Ensuring precise wire lengths for symmetrical designs and accurate sizing. |
4. Basic Wire Wrapping Techniques
Before you start wrapping your rock, it’s essential to learn some basic wire wrapping techniques. These techniques will form the foundation of your designs and allow you to create intricate and visually appealing wire-wrapped pieces.
4.1. The Coiling Technique
The coiling technique involves wrapping wire tightly around another wire to create a decorative coil. This technique can be used to add texture, create focal points, or secure wire segments.
Step-by-Step Guide:
- Cut a length of wire for the base wire and another shorter length for the coiling wire.
- Hold the base wire and begin wrapping the coiling wire tightly around it, creating a spiral effect.
- Continue coiling until you reach the desired length, then secure the end by tucking it under the last coil.
- Use chain nose pliers to tighten and adjust the coils as needed.
4.2. The Wrapping Technique
The wrapping technique involves wrapping wire around a stone or object to secure it in place. This technique is commonly used to create bezels or cages that hold the stone securely.
Step-by-Step Guide:
- Cut a length of wire long enough to wrap around the stone several times.
- Position the stone in the center of the wire and begin wrapping the wire around it, overlapping each wrap slightly.
- Continue wrapping until the stone is securely held in place, then twist the wire ends together to secure the wrap.
- Use chain nose pliers to tighten and adjust the wraps as needed.
4.3. The Twisting Technique
The twisting technique involves twisting two or more wires together to create a decorative element or add strength to a wire segment.
Step-by-Step Guide:
- Cut two or more lengths of wire to the desired length.
- Hold the wires together at one end and begin twisting them tightly, creating a spiral effect.
- Continue twisting until you reach the desired length, then secure the ends by bending them back or wrapping them around the twisted segment.
- Use chain nose pliers to adjust the twists as needed.
4.4. The Weaving Technique
The weaving technique involves interlacing wire strands to create intricate patterns and textures. This technique can be used to add visual interest to wire-wrapped pieces or to create decorative elements.
Step-by-Step Guide:
- Create a framework of vertical wires to serve as the base for your weaving.
- Cut a length of wire for the weaving wire and begin interlacing it horizontally through the vertical wires, alternating over and under each wire.
- Continue weaving until you reach the desired height, then secure the ends by tucking them under the woven strands.
- Use chain nose pliers to adjust the woven strands as needed.
5. Step-by-Step Guide to Wire Wrapping a Rock
Now that you have gathered your materials, tools, and knowledge of basic techniques, let’s dive into the step-by-step guide to wire wrapping a rock:
5.1. Preparing the Rock
- Clean the Rock: Use a soft cloth to remove any dirt or debris from the rock’s surface.
- Assess the Rock: Examine the rock to determine the best way to position it within the wire wrap.
5.2. Creating the Base Wrap
- Measure the Wire: Cut a length of wire approximately three times the circumference of the rock.
- Center the Rock: Place the rock in the center of the wire and bring the two ends together.
- Wrap the Wire: Wrap the wire around the rock, ensuring it is snug but not too tight. Leave enough space to allow for adjustments.
5.3. Securing the Rock
- Twist the Ends: Twist the two wire ends together at the top of the rock to secure the base wrap.
- Adjust the Wrap: Use chain nose pliers to tighten and adjust the wire, ensuring the rock is securely held in place.
5.4. Adding Decorative Elements
- Cut Additional Wire: Cut additional lengths of wire for adding decorative elements.
- Create Coils: Use round nose pliers to create coils and spirals with the wire.
- Attach Coils: Attach the coils to the base wrap using the wrapping technique.
- Add Beads (Optional): Incorporate beads into the wire wrap for added embellishment.
5.5. Finishing Touches
- Trim Excess Wire: Use wire cutters to trim any excess wire.
- Tuck in Ends: Use chain nose pliers to tuck in any sharp wire ends to prevent snagging or scratching.
- Polish the Wire: Use a polishing cloth to polish the wire and enhance its shine.
6. Advanced Wire Wrapping Techniques
Once you’ve mastered the basic wire wrapping techniques, you can explore more advanced techniques to create intricate and visually stunning designs.
6.1. Creating a Wire-Wrapped Bezel
A bezel is a metal rim or groove that holds a stone in place. Wire-wrapped bezels offer a unique and artistic way to showcase your rocks.
Step-by-Step Guide:
- Measure the circumference of the rock and cut a length of wire slightly longer than the measurement.
- Form the wire into a circle that closely fits the rock, leaving a small gap.
- Use the coiling technique to create a decorative coil along the wire circle.
- Position the bezel around the rock and use the wrapping technique to secure it in place.
- Add additional wire strands to create a cage-like structure that holds the rock securely within the bezel.
6.2. Adding Wire-Wrapped Accents
Wire-wrapped accents can add visual interest and depth to your designs. Here are some ideas for creating wire-wrapped accents:
- Wire-Wrapped Flowers: Create delicate wire flowers to add a touch of femininity to your designs.
- Wire-Wrapped Leaves: Craft realistic wire leaves to add a natural and organic element.
- Wire-Wrapped Spirals: Incorporate wire spirals to add movement and energy to your designs.
6.3. Incorporating Multiple Stones
Incorporating multiple stones into your wire-wrapped designs can create a visually striking and complex piece. Here are some tips for working with multiple stones:
- Choose Complementary Stones: Select stones that complement each other in color, shape, and texture.
- Create a Balanced Design: Arrange the stones in a balanced and harmonious composition.
- Use Wire to Connect Stones: Use wire to connect the stones, creating a cohesive and unified design.
7. Troubleshooting Common Wire Wrapping Issues
Even experienced wire wrappers encounter occasional issues. Here are some common problems and how to solve them:
| Issue | Solution |
|---|---|
| Wire Breaks | Use a thicker gauge wire or anneal the wire to make it more flexible. |
| Wire Scratches | Use nylon jaw pliers to protect the wire from scratches. |
| Rock Is Not Secure | Tighten the wire wraps or add additional wire strands to secure the rock in place. |
| Design Looks Messy | Practice consistent wire wrapping techniques and take your time to create clean and precise wraps. |
8. Caring for Your Wire-Wrapped Rock Creations
To ensure your wire-wrapped rock creations last for years to come, it’s essential to care for them properly. Here are some tips:
- Store Properly: Store your wire-wrapped pieces in a soft pouch or jewelry box to prevent scratches and damage.
- Clean Regularly: Clean your wire-wrapped pieces regularly with a soft cloth to remove dirt and oils.
- Avoid Harsh Chemicals: Avoid exposing your wire-wrapped pieces to harsh chemicals, such as chlorine or cleaning solutions.
- Remove Before Activities: Remove your wire-wrapped jewelry before engaging in activities that could damage it, such as swimming, gardening, or exercising.
According to jewelry care experts, regular maintenance and proper storage can significantly extend the life of wire-wrapped jewelry.
9. Finding Inspiration and Resources
To further enhance your wire wrapping skills and find inspiration for your projects, explore these resources:
- Online Tutorials: Numerous websites and YouTube channels offer wire wrapping tutorials for all skill levels.
- Books and Magazines: Many books and magazines are dedicated to jewelry making and wire wrapping techniques.
- Local Craft Stores: Visit your local craft store to find materials, tools, and inspiration.
- Online Communities: Join online communities and forums to connect with other wire wrappers, share ideas, and ask questions.
- Rockscapes.net: Explore rockscapes.net for inspiration, resources, and unique rock specimens to enhance your wire-wrapping projects.
10. Turning Your Hobby into a Business
If you enjoy wire wrapping rocks and have a knack for creating beautiful designs, consider turning your hobby into a business. Here are some tips for selling your wire-wrapped creations:
- Create a Brand: Develop a unique brand identity that reflects your style and values.
- Set Up an Online Store: Create an online store on platforms like Etsy or Shopify to sell your creations.
- Participate in Craft Fairs: Showcase your work at local craft fairs and markets to reach a wider audience.
- Promote Your Work: Use social media and other marketing channels to promote your wire-wrapped creations.
- Offer Custom Designs: Provide custom design services to create personalized wire-wrapped pieces for your clients.
11. Frequently Asked Questions (FAQ)
11.1. What type of wire is best for wrapping rocks?
Dead soft wire in copper, silver, or gold-filled is best, with gauges ranging from 18 to 28 depending on the design’s complexity.
11.2. How do I prevent the wire from scratching the rock?
Use nylon jaw pliers and wrap the wire snugly but not too tightly to avoid friction.
11.3. Can I use any type of rock for wire wrapping?
Yes, but smooth, tumbled stones are easier for beginners. Ensure the rock is durable enough to withstand the wrapping process.
11.4. How do I secure the wire ends so they don’t poke?
Use chain nose pliers to tuck the wire ends inside the wrap or create a decorative coil to cover them.
11.5. What tools do I really need to start wire wrapping?
Wire cutters, round nose pliers, and chain nose pliers are essential for basic wire wrapping.
11.6. How much wire do I need to wrap a rock?
Generally, three times the circumference of the rock is a good starting point. Adjust as needed based on the design.
11.7. How do I clean wire-wrapped jewelry?
Use a soft cloth to gently clean the wire and rock. Avoid harsh chemicals and abrasive cleaners.
11.8. Where can I find unique rocks for wire wrapping?
Rockscapes.net offers a wide selection of unique and beautiful rocks perfect for wire wrapping projects.
11.9. Can I sell wire-wrapped rock jewelry?
Yes, many people sell their wire-wrapped creations online, at craft fairs, and in local stores.
11.10. How do I keep my wire-wrapped creations from tarnishing?
Store your jewelry in airtight bags or containers and use anti-tarnish cloths to prevent tarnishing.
Conclusion: Embrace the Art of Wire Wrapping at Rockscapes.net
Wire wrapping rocks is a rewarding and creative process that allows you to transform ordinary stones into stunning works of art. Whether you’re creating unique jewelry, decorative accents, or protective casings, the possibilities are endless. At rockscapes.net, we are dedicated to providing you with the resources, inspiration, and high-quality materials you need to embark on your wire wrapping journey.
Ready to explore the art of wire wrapping? Visit rockscapes.net today for a wide selection of rocks, wire, and inspiration to get started. Discover the beauty and versatility of wire-wrapped rocks and unlock your creative potential.
Call to Action:
- Discover Unique Rocks: Visit rockscapes.net to find the perfect stones for your wire-wrapping projects.
- Explore Design Ideas: Browse our gallery of wire-wrapped rock creations for inspiration.
- Get Expert Advice: Contact our team of experts for guidance and support on your wire wrapping journey.
Contact Information:
Address: 1151 S Forest Ave, Tempe, AZ 85281, United States
Phone: +1 (480) 965-9011
Website: rockscapes.net