Pet Rocks – they might seem like a simple novelty, but these little companions have captured hearts and imaginations for decades. Do you remember the pet rock craze of the 1970s? Or perhaps you’re looking for a fun, easy, and budget-friendly craft activity? Whether you’re nostalgic for retro trends or seeking a creative project for kids (and adults!), painting your own pet rock is a fantastic way to unleash your creativity.
This guide will take you beyond just gluing googly eyes onto a stone. We’ll explore how to transform ordinary rocks into adorable animals, quirky creatures, and personalized pals. Get ready to discover the simple joy of pet rock crafting!
 Paint Your Own Pet Rock
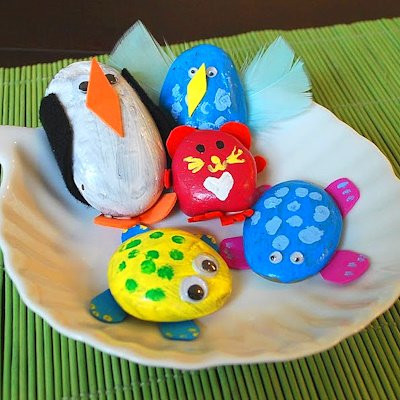
A collection of painted pet rocks in various colors, showcasing the beginning stages of a creative craft project.
Gather Your Supplies: What You’ll Need
Before you embark on your pet rock adventure, gather these essential materials. Most can be found at craft stores, dollar stores, or even in your backyard!
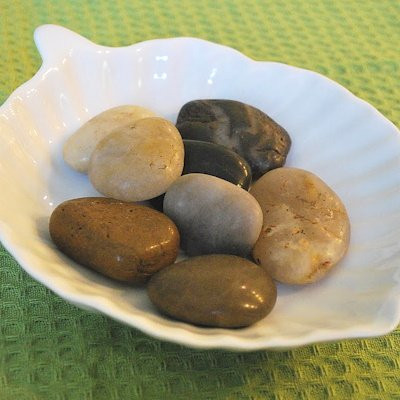
- Smooth Rocks: The foundation of your pet rock masterpiece! Look for smooth, flat rocks in various sizes and shapes. Craft stores like Walmart, Michaels, and Dollar Tree often sell bags of smooth rocks specifically for crafts. Landscape supply stores are another great source for diverse rock options.
- Acrylic Paint: Unleash your inner artist with vibrant acrylic paints. Ceramcoat is a popular choice, known for being washable while wet and permanent once dry. A variety of colors will allow for endless creativity.
- Paint Brushes: A selection of paintbrushes in different sizes – fine tip for details, wider brushes for base coats – will be helpful.
- Cotton Swabs (Q-tips): These are surprisingly useful for creating dots, patterns, and adding subtle details to your pet rock designs.
- Decorative Embellishments: This is where the fun really begins! Gather wiggly eyes, colorful feathers, felt scraps, foam pieces, and anything else that sparks your imagination.
- Permanent Markers (like Sharpie): Fine-tip permanent markers are perfect for outlining details, adding facial features, and creating intricate designs.
- Craft Glue: A strong craft glue is essential for securely attaching decorations. Tacky glue is recommended, especially for slick rock surfaces, as standard Elmer’s glue might not be strong enough.
- Mod Podge or Acrylic Spray Sealer: To protect your painted artwork and add a nice finish, a sealant is recommended. Mod Podge provides a durable, slightly glossy finish, while acrylic spray offers a quicker drying option.
Other Useful Materials:
- Newspaper: Protect your work surface from paint splatters by covering it with newspaper.
- Parchment Paper: Use parchment paper as a drying surface to prevent your painted pet rocks from sticking to other surfaces.
- Small Cup of Water: Keep a cup of water handy for rinsing your paintbrushes.
Unleashing Your Creativity: Decoration Ideas
Let your imagination run wild! Pet rocks are a blank canvas for creativity. Here are some ideas to get you started:
- Permanent Paint in Squeeze Bottles: These are ideal for creating raised lines, outlines, and adding dimension to your designs.
- Glitter Glue or Paint: Add sparkle and shine to your pet rocks with glitter glue or glitter paint.
- Buttons & Sequins: Small buttons and sequins can be glued on to create eyes, noses, or decorative accents.
- Wiggly Eyes: Instantly bring your pet rocks to life with wiggly eyes in various sizes.
- Pom Poms: Soft and fluffy pom poms are great for noses, tails, or hair on your pet rock creatures.
- Feathers: Add a touch of whimsy and texture with colorful feathers.
- Stickers & Washi Tape: For younger children or quicker decorations, stickers and washi tape offer easy and mess-free options.
- Faux Fur, Foam, Yarn, Ribbon, Pipe Cleaners: Explore different textures and materials to add unique features and personalities to your pet rocks.
- Paint Markers: For precise lines and detailed drawings, paint markers are an excellent choice.
 Pet Rock Craft
Close-up view showcasing a variety of decorated pet rocks with googly eyes, paint, and other craft materials, highlighting the diverse creative possibilities.
 Pet Rock Craft
Another perspective of crafted pet rocks, emphasizing the use of paint and decorative elements to transform ordinary stones into charming characters.
Step-by-Step Guide: Creating Your Pet Rock Pal
Ready to bring your pet rock to life? Follow these simple steps:
- Choose Your Rock(s): Select rocks in different sizes and shapes to create a variety of pet rock characters. Consider what kind of animal or creature you want to make and choose a rock shape that inspires you.
- Paint the Base Coat: Apply a base coat of acrylic paint to your rock. Let the paint dry completely. For a richer and more opaque color, apply a second coat of paint and let it dry thoroughly.
- Add Details and Decorations: Once the base coat is dry, it’s time to get creative with details! Paint spots, stripes, patterns, or other features to transform your rock into an animal or creature. Let the paint details dry completely before moving on to the next step.
- Create Features from Foam (Optional): For features like beaks, arms, or feet, consider using craft foam. Discuss with children how basic shapes like ovals, circles, squares, and diamonds can be used to create these features. Draw shapes onto foam, cut them out, and prepare to glue them onto the rock.
- Glue on Decorations: Use craft glue to attach wiggly eyes, foam shapes, felt pieces, feathers, pom poms, and other decorative items. For slick surfaces, ensure you use a tacky glue for better adhesion.
- Drying Considerations: If you’ve glued decorations to the back or bottom of your pet rock (like arms or feet), dry it on waxed or parchment paper to prevent sticking to your work surface.
- Seal Your Pet Rock: To protect the paint and decorations, and to add a nice sheen, apply a couple of coats of Mod Podge or acrylic spray sealer. If using spray sealant, ensure proper ventilation and adult supervision is recommended for this step.
Tips and Suggestions for Pet Rock Success
- Inspiration from Stuffed Animals: For younger children, suggest using a favorite stuffed animal as inspiration for color schemes and animal features.
- Practice Fine Details: For fine lines and dots, practice painting on newspaper first to get comfortable. For very thin lines like whiskers, you might need to guide a child’s hand. Let children have creative freedom with spots and patterns.
- Drying Time is Key: Always ensure paint is completely dry before adding sequins or other embellishments to prevent smudging or the decorations from falling off.
Pet Rocks in the Classroom: Educational Activities
Pet rocks are not just fun; they can also be incorporated into educational activities in the classroom:
Pet Rock Interview Activity
Engage students’ imaginations with a “Pet Rock Interview” activity. Write sample questions on the whiteboard and have each child draw their pet rock and answer the questions on paper. Alternatively, create a class “Pet Rock Book” where each student includes a picture and story about their pet rock.
Sample Interview Questions:
- What is your pet’s name?
- What is your pet’s favorite color?
- What does your pet like to do for fun?
- What is your pet’s favorite food (rocks excluded!)?
- How do you take care of your pet rock?
Explore Rocks Through Literature
Supplement your pet rock crafting with reading books about rocks. There are numerous fiction and non-fiction books available that explore geology, different types of rocks, and even stories featuring rocks as characters.
Beyond Crafts: Creative Uses for Pet Rocks
Pet rocks can be more than just decorative crafts. Consider these practical and fun uses:
Pet Rock Paperweights
Paint flowers, geometric designs, or personalized messages on larger, flatter rocks to create unique and functional paperweights.
Garden Pet Rock Decorations
Decorate your garden by placing pet rocks amongst plants and flowers. They add a whimsical touch to outdoor spaces. As a fun anecdote, the original article mentions finding pet rocks in their garden beds after moving, a charming reminder of past creative projects!
A Nod to History: The Pet Rock Phenomenon
While the idea of decorating rocks might seem timeless, the “Pet Rock” as a commercial product has a distinct history. In 1975, advertising executive Gary Dahl turned the simple concept into a cultural phenomenon. Pet rocks were marketed as the “perfect pet” – low-maintenance, always loyal, and undeniably unique.
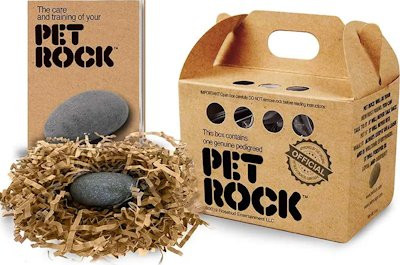
Priced at US $3.95, each pet rock was packaged in a cardboard box resembling a pet carrier, complete with a bed of straw and a “Pet Rock Training Manual.” This manual humorously instructed owners on caring for their inert companions, with commands like “sit” and “stay” being easily mastered, while “roll over” required a little human assistance!
 1970
1970
A vintage image from the 1970s showcasing the original Pet Rock packaging, including the cardboard carrier and instruction manual, highlighting the novelty item’s presentation.
Interestingly, the concept of “pet rocks” or rocks with special significance isn’t entirely new. Evidence suggests that rocks have held symbolic importance in various cultures throughout history, from ancient Egyptian tomb paintings to iconic structures like Stonehenge in ancient Britain. This suggests a deeper, perhaps innate, human connection with rocks that transcends fleeting trends.
Whether you’re drawn to the nostalgic charm of the 70s craze or simply looking for a fun and engaging craft project, painting pet rocks offers a delightful way to express your creativity and connect with a bit of whimsical history. So, grab some rocks, paints, and let your imagination take flight!