What Grit Sandpaper For Polishing Rocks is a crucial question for anyone looking to transform rough stones into gleaming gems, and at rockscapes.net, we provide the answers! By understanding the different grits and their specific uses, you can achieve a professional-looking polish on your favorite rocks. We offer comprehensive guidance to help you through the process, ensuring stunning results every time.
1. Why is Choosing the Right Sandpaper Grit Important for Polishing Rocks?
Selecting the correct sandpaper grit is essential for achieving a smooth, polished surface on rocks. Using the wrong grit can result in scratches, uneven surfaces, or a dull finish, so each grit level serves a unique purpose in the polishing process. Rockscapes.net can guide you through these choices.
- Rough Shaping: Coarse grits are designed to remove material quickly and shape the rock.
- Scratch Removal: Medium grits smooth out the surface and remove scratches left by coarser grits.
- Polishing: Fine grits produce a high-gloss finish by smoothing out the tiniest imperfections.
2. What are the Different Types of Sandpaper Used for Rock Polishing?
Rock polishing involves using a range of sandpaper grits to gradually smooth and refine the surface of the stone. Here’s a breakdown of the most common types:
| Grit Range | Purpose |
|---|---|
| 60-80 Grit | Used for initial shaping and removing significant imperfections. Not recommended for softer stones as it can cause excessive scratching. |
| 120-220 Grit | Ideal for removing rough edges and beginning to refine the shape of the rock. It’s a good starting point for harder stones or those with noticeable flaws. |
| 400-600 Grit | This range further smooths the surface and removes scratches left by coarser grits. Essential for preparing the rock for the final polishing stages. |
| 800-1200 Grit | Used for pre-polishing, this range buffs out tiny scratches and starts to bring out the stone’s natural shine. It’s crucial for achieving a smooth, reflective surface. |
| 2000+ Grit | These ultra-fine grits are used for final polishing, creating a high-gloss finish. They are often used with polishing compounds for maximum shine. |
3. How Does the Mohs Hardness Scale Relate to Sandpaper Grit Selection?
The Mohs Hardness Scale measures a mineral’s resistance to scratching, and it directly influences the sandpaper grit you should use. Softer stones require finer grits to avoid damage, while harder stones can withstand coarser grits for initial shaping. Here’s how it breaks down:
- Softer Stones (Mohs 1-4): Examples include Amber, Turquoise, and Fluorite. Start with 220-grit sandpaper and move to finer grits (600, 1200, and higher).
- Medium Hardness Stones (Mohs 5-7): Examples include Apatite, Obsidian, and Quartz. Begin with 120-grit sandpaper for shaping, then progress through 400, 800, and 1200 grits.
- Harder Stones (Mohs 7+): Examples include Topaz, Corundum, and Diamond. Start with 60-80 grit for significant shaping, then move to 220, 500, and 1200 grits.
4. What is the Step-by-Step Guide to Hand Polishing Rocks with Sandpaper?
Hand polishing rocks is a rewarding process that yields beautiful results. Here’s a step-by-step guide to help you achieve a professional-looking finish:
Step 1: Cleaning the Rocks
Begin by thoroughly cleaning the rocks with warm, soapy water to remove any dirt, debris, or residue. An old toothbrush can be helpful for scrubbing crevices and stubborn spots. Rinse the rocks with clean water and ensure they are completely free of soap before proceeding.
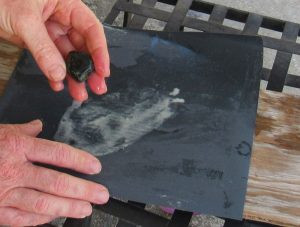 Cleaning rocks with soapy water
Alt text: Cleaning rock samples with soapy water and a brush to remove dirt before polishing.
Step 2: Rough Shaping with Coarse Grit Sandpaper (60-220 Grit)
If the rock has sharp edges or requires significant shaping, start with 60-80 grit sandpaper for harder stones or 120-220 grit for softer stones. Wet the sandpaper and place it grit-side up on a flat surface. Wet the rock and rub it against the sandpaper in a consistent motion to remove unwanted edges and shape the stone.
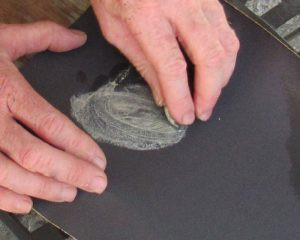 Shaping a rock with coarse sandpaper
Alt text: Hand polishing a rock with 220-grit sandpaper to smooth rough edges and shape the stone.
Step 3: Refining the Shape with Medium Grit Sandpaper (400-600 Grit)
Once the initial shaping is complete, switch to 400-600 grit sandpaper to remove scratches and further refine the shape. Continue to wet the sandpaper and the rock, and rub the rock against the sandpaper until the surface is smooth and free of deep scratches.
Step 4: Pre-Polishing with Fine Grit Sandpaper (800-1200 Grit)
Move to 800-1200 grit sandpaper to begin the polishing process. This step buffs out tiny scratches and starts to bring out the stone’s natural shine. Keep the rock wet and frequently rinse it to check for any missed spots.
Step 5: Final Polishing
For the final polishing, you can use specialized rock polishing compounds or common household items like toothpaste. Apply a small amount of polishing compound or toothpaste to a soft cloth (denim works well) and rub the rock vigorously. Continue until the desired shine is achieved.
Step 6: Finishing Touches
Rinse the rock to remove any remaining polishing compound or toothpaste. Coat the rock with mineral oil or a commercial rock polish to enhance the luster and protect the surface.
5. What Tools and Materials Do I Need for Hand Polishing Rocks?
To effectively hand polish rocks, gather these essential tools and materials:
- Sandpaper: Assorted grits (60-80, 120-220, 400-600, 800-1200, 2000+)
- Water: For wetting the sandpaper and rinsing the rocks
- Flat Surface: Such as a cutting board or tile
- Soft Cloth: Denim or microfiber for final polishing
- Polishing Compound: Optional, for enhancing shine
- Toothpaste: A readily available alternative to polishing compound
- Mineral Oil: Or commercial rock polish for finishing
- Bucket: To hold water for cleaning and rinsing
- Gloves: To protect hands.
- Mask: Prevents inhaling tiny particles coming off the rock.
6. What are the Benefits of Hand Polishing Rocks Compared to Using a Rock Tumbler?
Both hand polishing and rock tumbling have their advantages. Here’s a comparison:
| Feature | Hand Polishing | Rock Tumbling |
|---|---|---|
| Speed | Faster for softer rocks; allows for quicker turnaround. | Slower; takes days or weeks to complete, especially for larger, harder rocks. |
| Labor | More labor-intensive; requires manual effort for shaping and polishing. | Less labor-intensive; the machine does most of the work. |
| Control | Greater control over the final shape and finish, which is crucial for valuable specimens. | Less control; the rocks are shaped and polished by the tumbling action, which can be unpredictable. |
| Cost | Lower initial cost; requires only sandpaper, water, and basic polishing supplies. | Higher initial cost; requires a rock tumbler, tumbling grit, and polishing compounds. |
| Best For | Softer stones, valuable specimens, and those who enjoy a hands-on approach. | Harder stones, large quantities of rocks, and those who prefer a more automated process. |
| Environmental | Less environmental impact, as it uses less electricity compared to rock tumbling machines. | More environmental impact due to the extended use of electricity and the potential disposal of tumbling grit. |
7. How Can I Use a Dremel Tool to Enhance Rock Polishing?
A Dremel tool can significantly speed up the rock polishing process, especially for shaping and smoothing hard stones. Here’s how to use it effectively:
- Safety First: Always wear protective eyewear, gloves, and a mask to protect yourself from flying debris and dust.
- Attachments: Use Dremel attachments with varying grits, similar to sandpaper grits. Start with a coarse grit for shaping and gradually move to finer grits for polishing.
- Technique: Apply light pressure and move the Dremel in a consistent motion. Avoid holding the tool in one spot for too long to prevent overheating and uneven polishing.
- Water: Keep the rock and the Dremel attachment wet to reduce friction and dust.
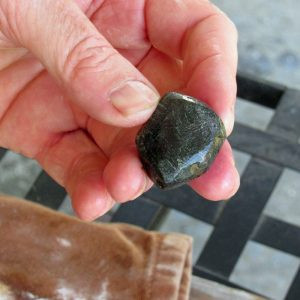 Using a Dremel for rock polishing
Alt text: Shiny polished rock after four rounds of shaping and polishing with a Dremel.
8. What are Some Common Mistakes to Avoid When Polishing Rocks?
To achieve the best results, avoid these common mistakes:
- Skipping Grits: Jumping directly from a coarse grit to a fine grit can leave deep scratches that are difficult to remove.
- Using Dry Sandpaper: Always wet the sandpaper to reduce friction and prevent dust.
- Applying Too Much Pressure: Let the sandpaper do the work; applying too much pressure can cause uneven polishing and damage the stone.
- Neglecting Safety: Always wear protective gear, including eyewear, gloves, and a mask.
- Not Cleaning Rocks Properly: Failing to remove dirt and debris can contaminate the sandpaper and result in a poor finish.
9. How Do I Maintain the Shine on My Polished Rocks?
To keep your polished rocks looking their best, follow these maintenance tips:
- Regular Cleaning: Clean the rocks with a soft cloth and mild soap to remove dust and fingerprints.
- Reapplication of Polish: Reapply mineral oil or commercial rock polish periodically to maintain the luster.
- Storage: Store the rocks in a clean, dry place away from direct sunlight to prevent fading and damage.
10. What are the Best Types of Rocks to Polish by Hand?
Certain types of rocks are better suited for hand polishing due to their hardness and composition. Here are some of the best options:
- Agate: Known for its vibrant colors and banding patterns.
- Jasper: A variety of chalcedony with a wide range of colors and patterns.
- Obsidian: Volcanic glass with a smooth, reflective surface.
- Turquoise: A soft, blue-green mineral prized for its color.
- Amber: Fossilized tree resin with a warm, golden color.
11. What are Some Advanced Techniques for Rock Polishing?
For those looking to take their rock polishing skills to the next level, here are some advanced techniques:
- Using a Lapidary Machine: A lapidary machine provides more precision and control for shaping and polishing rocks.
- Diamond Polishing Compounds: Diamond polishing compounds offer superior polishing power and can achieve a higher level of shine.
- Creating Cabochons: Cabochons are polished gemstones with a rounded top and a flat bottom, often used in jewelry making.
12. How to Polish Rocks for Landscaping?
Polishing rocks for landscaping can add a touch of elegance and sophistication to your outdoor spaces. Here are some tips:
- Choose the Right Rocks: Select rocks that complement your landscape design and are durable enough to withstand the elements.
- Focus on Key Areas: Polish rocks that will be prominently displayed, such as those around water features or along pathways.
- Consider Size and Shape: Use a variety of sizes and shapes to create visual interest.
- Seal the Rocks: Apply a sealant to protect the polished surface from weathering and staining.
13. What are Some Common Applications of Polished Rocks?
Polished rocks have a wide range of applications, from decorative to functional:
- Jewelry Making: Polished stones are used in rings, pendants, earrings, and bracelets.
- Home Décor: Polished rocks can be displayed in bowls, vases, or as paperweights.
- Landscaping: Polished stones add beauty to gardens, ponds, and pathways.
- Gifts: Polished rocks make unique and thoughtful gifts for rock enthusiasts and nature lovers.
- Meditation and Healing: Some believe that polished stones have metaphysical properties that can promote relaxation and healing.
14. How Do Regional Geological Factors Impact Rock Polishing in the USA, Especially in Areas Like Arizona?
Regional geological factors significantly influence the types of rocks available for polishing. In Arizona, the abundance of volcanic activity and diverse mineral deposits creates a wealth of unique and beautiful stones. Here’s how it affects rock polishing:
- Rock Variety: Arizona is known for its rich variety of rocks, including agate, jasper, turquoise, and petrified wood, each requiring specific polishing techniques.
- Hardness Variations: The hardness of these rocks varies, influencing the choice of sandpaper grit and polishing compounds.
- Local Resources: Local rock shops and suppliers offer specialized tools and materials tailored to the rocks found in the region.
- Environmental Considerations: Awareness of local regulations and environmental concerns is crucial when collecting and polishing rocks.
According to research from Arizona State University’s School of Earth and Space Exploration, Arizona’s unique geological landscape provides an unparalleled opportunity for rock enthusiasts to discover and polish a wide array of stunning stones.
15. What are the Latest Trends in Rock Polishing Techniques?
Stay up-to-date with the latest trends in rock polishing to enhance your skills and achieve cutting-edge results:
- Micro-abrasive Polishing: This technique uses ultra-fine abrasives to create a flawless, mirror-like finish.
- Vibratory Tumbling: Vibratory tumblers offer a faster and more efficient alternative to traditional rotary tumblers.
- 3D-Printed Polishing Tools: Custom-designed polishing tools can be 3D-printed to fit specific rock shapes and sizes.
- Eco-Friendly Polishing Compounds: Environmentally friendly polishing compounds are gaining popularity as a sustainable alternative to traditional chemicals.
16. How Can I Find Reputable Rock Suppliers and Polishing Experts in the USA?
Finding reliable rock suppliers and polishing experts is essential for obtaining quality materials and guidance. Here are some tips:
- Online Research: Search online for rock shops, lapidary suppliers, and polishing experts in your area.
- Rock and Gem Clubs: Join a local rock and gem club to connect with experienced rockhounds and learn about reputable suppliers.
- Gem and Mineral Shows: Attend gem and mineral shows to meet suppliers and experts in person.
- Online Forums and Communities: Participate in online forums and communities to ask for recommendations and advice.
17. What are the Ethical Considerations in Rock Collecting and Polishing?
Ethical rock collecting and polishing involves respecting the environment and adhering to responsible practices:
- Obtain Permission: Always obtain permission before collecting rocks on private land.
- Follow Regulations: Adhere to local, state, and federal regulations regarding rock collecting.
- Minimize Impact: Minimize your impact on the environment by avoiding sensitive areas and leaving no trace.
- Support Sustainable Practices: Purchase rocks and materials from suppliers who follow sustainable and ethical practices.
18. How to Start a Rock Polishing Business?
Starting a rock polishing business can be a rewarding venture for those passionate about rocks and minerals. Here are some steps to consider:
- Develop Your Skills: Hone your rock polishing skills and learn advanced techniques.
- Create a Business Plan: Develop a detailed business plan outlining your goals, target market, and financial projections.
- Invest in Equipment: Purchase the necessary equipment, including polishing machines, tools, and supplies.
- Establish a Brand: Create a unique brand identity and market your business through online and offline channels.
- Comply with Regulations: Ensure you comply with all local, state, and federal regulations for operating a business.
19. What is the Role of Universities and Research Institutions in Advancing Rock Polishing Knowledge?
Universities and research institutions play a crucial role in advancing rock polishing knowledge through scientific research and educational programs. Here are some examples:
- Geological Studies: Geological studies provide valuable insights into the composition, formation, and properties of rocks.
- Materials Science Research: Materials science research explores new polishing techniques and materials for achieving optimal results.
- Educational Programs: Universities and colleges offer courses and workshops on lapidary arts and gemology.
- Public Outreach: Research institutions often engage in public outreach activities to educate the community about rocks and minerals.
20. How to Document and Share Your Rock Polishing Projects?
Documenting and sharing your rock polishing projects can inspire others and showcase your skills. Here are some tips:
- Take Before-and-After Photos: Capture before-and-after photos to highlight the transformation of your rocks.
- Write Detailed Descriptions: Write detailed descriptions of your polishing process, including the types of rocks, grits, and techniques used.
- Share on Social Media: Share your projects on social media platforms like Instagram, Facebook, and Pinterest.
- Create a Blog or Website: Create a blog or website to showcase your projects and share your knowledge with others.
- Participate in Online Communities: Engage with online rock polishing communities and forums to share your projects and learn from others.
21. What are the Safety Precautions When Polishing Rocks by Hand?
Safety is paramount when polishing rocks by hand. Ensure you take these precautions:
- Wear Safety Glasses: Always wear safety glasses to protect your eyes from flying debris and dust.
- Use Gloves: Wear gloves to protect your hands from sharp edges and abrasive materials.
- Wear a Dust Mask: Wear a dust mask to prevent inhaling fine particles, especially when working with dry materials.
- Work in a Well-Ventilated Area: Ensure adequate ventilation to prevent the buildup of dust and fumes.
- Keep Your Work Area Clean: Keep your work area clean and organized to prevent accidents and injuries.
22. How to Choose the Right Polishing Compound for Different Types of Rocks?
Selecting the right polishing compound is crucial for achieving the desired finish on different types of rocks. Here’s a guide:
| Rock Type | Recommended Polishing Compound |
|---|---|
| Agate | Cerium oxide, diamond paste |
| Jasper | Cerium oxide, aluminum oxide |
| Obsidian | Cerium oxide, tin oxide |
| Turquoise | Tin oxide, rouge |
| Amber | Toothpaste, very fine polishing cloths |
| General Use | Aluminum oxide, suitable for a wide range of rocks |
23. What are the Environmental Impacts of Rock Polishing and How Can They Be Minimized?
Rock polishing can have environmental impacts, but there are ways to minimize them:
- Water Usage: Use water efficiently and consider recycling water when possible.
- Waste Disposal: Dispose of polishing compounds and waste materials properly, following local regulations.
- Sustainable Sourcing: Source rocks and materials from suppliers who follow sustainable practices.
- Eco-Friendly Compounds: Choose eco-friendly polishing compounds that are biodegradable and non-toxic.
- Energy Consumption: Use energy-efficient equipment and minimize energy consumption.
24. How Can Rockscapes.net Help You with Your Rock Polishing Needs?
At Rockscapes.net, we are dedicated to providing you with the resources and expertise you need to succeed in your rock polishing endeavors. We offer:
- Comprehensive Guides: Detailed guides on rock polishing techniques, tools, and materials.
- Expert Advice: Access to expert advice from experienced rockhounds and lapidary artists.
- Product Recommendations: Recommendations for high-quality polishing compounds, tools, and equipment.
- Inspiration and Ideas: Inspiration and ideas for creating stunning polished rock projects.
- Community Support: A supportive community where you can share your projects and learn from others.
25. Why should I visit rockscapes.net for my Rock Polishing Inquiries?
Rockscapes.net is your ultimate destination for unlocking the secrets of rock polishing. From selecting the right sandpaper grit to mastering advanced techniques, we provide the knowledge and resources you need to transform ordinary stones into extraordinary gems. With our expert guidance, you can achieve professional-looking results and create stunning works of art that showcase the beauty of nature. Join us at Rockscapes.net and embark on a journey of discovery, creativity, and endless possibilities.
FAQ: What Grit Sandpaper for Polishing Rocks?
1. What is the best starting grit for polishing rocks?
The best starting grit depends on the hardness and condition of the rock. For harder rocks with rough edges, begin with 60-80 grit. Softer stones can start with 120-220 grit to avoid excessive scratching.
2. Can I skip sandpaper grits when polishing rocks?
Skipping grits is not recommended, as it can leave deep scratches that are difficult to remove. Each grit level serves a specific purpose in smoothing the surface and preparing it for the next stage.
3. How do I know when to move to the next grit of sandpaper?
Move to the next grit when the scratches from the previous grit are no longer visible. Ensure the surface is uniformly smooth before progressing.
4. Is it necessary to use water when polishing rocks with sandpaper?
Yes, using water is essential. Water reduces friction, prevents dust, and helps to carry away debris, resulting in a smoother finish.
5. Can I use regular sandpaper for polishing rocks?
While regular sandpaper can be used, specialized rock polishing sandpaper is more durable and effective. Look for silicon carbide or aluminum oxide sandpaper designed for wet sanding.
6. How does the Mohs hardness scale affect sandpaper grit selection?
The Mohs hardness scale measures a mineral’s resistance to scratching. Softer stones require finer grits to avoid damage, while harder stones can withstand coarser grits for initial shaping.
7. What is the final grit sandpaper I should use for polishing rocks?
The final grit depends on the desired level of shine. For a high-gloss finish, use 2000+ grit sandpaper or polishing compounds.
8. Can I use a Dremel tool for polishing rocks?
Yes, a Dremel tool can be used for shaping and polishing rocks. Use appropriate attachments with varying grits and always wear safety gear.
9. What are some common mistakes to avoid when polishing rocks?
Common mistakes include skipping grits, using dry sandpaper, applying too much pressure, and neglecting safety precautions.
10. How do I maintain the shine on my polished rocks?
Clean the rocks regularly with a soft cloth and mild soap. Reapply mineral oil or commercial rock polish periodically to maintain the luster.
Discover the artistry of rock polishing with Rockscapes.net, where we transform ordinary stones into extraordinary gems. Dive into our comprehensive guides and unlock the secrets to achieving professional-quality finishes, whether you’re a seasoned lapidary artist or a curious beginner.
Ready to start your rock polishing journey? Visit Rockscapes.net today and explore our extensive collection of resources, expert tips, and inspiring ideas. Contact us at Address: 1151 S Forest Ave, Tempe, AZ 85281, United States or call us at Phone: +1 (480) 965-9011. Let rockscapes.net be your trusted partner in creating stunning works of art that celebrate the beauty of nature.