What Paint Do You Use To Paint Rocks? Rock painting is a delightful activity that combines creativity with the joy of spreading kindness, and choosing the right paint is essential for creating lasting rock art. At rockscapes.net, we understand the importance of selecting the perfect materials for your artistic endeavors, ensuring your painted rocks withstand the elements and continue to bring joy to those who find them. Let’s explore the best paints and techniques for transforming ordinary stones into extraordinary works of art with durable finishes, artistic designs, and vibrant colors.
1. Understanding Rock Painting and Its Growing Popularity
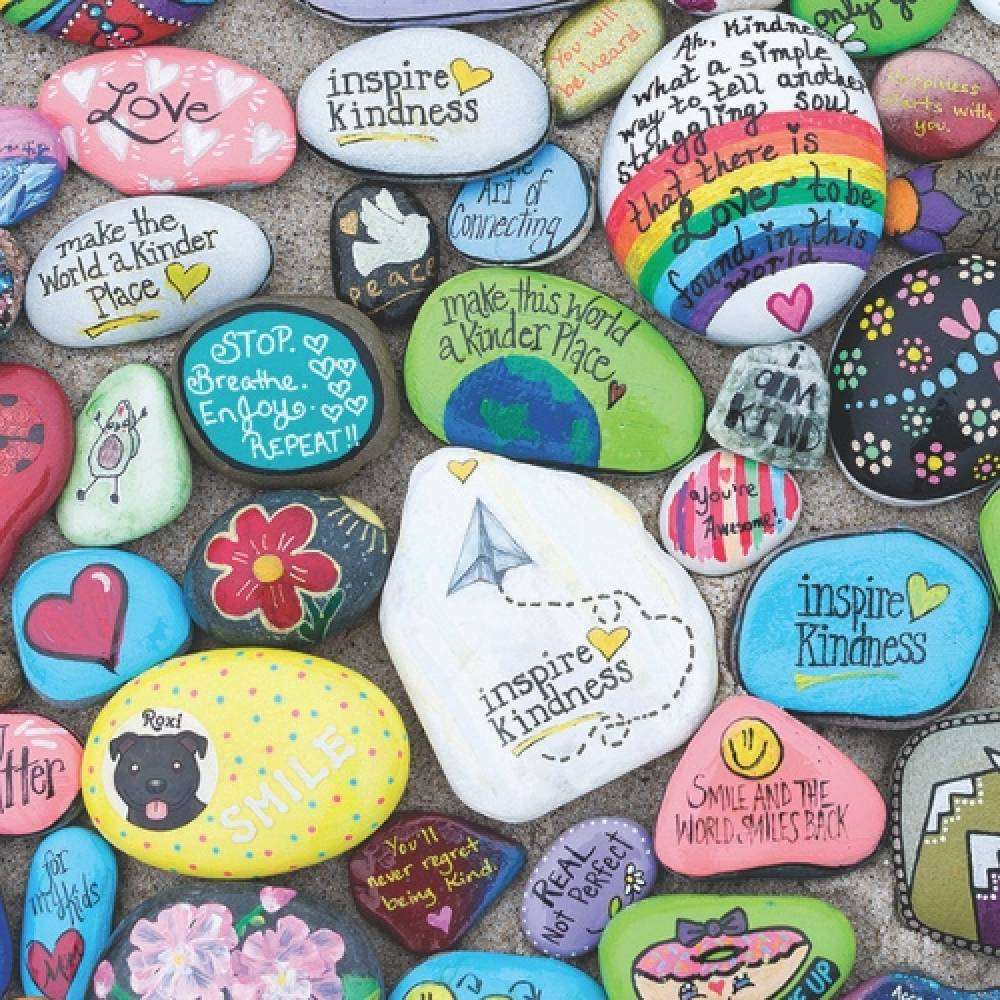
Rock painting, also known as kindness rocks, has surged in popularity as a creative way to spread positivity and artistic expression within communities. These decorated rocks, often adorned with inspirational messages or vibrant designs, are left in public places for others to discover, fostering a sense of connection and joy. According to a recent survey by the Public Art Review, community art projects like rock painting have seen a 30% increase in participation over the past five years, highlighting their significant role in enhancing social well-being.
1.1 What is the Purpose of Painting Rocks?
The primary purpose of painting rocks is to spread kindness and inspiration. Each painted rock serves as a small, portable piece of art that can brighten someone’s day. Rock painting provides a unique way to engage with your community, share positive messages, and encourage creativity. The act of creating and sharing these rocks fosters a sense of connection and goodwill, making it a rewarding hobby for individuals of all ages.
1.2 Why is Rock Painting So Popular?
Rock painting’s popularity stems from its accessibility, simplicity, and the positive impact it has on communities. It requires minimal materials, no specialized skills, and can be enjoyed by people of all ages. The ability to create something beautiful and then share it with others taps into a fundamental human desire to connect and contribute positively. Additionally, the element of surprise and discovery associated with finding a painted rock adds an element of fun and excitement to everyday life.
1.3 How Does Rock Painting Promote Kindness?
Rock painting directly promotes kindness by providing a tangible way for people to express positive messages and share them with the world. The messages on these rocks often include affirmations, uplifting quotes, or simple acts of kindness, such as “Be Kind” or “You Are Loved.” Finding a painted rock can be a powerful reminder of positivity and can brighten someone’s day, encouraging them to pay it forward and spread kindness to others. This ripple effect of positivity is a key reason why rock painting has become such a beloved activity.
 Painted kindness rock with a ladybug design, perfect for outdoor use
2. Essential Materials for Rock Painting
To embark on your rock painting journey, you’ll need to gather a few essential materials. These include suitable rocks, the right type of paint, brushes, paint pens, and a sealant to protect your artwork.
2.1 Selecting the Right Rocks
Choosing the right rocks is the first step in creating beautiful painted rocks. Look for rocks that are smooth, flat, and free from cracks or jagged edges. These characteristics make them easier to paint and ensure that your designs will adhere well.
2.1.1 What Type of Rocks are Best for Painting?
The best rocks for painting are those with a smooth surface, such as river rocks or beach stones. These rocks provide an ideal canvas for intricate designs and detailed artwork. Avoid rocks with rough textures or uneven surfaces, as they can be challenging to paint and may not hold paint well.
2.1.2 Where Can You Find Rocks for Painting?
Rocks for painting can be found in various places, including:
- Craft Stores: Many craft stores sell bags of smooth, pre-washed rocks specifically for painting.
- Hardware Stores: Hardware stores often carry landscaping rocks that can be suitable for painting.
- Local Parks and Beaches: Depending on local regulations, you may be able to collect rocks from parks, beaches, or riverbeds.
- Landscaping Suppliers: Landscaping suppliers can provide larger quantities of rocks in various sizes and shapes.
2.1.3 Can You Use Any Type of Rock for Painting?
While you can technically use any type of rock for painting, smoother rocks will yield the best results. Porous rocks may require additional coats of paint, and rocks with rough surfaces may make it difficult to achieve detailed designs. It’s best to choose rocks that are easy to handle and provide a good surface for your artwork.
2.2 Choosing the Right Paint
Selecting the appropriate paint is crucial for creating vibrant, long-lasting designs on your rocks. Acrylic paints are generally recommended due to their durability, versatility, and wide range of colors.
2.2.1 Why is Acrylic Paint Recommended for Rock Painting?
Acrylic paint is highly recommended for rock painting due to its excellent adhesion, quick drying time, and water resistance once dry. It’s also available in a wide range of colors and finishes, allowing for endless creative possibilities. Acrylic paint is durable enough to withstand outdoor conditions, making it ideal for rocks that will be placed in gardens or public spaces.
2.2.2 What are the Different Types of Acrylic Paint?
There are several types of acrylic paint to choose from, each with its own unique characteristics:
- Heavy Body Acrylics: These paints have a thick consistency and are ideal for creating textured effects and impasto techniques.
- Soft Body Acrylics: These paints have a smoother consistency and are well-suited for blending and creating gradients.
- Acrylic Inks: These are highly pigmented, fluid paints that are perfect for detailed work and creating washes.
- Craft Acrylics: These are inexpensive paints that are great for beginners and large-scale projects.
2.2.3 Are There Other Paint Options Besides Acrylic?
While acrylic paint is the most popular choice for rock painting, other options include:
- Oil-Based Paints: Oil-based paints offer rich colors and a smooth finish but require longer drying times and specialized solvents for cleanup.
- Enamel Paints: Enamel paints provide a durable, glossy finish and are highly resistant to weathering, making them suitable for outdoor use.
- Chalk Paints: Chalk paints offer a matte finish and can be easily distressed for a vintage look. However, they require a sealant to protect them from moisture.
2.2.4 What Paint Colors are Best for Rock Painting?
The best paint colors for rock painting depend on your personal preferences and the designs you want to create. However, some popular choices include:
- Bright, Bold Colors: These colors are eye-catching and can help your rocks stand out.
- Pastel Colors: Pastel colors create a soft, delicate look that is perfect for floral designs and inspirational messages.
- Metallic Colors: Metallic colors add a touch of glamour and sophistication to your rock art.
- Glow-in-the-Dark Paints: Glow-in-the-dark paints can add a fun and whimsical element to your painted rocks, making them visible at night.
2.3 Selecting Brushes and Paint Pens
In addition to paint, you’ll need a variety of brushes and paint pens to create detailed designs and intricate artwork on your rocks.
2.3.1 What Types of Brushes are Best for Rock Painting?
The best types of brushes for rock painting include:
- Round Brushes: Round brushes are versatile and can be used for both broad strokes and fine details.
- Flat Brushes: Flat brushes are ideal for creating smooth, even coverage and blending colors.
- Detail Brushes: Detail brushes have fine tips and are perfect for painting intricate designs and fine lines.
- Sponge Brushes: Sponge brushes are great for applying base coats and creating textured effects.
2.3.2 What are the Benefits of Using Paint Pens?
Paint pens offer several benefits for rock painting:
- Precision: Paint pens allow for precise control and are ideal for creating fine details and intricate designs.
- Convenience: Paint pens are easy to use and require no additional palettes or water for cleanup.
- Versatility: Paint pens are available in a variety of colors and tip sizes, making them suitable for a wide range of projects.
- Portability: Paint pens are compact and portable, making them perfect for on-the-go rock painting.
2.3.3 How Do You Choose the Right Size Brush or Pen?
Choosing the right size brush or pen depends on the level of detail you want to achieve. For large areas and base coats, use larger brushes. For fine details and intricate designs, opt for smaller brushes or paint pens with fine tips. Experiment with different sizes to find what works best for your style and project.
2.4 Choosing the Right Sealant
Sealing your painted rocks is essential for protecting your artwork from the elements and ensuring that your designs last for years to come.
2.4.1 Why is it Important to Seal Painted Rocks?
Sealing painted rocks is important for several reasons:
- Protection: Sealant protects the paint from chipping, fading, and water damage.
- Durability: Sealant enhances the durability of your artwork, making it resistant to scratches and wear.
- Longevity: Sealant extends the lifespan of your painted rocks, allowing them to be enjoyed for years to come.
- Appearance: Sealant can enhance the appearance of your painted rocks, adding a glossy or matte finish.
2.4.2 What Types of Sealants are Best for Rock Painting?
The best types of sealants for rock painting include:
- Acrylic Sealers: Acrylic sealers are water-based and provide a clear, durable finish that protects against UV damage and moisture.
- Polyurethane Sealers: Polyurethane sealers offer excellent protection against weathering and are ideal for rocks that will be placed outdoors.
- Epoxy Resins: Epoxy resins provide a high-gloss, waterproof finish that is extremely durable and long-lasting.
2.4.3 How Do You Apply Sealant to Painted Rocks?
To apply sealant to painted rocks:
- Ensure that your painted rocks are completely dry and free from dust or debris.
- Choose a well-ventilated area for sealing.
- Apply a thin, even coat of sealant using a brush or spray can.
- Allow the sealant to dry completely according to the manufacturer’s instructions.
- Apply additional coats of sealant for added protection, if desired.
3. Step-by-Step Guide to Painting Rocks
Painting rocks is a simple and enjoyable process that can be mastered by anyone with a little creativity and patience. Follow these step-by-step instructions to create your own beautiful painted rocks.
3.1 Preparing the Rocks
Before you begin painting, it’s important to prepare your rocks properly to ensure that the paint adheres well and your designs look their best.
3.1.1 How Do You Clean Rocks Before Painting?
To clean rocks before painting:
- Rinse the rocks under running water to remove any loose dirt or debris.
- Scrub the rocks with a brush and soapy water to remove any stubborn stains or grime.
- Rinse the rocks thoroughly with clean water.
- Allow the rocks to dry completely before painting.
3.1.2 Do You Need to Prime the Rocks Before Painting?
Priming the rocks before painting is optional but can help to create a smoother surface for your designs and improve the adhesion of the paint. If you choose to prime your rocks, use a white or light-colored acrylic primer and allow it to dry completely before painting.
3.2 Painting the Base Coat
Applying a base coat of paint is the next step in creating your painted rocks. This provides a uniform surface for your designs and helps the colors to stand out.
3.2.1 Why is a Base Coat Important?
A base coat is important for several reasons:
- Uniformity: It creates a uniform surface for your designs, ensuring that the colors look consistent and vibrant.
- Adhesion: It improves the adhesion of the paint, preventing it from chipping or peeling.
- Coverage: It provides better coverage for your designs, especially if you are using light-colored paints on dark rocks.
3.2.2 What Colors are Best for a Base Coat?
The best colors for a base coat depend on the designs you plan to create. White is a popular choice as it provides a neutral background that allows colors to pop. Light-colored pastels can also be effective, especially for floral designs and inspirational messages.
3.2.3 How Many Coats of Base Coat Do You Need?
The number of coats of base coat you need depends on the opacity of the paint and the color of the rock. Generally, two coats of base coat are sufficient to provide adequate coverage and a smooth surface for your designs.
3.3 Creating Your Designs
Once the base coat is dry, it’s time to unleash your creativity and start creating your designs.
3.3.1 What are Some Popular Rock Painting Ideas?
Some popular rock painting ideas include:
- Inspirational Messages: Paint uplifting quotes or affirmations on your rocks to spread positivity.
- Floral Designs: Create colorful floral patterns using a variety of brushes and paint pens.
- Animal Designs: Paint cute and whimsical animal designs, such as ladybugs, butterflies, or owls.
- Geometric Patterns: Create modern and eye-catching geometric patterns using tape or stencils.
- Mandalas: Paint intricate mandala designs using fine-tipped paint pens.
3.3.2 How Do You Transfer Designs Onto Rocks?
To transfer designs onto rocks:
- Sketch your design onto a piece of paper.
- Place a piece of carbon paper between the design and the rock.
- Trace the design with a pencil, transferring it onto the rock’s surface.
- Use paint or paint pens to fill in the design.
3.3.3 Tips for Painting Intricate Details
For painting intricate details:
- Use fine-tipped paint pens or detail brushes.
- Work in a well-lit area.
- Take your time and be patient.
- Use a magnifying glass if needed.
- Practice on a piece of paper before painting on the rock.
3.4 Sealing the Painted Rocks
After you’ve finished painting your designs, it’s important to seal the rocks to protect your artwork from the elements.
3.4.1 When Should You Seal the Painted Rocks?
You should seal the painted rocks after the paint has completely dried, typically 24-48 hours after painting.
3.4.2 How Many Coats of Sealant Do You Need?
The number of coats of sealant you need depends on the type of sealant and the level of protection you desire. Generally, two to three coats of sealant are sufficient to provide adequate protection.
3.4.3 How Long Does it Take for Sealant to Dry?
The drying time for sealant varies depending on the type of sealant and the environmental conditions. Refer to the manufacturer’s instructions for specific drying times.
4. Choosing the Right Paint for Specific Rock Painting Projects
Different rock painting projects may require different types of paint to achieve the desired effect. Consider the following factors when selecting paint for your specific project.
4.1 Painting Rocks for Outdoor Display
If you plan to display your painted rocks outdoors, it’s important to choose paints that are durable and weather-resistant.
4.1.1 What Type of Paint is Best for Outdoor Rocks?
The best type of paint for outdoor rocks is acrylic paint that is specifically formulated for outdoor use. These paints are designed to withstand exposure to sunlight, rain, and temperature changes.
4.1.2 How Do You Protect Outdoor Painted Rocks from Fading?
To protect outdoor painted rocks from fading:
- Use paints that are UV-resistant.
- Apply a UV-resistant sealant.
- Place the rocks in a shaded area.
- Reapply sealant periodically.
4.2 Painting Rocks with Kids
When painting rocks with kids, it’s important to choose paints that are non-toxic and easy to clean up.
4.2.1 What Type of Paint is Safe for Kids to Use?
The safest type of paint for kids to use is non-toxic, water-based acrylic paint. These paints are easy to clean up with soap and water and are less likely to cause allergic reactions.
4.2.2 How Do You Clean Up Paint Splatters from Kids’ Projects?
To clean up paint splatters from kids’ projects:
- Wipe up wet paint immediately with a damp cloth.
- Soak dried paint with warm, soapy water and scrub gently.
- Use a specialized paint remover for stubborn stains.
4.3 Painting Rocks for Gifts
When painting rocks for gifts, consider the recipient’s personal style and preferences when choosing colors and designs.
4.3.1 What are Some Thoughtful Rock Painting Gift Ideas?
Some thoughtful rock painting gift ideas include:
- Personalized rocks with the recipient’s name or initials.
- Rocks with inspirational messages or quotes.
- Rocks with designs that reflect the recipient’s hobbies or interests.
- Rocks that match the recipient’s home decor.
4.3.2 How Do You Personalize Painted Rocks for Different Occasions?
To personalize painted rocks for different occasions:
- Use colors and designs that are appropriate for the occasion.
- Add a special message or greeting.
- Incorporate elements that are relevant to the event or holiday.
5. Advanced Techniques and Tips for Rock Painting
Once you’ve mastered the basics of rock painting, you can explore more advanced techniques to create unique and stunning artwork.
5.1 Using Stencils and Templates
Stencils and templates can help you create precise designs and intricate patterns on your painted rocks.
5.1.1 How Do You Use Stencils for Rock Painting?
To use stencils for rock painting:
- Secure the stencil to the rock with tape or adhesive.
- Apply paint over the stencil using a brush, sponge, or paint pen.
- Remove the stencil carefully and allow the paint to dry.
5.1.2 What are Some Creative Stencil Ideas for Rock Painting?
Some creative stencil ideas for rock painting include:
- Floral patterns
- Geometric shapes
- Animal silhouettes
- Lettering and numbers
- Mandala designs
5.2 Blending and Shading Techniques
Blending and shading techniques can add depth and dimension to your painted rock designs.
5.2.1 How Do You Blend Acrylic Paints on Rocks?
To blend acrylic paints on rocks:
- Apply two or more colors of paint next to each other on the rock.
- Use a soft brush to gently blend the colors together, creating a smooth transition.
- Add more layers of paint as needed to achieve the desired effect.
5.2.2 How Do You Create Shading Effects on Rocks?
To create shading effects on rocks:
- Apply a base coat of paint to the rock.
- Use a darker shade of paint to add shadows to the design.
- Use a lighter shade of paint to add highlights to the design.
- Blend the shades together to create a smooth transition.
5.3 Adding Texture and Dimension
Adding texture and dimension to your painted rocks can create a unique and tactile experience.
5.3.1 What Materials Can You Use to Add Texture to Rocks?
Materials that can be used to add texture to rocks include:
- Sand
- Gravel
- Beads
- Buttons
- Yarn
- Fabric
5.3.2 How Do You Apply Texture to Painted Rocks?
To apply texture to painted rocks:
- Apply a layer of wet paint to the rock.
- Sprinkle the desired texture material onto the wet paint.
- Press the texture material into the paint to secure it.
- Allow the paint to dry completely.
6. Finding Inspiration and Sharing Your Rock Art
Rock painting is a social activity that can be enhanced by finding inspiration from others and sharing your own creations with the community.
6.1 Where Can You Find Rock Painting Inspiration?
You can find rock painting inspiration from various sources, including:
- Online galleries and blogs
- Social media platforms
- Rock painting groups and communities
- Art books and magazines
- Nature and the environment
6.2 How Can You Share Your Rock Art with Others?
You can share your rock art with others in various ways, including:
- Hiding your painted rocks in public places for others to find
- Sharing photos of your rocks on social media
- Joining a local rock painting group or community
- Participating in rock painting events and workshops
- Displaying your rocks in your home or garden
6.3 Joining Rock Painting Communities
Joining a rock painting community can provide you with inspiration, support, and a sense of connection with other artists.
6.3.1 What are the Benefits of Joining a Rock Painting Group?
The benefits of joining a rock painting group include:
- Sharing ideas and inspiration
- Learning new techniques and tips
- Receiving feedback and support
- Making new friends
- Participating in community events
6.3.2 How Can You Find Local Rock Painting Groups?
You can find local rock painting groups by:
- Searching online for rock painting groups in your area
- Checking with local community centers and libraries
- Asking at local craft stores and art supply stores
- Looking for rock painting events and workshops in your area
7. Addressing Common Rock Painting Challenges
Like any art form, rock painting can present its own set of challenges. Here are some common issues and how to address them.
7.1 Paint Not Adhering to Rocks
If you’re experiencing issues with paint not adhering to rocks, consider the following:
7.1.1 Why is Paint Peeling Off Rocks?
Paint may peel off rocks due to:
- Dirty or oily rock surfaces
- Using the wrong type of paint
- Applying paint too thickly
- Not allowing the paint to dry completely
- Not sealing the painted rocks
7.1.2 How Can You Improve Paint Adhesion?
To improve paint adhesion:
- Clean the rocks thoroughly before painting.
- Use acrylic paint that is specifically designed for outdoor use.
- Apply thin, even coats of paint.
- Allow the paint to dry completely between coats.
- Seal the painted rocks with a durable sealant.
7.2 Designs Fading or Smudging
If your designs are fading or smudging, consider the following:
7.2.1 Why are Painted Rock Designs Fading?
Painted rock designs may fade due to:
- Exposure to sunlight
- Exposure to moisture
- Using paints that are not UV-resistant
- Not sealing the painted rocks
7.2.2 How Can You Prevent Designs from Smudging?
To prevent designs from smudging:
- Allow the paint to dry completely before handling the rocks.
- Use paint pens with waterproof ink.
- Apply a sealant to protect the designs.
- Avoid placing the rocks in areas where they will be exposed to excessive moisture or abrasion.
7.3 Cracking or Chipping of Sealant
If your sealant is cracking or chipping, consider the following:
7.3.1 Why is Sealant Cracking on Painted Rocks?
Sealant may crack on painted rocks due to:
- Using the wrong type of sealant
- Applying sealant too thickly
- Not allowing the sealant to dry completely
- Exposure to extreme temperatures
7.3.2 How Can You Prevent Sealant from Cracking?
To prevent sealant from cracking:
- Use a sealant that is specifically designed for outdoor use.
- Apply thin, even coats of sealant.
- Allow the sealant to dry completely between coats.
- Avoid exposing the rocks to extreme temperatures.
8. Safety Considerations for Rock Painting
When engaging in rock painting, it’s important to prioritize safety to protect yourself and others.
8.1 Safe Handling of Paints and Sealants
Always follow the manufacturer’s instructions for safe handling of paints and sealants.
8.1.1 What Precautions Should You Take When Using Paints and Sealants?
Precautions to take when using paints and sealants include:
- Working in a well-ventilated area
- Wearing gloves to protect your skin
- Wearing a mask to avoid inhaling fumes
- Keeping paints and sealants out of reach of children
- Properly disposing of used containers and materials
8.1.2 How Do You Properly Dispose of Paint and Sealant Waste?
To properly dispose of paint and sealant waste:
- Check local regulations for proper disposal methods.
- Allow leftover paint to dry completely before disposing of it.
- Dispose of empty containers according to local guidelines.
- Never pour paint or sealant down the drain.
8.2 Environmental Considerations
Be mindful of the environment when collecting rocks and painting outdoors.
8.2.1 Is it Safe to Collect Rocks from Natural Areas?
Whether it’s safe to collect rocks from natural areas depends on local regulations and environmental considerations.
- Check with local authorities to determine if rock collecting is permitted.
- Avoid collecting rocks from protected areas or sensitive ecosystems.
- Only collect rocks that are loose and readily available.
- Do not disturb vegetation or wildlife when collecting rocks.
8.2.2 How Can You Minimize Your Environmental Impact When Rock Painting?
To minimize your environmental impact when rock painting:
- Use non-toxic paints and sealants.
- Avoid painting rocks in areas where paint could contaminate the environment.
- Dispose of paint and sealant waste properly.
- Encourage others to be mindful of the environment when rock painting.
9. Rockscapes.net: Your Source for Rock Painting Inspiration and Supplies
At rockscapes.net, we are passionate about rock painting and dedicated to providing you with the inspiration, information, and supplies you need to create beautiful and meaningful artwork.
9.1 Discover a World of Rock Painting Ideas
Explore our extensive collection of rock painting ideas, ranging from simple designs for beginners to intricate artwork for experienced artists. Whether you’re looking for inspiration for inspirational messages, floral patterns, animal designs, or geometric shapes, you’ll find it at rockscapes.net.
9.2 Find the Perfect Rock Painting Supplies
Browse our selection of high-quality rock painting supplies, including acrylic paints, paint pens, brushes, sealants, and more. We offer a wide range of products to suit every budget and skill level.
9.3 Get Expert Advice and Guidance
Benefit from our expert advice and guidance on all aspects of rock painting, from selecting the right materials to mastering advanced techniques. Our team of experienced artists is here to help you unleash your creativity and create stunning rock art.
9.4 Join Our Rock Painting Community
Connect with other rock painting enthusiasts in our online community, where you can share your creations, exchange ideas, and receive feedback and support. Join our community today and become part of a vibrant and inspiring network of artists.
Ready to start your rock painting adventure? Visit rockscapes.net today and discover the endless possibilities of this creative and rewarding art form. Whether you’re looking to spread kindness, express your artistic talents, or simply have fun, rock painting is the perfect activity for you. Join us at rockscapes.net and let your creativity rock! For inspiration, detailed information on various rock types, and expert advice, contact us at Address: 1151 S Forest Ave, Tempe, AZ 85281, United States. Phone: +1 (480) 965-9011.
10. Frequently Asked Questions (FAQs) About Rock Painting
Here are some frequently asked questions about rock painting to help you get started and address any concerns you may have.
10.1 What is Rock Painting?
Rock painting is the art of decorating rocks with paint, markers, or other embellishments to create colorful and inspirational designs. These painted rocks are often left in public places for others to find, bringing joy and spreading kindness within communities.
10.2 Why Should I Paint Rocks?
Rock painting is a fun, creative, and accessible hobby that can be enjoyed by people of all ages. It allows you to express your artistic talents, connect with your community, and spread positivity by sharing your creations with others.
10.3 What Kind of Rocks are Best for Painting?
Smooth, flat rocks with minimal texture are ideal for painting. River rocks and beach stones are popular choices as they provide an even surface for detailed designs and adhere well to paint.
10.4 What Type of Paint Should I Use for Rock Painting?
Acrylic paint is generally recommended for rock painting due to its durability, versatility, and wide range of colors. It adheres well to rock surfaces, dries quickly, and is water-resistant once dry.
10.5 How Do I Prepare Rocks for Painting?
Clean the rocks thoroughly with soap and water to remove any dirt or debris. Allow the rocks to dry completely before painting. You can also prime the rocks with a white or light-colored acrylic primer for a smoother surface.
10.6 How Do I Seal Painted Rocks?
Seal painted rocks with a waterproof sealant to protect the paint from chipping, fading, and water damage. Apply one to two coats of sealant, allowing each coat to dry completely before applying the next.
10.7 Is Rock Painting Safe for Kids?
Yes, rock painting is safe for kids as long as non-toxic, water-based acrylic paints and sealants are used. Always supervise children when they are painting and ensure they wear appropriate safety gear, such as gloves and masks.
10.8 Where Can I Hide Painted Rocks?
Hide painted rocks in public places where they can be easily found, such as parks, gardens, sidewalks, and community centers. Avoid placing rocks in private residences, businesses, or protected natural areas.
10.9 What Should I Do if I Find a Painted Rock?
If you find a painted rock, take a moment to appreciate its beauty and read any messages or inspirational quotes on it. You can either keep the rock or re-hide it in a new location for someone else to find.
10.10 How Can I Get Involved in Rock Painting Communities?
Join local rock painting groups or communities to connect with other artists, share your creations, and participate in rock painting events and workshops. You can find these groups on social media platforms or through local community centers and libraries.