Where Do You Find Rocks To Paint? Rock painting is an enjoyable hobby that combines creativity with nature’s beauty, and rockscapes.net is here to guide you. Discover where to find the perfect rocks for your art, from beaches to craft stores, and learn how to prepare them for painting so you can unleash your inner artist and transform ordinary stones into stunning works of art.
1. Understanding the Allure of Rock Painting
Rock painting has captured the hearts of many, becoming a beloved hobby for artists of all ages and skill levels. What is it about this simple yet rewarding activity that sparks such widespread interest?
1.1. Connecting with Nature Through Art
Rock painting offers a unique opportunity to connect with nature on a deeper level. By transforming ordinary stones into works of art, you’re not only expressing your creativity but also celebrating the inherent beauty of the natural world. Each rock carries its own unique story, shaped by the elements over time, and painting allows you to add your own chapter to that narrative.
1.2. Therapeutic and Stress-Relieving Benefits
In today’s fast-paced world, finding moments of calm and relaxation is essential for maintaining mental well-being. Rock painting provides a therapeutic outlet, allowing you to focus your attention on the present moment and let go of daily stresses. The repetitive motions of painting, combined with the tactile experience of working with natural materials, can have a calming effect on the mind and body.
1.3. A Creative Outlet for All Ages
One of the most appealing aspects of rock painting is its accessibility to people of all ages. Whether you’re a child discovering the joy of art or an adult seeking a new creative outlet, rock painting offers something for everyone. It’s a fun and engaging activity that can be enjoyed individually or as a group, making it perfect for families, friends, and community events.
1.4. Sharing Kindness and Inspiration
Beyond the personal benefits, rock painting can also be a way to spread kindness and inspiration within your community. Painted rocks can be hidden in public places for others to find, bringing a smile to their faces and a moment of unexpected joy to their day. This simple act of sharing can create a ripple effect of positivity, brightening the lives of those around you.
2. Identifying the Ideal Rocks for Painting
Not all rocks are created equal when it comes to painting. The best rocks for your art projects will depend on several factors, including size, shape, surface texture, and color. Here’s what to look for:
2.1. Size and Shape Considerations
- Smooth, Flat Surfaces: Opt for rocks with smooth, flat surfaces as they provide an ideal canvas for painting intricate designs.
- Manageable Size: Choose rocks that are comfortable to hold and work with. Smaller rocks are great for detailed designs, while larger rocks can accommodate more elaborate artwork.
- Unique Shapes: Don’t be afraid to experiment with different shapes. Unusual rocks can inspire creative ideas and add character to your finished pieces.
2.2. Surface Texture and Porosity
- Smooth Texture: A smooth surface allows paint to adhere evenly and prevents unwanted texture from interfering with your designs.
- Low Porosity: Rocks with low porosity absorb less paint, resulting in vibrant colors and crisp lines.
2.3. Color and Tone Preferences
- Light Colors: Lighter-colored rocks provide a blank canvas for your artwork, allowing colors to pop and stand out.
- Dark Colors: Darker rocks can create a dramatic effect, especially when using metallic or neon paints.
2.4. Sourcing Rocks Ethically and Sustainably
- Respecting Nature: When collecting rocks from natural environments, be mindful of the local ecosystem and avoid disturbing wildlife or vegetation.
- Obtaining Permission: If collecting rocks on private property, always seek permission from the landowner.
- Purchasing Responsibly: Consider purchasing rocks from sustainable sources, such as local landscaping suppliers or craft stores that prioritize ethical sourcing practices.
3. Prime Locations to Discover Rocks for Painting
The quest for the perfect painting rocks can lead you to a variety of exciting locations, each offering its own unique selection of stones. Let’s explore some of the best places to find rocks for your art projects:
3.1. Natural Habitats: Beaches, Rivers, and Mountains
- Beaches: Beaches are a treasure trove of smooth, wave-worn stones in various sizes and shapes. Look for rocks along the high-tide line, where they’ve been naturally polished by the ocean.
- Rivers: Riverbeds often contain an assortment of rocks, ranging from small pebbles to larger boulders. Explore the banks and shallow areas for rocks with interesting textures and colors.
- Mountains: Mountainous regions can yield unique rocks with rugged surfaces and distinctive mineral compositions. Be cautious when collecting rocks in mountainous areas, as loose rocks can pose a safety hazard.
Remember to check local regulations and obtain permission before collecting rocks from natural habitats.
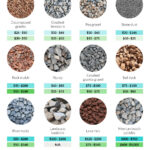
3.2. Landscaping Supply Stores and Garden Centers
Landscaping supply stores and garden centers are reliable sources for purchasing rocks specifically intended for decorative purposes. These stores typically offer a wide variety of rocks in different sizes, shapes, and colors, making it easy to find the perfect stones for your painting projects.
3.3. Craft Stores and Art Supply Retailers
Craft stores and art supply retailers often carry a selection of rocks designed for arts and crafts projects. These rocks are typically pre-cleaned and sorted, saving you time and effort in preparing them for painting. They may also offer specialty rocks with unique shapes or textures.
3.4. Online Marketplaces: Etsy, Amazon, and Rockscapes.net
Online marketplaces like Etsy, Amazon and rockscapes.net provide a convenient way to source rocks from the comfort of your own home. These platforms feature a wide variety of sellers offering rocks in bulk or individually, allowing you to find the perfect stones for your specific needs. Plus, on rockscapes.net you can find endless inspiration for your projects.
3.5. Community Resources: Local Rock Painting Groups and Facebook Marketplace
Connect with fellow rock painting enthusiasts in your local community through rock painting groups or online platforms like Facebook Marketplace. These groups often organize rock swaps or sales, providing an opportunity to acquire rocks from other artists and share your own creations.
4. Preparing Your Rocks for Painting: A Step-by-Step Guide
Before you can unleash your creativity on your newly acquired rocks, it’s essential to prepare them properly for painting. This ensures that your paint adheres well, your designs look crisp, and your finished pieces last longer. Here’s a step-by-step guide to preparing your rocks for painting:
4.1. Cleaning and Scrubbing: Removing Dirt and Debris
- Gather Supplies: You’ll need warm water, mild dish soap, a scrub brush, and a clean cloth or paper towels.
- Wash the Rocks: Submerge the rocks in warm, soapy water and use the scrub brush to remove any dirt, debris, or loose particles.
- Rinse Thoroughly: Rinse the rocks under clean running water to remove all traces of soap.
- Dry Completely: Allow the rocks to air dry completely, or pat them dry with a clean cloth or paper towels.
4.2. Priming for Enhanced Paint Adhesion
- Select a Primer: Choose a primer specifically designed for use on rocks or porous surfaces. Acrylic-based primers are a good option.
- Apply Primer: Apply a thin, even coat of primer to the surface of the rock using a brush or sponge.
- Let Dry: Allow the primer to dry completely according to the manufacturer’s instructions.
4.3. Sealing for Protection and Longevity
- Choose a Sealer: Select a clear, non-yellowing sealer that is suitable for use on painted rocks. Acrylic-based sealers are a popular choice.
- Apply Sealer: Apply a thin, even coat of sealer to the painted rock using a brush or spray can.
- Let Dry: Allow the sealer to dry completely according to the manufacturer’s instructions.
- Apply Additional Coats: For added protection, apply additional coats of sealer, allowing each coat to dry completely before applying the next.
4.4. Addressing Surface Imperfections
- Sanding: If your rocks have rough edges or uneven surfaces, use sandpaper to smooth them out before painting.
- Filling: For larger cracks or holes, use a rock filler or epoxy to create a smooth, even surface.
5. Unleashing Your Creativity: Painting Techniques and Ideas
With your rocks prepped and ready, it’s time to let your imagination run wild and transform them into stunning works of art. Here are some painting techniques and ideas to inspire your creativity:
5.1. Essential Painting Supplies and Tools
- Acrylic Paints: Acrylic paints are the most popular choice for rock painting due to their versatility, durability, and vibrant colors.
- Paintbrushes: Invest in a variety of paintbrushes in different sizes and shapes to achieve different effects.
- Paint Pens: Paint pens are ideal for creating fine lines, intricate details, and lettering on your rocks.
- Palette: Use a palette to hold and mix your paints.
- Water Container: Keep a container of water nearby for cleaning your brushes.
- Paper Towels: Paper towels are essential for wiping up spills and cleaning your brushes.
5.2. Basic Painting Techniques: Blending, Layering, and Detailing
- Blending: Create smooth transitions between colors by blending them together while they’re still wet.
- Layering: Build up depth and dimension in your designs by layering different colors and textures on top of each other.
- Detailing: Use fine-tipped brushes or paint pens to add intricate details to your artwork.
5.3. Inspirational Design Ideas for Rock Painting
- Animals: Paint your favorite animals on rocks, from cute kittens to majestic lions.
- Flowers: Capture the beauty of nature by painting colorful flowers on rocks.
- Mandalas: Create intricate mandala designs for a calming and meditative art experience.
- Inspirational Messages: Write uplifting messages or quotes on rocks to spread positivity and encouragement.
- Holiday Themes: Celebrate special occasions by painting rocks with holiday-themed designs.
5.4. Incorporating Mixed Media Elements
- Glitter: Add sparkle and shine to your rocks by incorporating glitter into your designs.
- Gems: Embellish your rocks with colorful gems for a touch of elegance.
- Buttons: Attach small buttons to your rocks to create whimsical and playful designs.
- Twine: Wrap twine around your rocks to add texture and a rustic touch.
6. Displaying and Sharing Your Painted Rocks
Once you’ve completed your rock painting masterpieces, it’s time to showcase them and share your creativity with the world. Here are some ideas for displaying and sharing your painted rocks:
6.1. Indoor Display Ideas
- Shelves: Arrange your painted rocks on shelves to create a colorful and eye-catching display.
- Mantels: Decorate your mantel with painted rocks to add a touch of personality to your living space.
- Coffee Tables: Place painted rocks on your coffee table as conversation starters.
- Windowsills: Display painted rocks on your windowsills to brighten up your home with natural beauty.
- Terrariums: Incorporate painted rocks into terrariums to add pops of color and visual interest.
6.2. Outdoor Placement and Rock Gardens
- Gardens: Scatter painted rocks throughout your garden to add whimsical accents and pops of color.
- Pathways: Line your garden pathways with painted rocks to create a unique and inviting entrance.
- Rock Gardens: Create a dedicated rock garden featuring your painted rocks as the main attraction.
- Patios: Decorate your patio with painted rocks to add personality and charm to your outdoor living space.
6.3. Joining Local Rock Painting Communities
- Rock Drops: Participate in rock drops, where you hide painted rocks in public places for others to find and enjoy.
- Rock Swaps: Attend rock swaps to trade your painted rocks with other artists and expand your collection.
- Online Groups: Join online rock painting groups to share your creations, get inspiration, and connect with fellow enthusiasts.
6.4. Spreading Kindness Through “Kindness Rocks”
- Leave Inspirational Messages: Write uplifting messages or quotes on your painted rocks to spread positivity and encouragement.
- Hide Rocks in Public Places: Hide your kindness rocks in parks, playgrounds, and other public places for others to discover.
- Track Your Rocks: Encourage finders to share photos of your rocks on social media using a unique hashtag, allowing you to track their journey and spread joy around the world.
7. Safety Considerations for Rock Painting
While rock painting is a fun and rewarding activity, it’s important to prioritize safety to ensure a positive experience for everyone involved. Here are some safety considerations to keep in mind:
7.1. Using Non-Toxic Paints and Sealers
- Check Labels: Always check the labels of your paints and sealers to ensure that they are non-toxic and safe for use by children and adults.
- Avoid Lead-Based Paints: Avoid using paints that contain lead, as lead can be harmful if ingested or inhaled.
- Opt for Water-Based Products: Choose water-based paints and sealers, as they are generally safer and easier to clean up than solvent-based products.
7.2. Ventilation and Respiratory Protection
- Work in Well-Ventilated Areas: When painting or sealing rocks, work in a well-ventilated area to avoid inhaling harmful fumes.
- Wear a Mask: If you’re sensitive to fumes or working with spray paints or sealers, wear a mask to protect your respiratory system.
7.3. Handling Rocks Safely
- Wear Gloves: Wear gloves to protect your hands from paint and other materials.
- Wash Hands Thoroughly: Wash your hands thoroughly after handling rocks, paints, and sealers.
- Supervise Children: Supervise children closely when they are painting rocks to prevent them from ingesting paint or other materials.
7.4. Eye Protection
- Wear Safety Glasses: Wear safety glasses to protect your eyes from paint splatters or flying debris.
- Avoid Rubbing Eyes: Avoid rubbing your eyes while painting, as this can transfer paint and other materials to your eyes.
8. Advanced Techniques and Expert Tips
Ready to take your rock painting skills to the next level? Here are some advanced techniques and expert tips to help you create even more stunning and professional-looking artwork:
8.1. Mastering Fine Details and Intricate Designs
- Use Fine-Tipped Brushes: Invest in a set of fine-tipped brushes specifically designed for detail work.
- Practice Steady Hand Techniques: Practice holding your brush steady and using small, controlled strokes to create intricate designs.
- Use a Magnifying Glass: Use a magnifying glass to help you see fine details more clearly.
8.2. Creating Realistic Effects with Shading and Highlighting
- Study Light and Shadow: Study how light and shadow interact with objects in real life to understand how to create realistic effects in your paintings.
- Use a Variety of Colors: Use a variety of colors to create depth and dimension in your paintings.
- Blend Carefully: Blend your colors carefully to create smooth transitions between light and shadow.
8.3. Working with Textures and Patterns
- Experiment with Different Textures: Experiment with different textures, such as stippling, dry brushing, and sponge painting, to add visual interest to your rocks.
- Use Stencils: Use stencils to create intricate patterns and designs on your rocks.
- Incorporate Natural Elements: Incorporate natural elements, such as leaves, twigs, and flowers, into your designs to add texture and dimension.
8.4. Preserving Your Artwork for Outdoor Display
- Use UV-Resistant Sealers: Use UV-resistant sealers to protect your painted rocks from fading and discoloration when displayed outdoors.
- Apply Multiple Coats of Sealer: Apply multiple coats of sealer to provide maximum protection against the elements.
- Choose Weather-Resistant Paints: Choose weather-resistant paints that are designed to withstand outdoor conditions.
9. Inspiring Rock Painting Projects for Every Skill Level
Whether you’re a beginner or an experienced artist, there’s a rock painting project out there for you. Here are some inspiring ideas for every skill level:
9.1. Beginner-Friendly Projects: Simple Shapes and Basic Designs
- Polka Dots: Paint simple polka dots on rocks in various colors and sizes.
- Stripes: Create colorful stripes on rocks using different widths and patterns.
- Hearts: Paint simple heart shapes on rocks as a symbol of love and kindness.
- Stars: Create starry night scenes on rocks using white and yellow paint.
- Inspirational Words: Write simple inspirational words on rocks, such as “Hope,” “Love,” or “Believe.”
9.2. Intermediate Projects: Animals, Flowers, and Landscapes
- Animals: Paint your favorite animals on rocks, such as cats, dogs, birds, or butterflies.
- Flowers: Capture the beauty of nature by painting colorful flowers on rocks, such as roses, daisies, or sunflowers.
- Landscapes: Create miniature landscapes on rocks, such as mountains, forests, or beaches.
- Mandalas: Paint intricate mandala designs on rocks using geometric patterns and vibrant colors.
- Cartoon Characters: Paint your favorite cartoon characters on rocks for a fun and playful project.
9.3. Advanced Projects: Portraits, Realistic Scenes, and Abstract Art
- Portraits: Challenge yourself by painting realistic portraits of people or animals on rocks.
- Realistic Scenes: Create detailed and realistic scenes on rocks, such as cityscapes, landscapes, or still life compositions.
- Abstract Art: Experiment with abstract art techniques, such as color blocking, splatter painting, and texture manipulation, to create unique and expressive rock paintings.
- Mixed Media: Combine different media, such as paint, collage, and found objects, to create mixed media rock art.
- 3D Rock Art: Create three-dimensional rock art by attaching found objects to rocks and painting them to create unique sculptures.
10. Frequently Asked Questions About Rock Painting
Still have questions about rock painting? Here are some frequently asked questions to help you get started:
10.1. What kind of rocks are best for painting?
Smooth, flat rocks with low porosity are best for painting. These rocks provide an even surface for paint to adhere to and prevent paint from being absorbed into the rock.
10.2. What kind of paint should I use for rock painting?
Acrylic paints are the most popular choice for rock painting due to their versatility, durability, and vibrant colors.
10.3. Do I need to seal my painted rocks?
Yes, sealing your painted rocks is important to protect them from the elements and prevent the paint from fading or chipping.
10.4. What kind of sealer should I use?
Choose a clear, non-yellowing sealer that is suitable for use on painted rocks. Acrylic-based sealers are a good option.
10.5. How do I clean my painted rocks?
You can clean your painted rocks with a soft cloth and mild soap and water. Avoid using harsh chemicals or abrasive cleaners, as these can damage the paint.
10.6. Can I paint rocks with kids?
Yes, rock painting is a fun and engaging activity for kids of all ages. Just be sure to supervise children closely and use non-toxic paints and sealers.
10.7. Where can I find inspiration for rock painting designs?
You can find inspiration for rock painting designs online, in books, and in nature. Look for patterns, colors, and shapes that appeal to you and let your imagination run wild.
10.8. How can I share my painted rocks with others?
You can share your painted rocks by hiding them in public places, giving them as gifts, or selling them at craft fairs or online.
10.9. Are there any safety concerns I should be aware of?
Yes, it’s important to use non-toxic paints and sealers, work in a well-ventilated area, and wear gloves and eye protection when painting rocks.
10.10. Where can I buy rocks for painting?
You can buy rocks for painting at landscaping supply stores, garden centers, craft stores, and online marketplaces like Etsy, Amazon and rockscapes.net.
Ready to start your rock painting adventure? At rockscapes.net, we provide a wealth of inspiration, detailed information about different types of rocks, and helpful tips to bring your creative visions to life. Contact us today at Address: 1151 S Forest Ave, Tempe, AZ 85281, United States or Phone: +1 (480) 965-9011. Visit our website rockscapes.net and discover the beauty of rockscapes. Let’s transform ordinary stones into extraordinary art together!