Building a rock wall around a tree not only enhances your landscape but also protects the tree and creates a unique garden feature. At rockscapes.net, we provide expert guidance and inspiration to help you achieve stunning results with natural stone. Constructing a retaining wall involves careful planning, selecting the right materials, and following precise construction steps to ensure both stability and aesthetic appeal. Discover innovative landscape designs and practical tips for building your dream rock wall today.
1. What Are The Benefits Of Building A Rock Wall Around A Tree?
Building a rock wall around a tree offers aesthetic appeal, root protection, erosion control, and improved planting conditions. The rock wall enhances the visual appeal of your landscape, protects the tree’s roots from damage, prevents soil erosion, and creates a level planting bed.
- Aesthetic Enhancement: A rock wall adds a natural, textured element to your garden, enhancing its visual appeal and creating a focal point. According to landscape design experts, incorporating natural stone can increase property value and curb appeal.
- Root Protection: The wall acts as a barrier, protecting the tree’s roots from lawnmowers, foot traffic, and other potential damage. This protection is particularly important for trees with shallow root systems.
- Erosion Control: On sloped landscapes, a rock wall helps to retain soil, preventing erosion and runoff that can expose roots and harm the tree. The Natural Resources Conservation Service emphasizes the importance of retaining walls in managing soil erosion.
- Improved Planting Conditions: The wall creates a level or terraced planting area around the tree, making it easier to plant flowers, shrubs, or ground cover. This improves the growing environment and allows for better water retention.
- Habitat Creation: Rock walls can provide habitat for beneficial insects and small animals, contributing to the biodiversity of your garden. Studies have shown that rock structures can increase the presence of pollinators and other beneficial species.
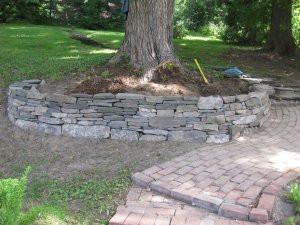 Rock wall enhancing garden with lush plantings
2. What Materials Are Needed To Build A Rock Wall?
Building a rock wall requires natural stones, gravel, landscape fabric, and construction adhesive. These materials ensure the wall is stable, well-draining, and aesthetically pleasing.
| Material | Description | Purpose |
|---|---|---|
| Natural Stones | Various sizes and types (e.g., granite, sandstone, limestone) | Provides the primary structure and aesthetic appeal of the wall. Different types offer varying textures and colors. |
| Gravel | Pea gravel or crushed stone | Ensures proper drainage behind the wall, preventing water buildup that can cause instability. |
| Landscape Fabric | Heavy-duty, permeable fabric | Prevents soil from mixing with the gravel, maintaining drainage efficiency and preventing the wall from shifting over time. |
| Construction Adhesive | Exterior-grade adhesive | Bonds the stones together, adding stability and preventing movement. Important for taller walls or those in areas with heavy foot traffic or potential seismic activity. |
| Level | Ensures each stone is placed accurately | It is an essential tool for ensuring the rock wall is level and stable |
| Safety Glasses and Gloves | Personal protection equipment | Safety gear is essential to prevent injury during the building process. |
- Natural Stones: Choose stones that complement your landscape and are suitable for retaining walls. Granite, sandstone, and limestone are popular choices. Consider the size and shape of the stones for stability and visual appeal. Rockscapes.net offers a variety of natural stones perfect for your project.
- Gravel: Use pea gravel or crushed stone for drainage behind the wall. This prevents water buildup, which can cause the wall to collapse.
- Landscape Fabric: Line the back of the wall with landscape fabric to prevent soil from mixing with the gravel. This maintains the drainage system and prevents the wall from shifting.
- Construction Adhesive: Use an exterior-grade construction adhesive to bond the stones together. This adds stability, especially for taller walls.
3. How Do You Prepare The Site For A Rock Wall?
Site preparation involves clearing the area, outlining the wall, and digging a foundation trench. Proper preparation ensures the wall is stable and long-lasting.
- Clear the Area: Remove any grass, weeds, rocks, and debris from the area where the wall will be built. This ensures a clean and level surface to work on.
- Outline the Wall: Use spray paint or stakes and string to mark the desired curve and dimensions of the wall. This provides a visual guide during construction.
- Dig a Trench: Excavate a trench along the outline, typically 6-12 inches deep, depending on the size and height of the wall. The trench provides a stable foundation for the first layer of stones.
- Level the Base: Use a level and shovel to ensure the base of the trench is even. This prevents the wall from leaning or collapsing over time.
- Compact the Soil: Use a hand tamper or plate compactor to compact the soil in the trench. This creates a solid base for the stones.
- Consult Local Regulations: Check with your local authorities for any permits or regulations regarding retaining walls. Some areas have restrictions on wall height and location.
- Consider Tree Roots: Be careful not to damage the tree’s major roots during excavation. If you encounter large roots, adjust the wall’s placement or consult an arborist for advice.
- Ensure Proper Drainage: Plan for proper drainage behind the wall to prevent water buildup. This may involve installing a perforated drain pipe at the base of the wall, connected to a suitable outlet.
4. How Do You Build The First Layer Of A Rock Wall?
The first layer is crucial for stability. Place the largest stones in the trench, ensuring they are level and stable.
- Select Large Stones: Choose the largest, flattest stones for the first layer. These will provide a solid foundation for the rest of the wall.
- Position the Stones: Place the stones in the trench, ensuring they fit snugly together. Use smaller stones or gravel to fill any gaps.
- Check for Level: Use a level to ensure each stone is level both horizontally and vertically. Adjust the stones as needed to create an even base.
- Bury Part of the Stones: Bury about one-third to one-half of each stone below the ground level. This adds stability and prevents the wall from shifting.
- Compact the Soil: Backfill around the stones with soil, compacting it firmly to hold them in place.
- Use a Batter: Angle the first layer slightly inward towards the slope. This creates a batter, which improves the wall’s stability and resistance to pressure from the soil behind it.
- Stagger Joints: Stagger the joints between the stones in each layer to increase the wall’s strength and prevent weak points.
- Dry-Fit the Stones: Before permanently placing the stones, dry-fit them to ensure they fit well together and create a visually appealing pattern.
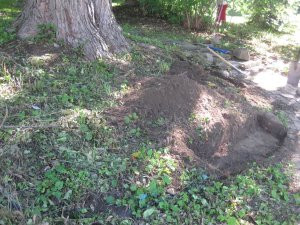 First layer of rock wall construction showing large stones placed in a trench
5. How Do You Add Subsequent Layers To The Rock Wall?
Subsequent layers should be staggered and securely placed. Use smaller stones to fill gaps and maintain a consistent batter.
- Stagger the Joints: Place each stone so that its joint does not align with the joints in the layer below. This increases the wall’s strength and stability.
- Use Smaller Stones: Use smaller stones to fill gaps between the larger stones. This creates a tight, interlocking structure.
- Maintain a Batter: Continue to angle each layer slightly inward towards the slope. This helps the wall resist pressure from the soil behind it.
- Check for Level: Use a level to ensure each stone is level and that the wall is progressing evenly.
- Secure with Adhesive: Apply construction adhesive between the stones to bond them together. This is particularly important for taller walls or those in areas with seismic activity.
- Choose Stones Carefully: Select stones that fit well together and create a visually appealing pattern. Consider the color, texture, and shape of each stone.
- Use Gravity to Your Advantage: Angle the stones slightly downward towards the back of the wall. This helps to lock them in place and resist movement.
- Backfill as You Go: Backfill behind each layer of stones with gravel and soil. This provides support and ensures proper drainage.
6. How Do You Ensure Proper Drainage Behind The Rock Wall?
Proper drainage is essential to prevent water buildup and wall collapse. Use gravel and landscape fabric to create an effective drainage system.
- Line with Landscape Fabric: Line the back of the wall with landscape fabric before adding gravel. This prevents soil from mixing with the gravel and clogging the drainage system.
- Add Gravel: Pour gravel behind the wall to a depth of at least 6 inches. This provides a space for water to collect and drain away.
- Install a Drain Pipe: For taller walls or areas with heavy rainfall, install a perforated drain pipe at the base of the wall. Connect the pipe to a suitable outlet, such as a storm drain or dry well.
- Slope the Ground: Slope the ground behind the wall away from the structure. This helps to direct water away from the wall and reduces the amount of water that can seep behind it.
- Inspect Regularly: Regularly inspect the drainage system to ensure it is functioning properly. Remove any debris or obstructions that could impede water flow.
- Use a Permeable Backfill: In addition to gravel, consider using a permeable backfill material, such as crushed stone or sand. This allows water to drain more easily and reduces the risk of water buildup.
- Create Weep Holes: If the wall is solid and does not allow water to drain through the stones, create weep holes at regular intervals. These holes allow water to escape from behind the wall and prevent pressure from building up.
- Consider a French Drain: A French drain is a trench filled with gravel that directs water away from the wall. This can be an effective solution for areas with poor drainage.
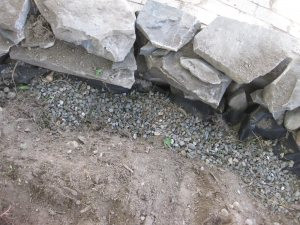 Drainage system behind rock wall with gravel and landscape fabric
7. How Do You Protect The Tree Roots While Building The Rock Wall?
Protecting tree roots is crucial for the tree’s health. Avoid cutting major roots and provide adequate space for root growth.
- Identify Major Roots: Before digging, carefully examine the area around the tree to identify any major roots. Avoid cutting or damaging these roots, as they are essential for the tree’s survival.
- Adjust Wall Placement: If you encounter large roots, adjust the wall’s placement to avoid them. You may need to curve the wall or create a wider gap around the tree.
- Create a Root Barrier: Install a root barrier between the wall and the tree to prevent roots from growing into the wall. This can be made from heavy-duty plastic or metal sheeting.
- Provide Adequate Space: Leave enough space between the wall and the tree trunk to allow for future growth. The general rule is to leave at least 1-2 feet of space, depending on the size and species of the tree.
- Consult an Arborist: If you are unsure about how to protect the tree’s roots, consult an arborist for advice. They can assess the tree’s health and provide recommendations for minimizing damage during construction.
- Use Hand Tools: When digging near the tree, use hand tools rather than heavy machinery. This allows you to work more carefully and avoid damaging the roots.
- Water the Tree Regularly: After construction, water the tree regularly to help it recover from any stress. This is particularly important during dry periods.
- Mulch Around the Tree: Apply a layer of mulch around the tree to help retain moisture and protect the roots. Use organic mulch, such as wood chips or shredded bark, and keep it away from the tree trunk to prevent rot.
8. How Can You Incorporate Plants Into The Rock Wall?
Incorporating plants adds beauty and softens the wall’s appearance. Choose plants that thrive in rocky conditions and provide good drainage.
- Choose Suitable Plants: Select plants that are well-suited to rocky conditions and can tolerate drought. Sedums, succulents, and alpine plants are good choices.
- Create Planting Pockets: Create planting pockets between the stones as you build the wall. Fill these pockets with well-draining soil.
- Plant as You Build: Plant the plants in the pockets as you build the wall. This makes it easier to access the planting areas and ensures the plants are securely in place.
- Water Regularly: Water the plants regularly, especially during dry periods. Provide adequate drainage to prevent root rot.
- Mulch Around the Plants: Apply a layer of mulch around the plants to help retain moisture and suppress weeds.
- Consider the Aspect: Choose plants that are appropriate for the amount of sunlight the wall receives. South-facing walls will be hotter and drier than north-facing walls.
- Use a Variety of Plants: Use a variety of plants to create visual interest and attract pollinators. Consider the color, texture, and bloom time of each plant.
- Prune Regularly: Prune the plants regularly to keep them healthy and attractive. Remove any dead or damaged foliage.
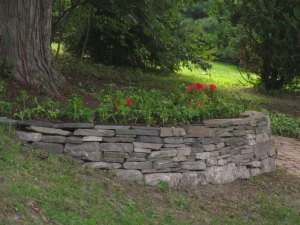 Rock wall with plants incorporated into the design
9. How Do You Maintain A Rock Wall Around A Tree?
Regular maintenance ensures the wall remains stable and attractive. Inspect for damage and address any issues promptly.
- Inspect Regularly: Inspect the wall regularly for any signs of damage, such as cracks, bulging, or shifting stones.
- Address Issues Promptly: Address any issues promptly to prevent them from becoming worse. Replace damaged stones, repair cracks, and reinforce weak areas.
- Remove Debris: Remove any debris, such as leaves, twigs, and weeds, from the wall. This helps to prevent water buildup and maintain the wall’s appearance.
- Control Weeds: Control weeds growing on the wall by hand-pulling or using a herbicide. Be careful not to damage the plants you want to keep.
- Prune Plants: Prune any plants growing on the wall to keep them healthy and attractive. Remove any dead or damaged foliage.
- Re-Point Mortar Joints: If the wall is mortared, re-point any cracked or damaged mortar joints. This helps to prevent water from seeping behind the wall and causing damage.
- Clean the Stones: Clean the stones periodically to remove dirt, algae, and stains. Use a soft brush and mild detergent.
- Apply a Sealant: Apply a sealant to the stones to protect them from the elements and prevent staining. Choose a sealant that is appropriate for the type of stone used.
10. What Are Some Design Ideas For Rock Walls Around Trees?
Explore creative design ideas to make your rock wall unique and visually appealing. Consider terracing, adding water features, or incorporating lighting.
- Terraced Walls: Create a terraced wall to add visual interest and provide more planting space. This is particularly effective on sloped landscapes.
- Water Features: Incorporate a water feature, such as a small waterfall or pond, into the wall. This adds a soothing element and attracts wildlife.
- Lighting: Add lighting to the wall to highlight its features and create a dramatic effect at night. Use low-voltage landscape lighting to save energy.
- Benches: Build a bench into the wall to provide a seating area. This is a great way to enjoy your garden and relax in the shade of the tree.
- Sculptures: Add sculptures or other decorative elements to the wall to personalize it. Choose items that complement the style of your garden.
- Use Different Types of Stone: Use different types of stone to create a unique and textured look. Mix and match colors, sizes, and shapes to add visual interest.
- Incorporate Native Plants: Incorporate native plants into the wall to attract pollinators and support local ecosystems. Choose plants that are well-suited to the conditions in your area.
- Create a Focal Point: Create a focal point in the wall, such as a large stone, a unique plant, or a decorative element. This draws the eye and adds interest.
Crafting a rock wall around a tree combines functionality with artistry, creating a beautiful and sustainable landscape feature. For inspiration, materials, and expert advice, visit rockscapes.net, your premier destination for all things stone.
FAQ: Building Rock Walls Around Trees
Can building a rock wall around a tree harm it?
No, if done correctly. It’s important to avoid damaging major roots, provide good drainage, and allow space for future growth.
What type of stones is best for building a rock wall?
Durable stones like granite, sandstone, or limestone are ideal due to their longevity and aesthetic appeal. Rockscapes.net offers a wide selection.
How do I ensure the rock wall is stable?
A stable foundation, proper batter (inward slope), and staggering joints between stones are crucial for stability.
What’s the best way to provide drainage behind the wall?
Using gravel and landscape fabric behind the wall ensures proper drainage and prevents water buildup.
Can I incorporate plants into my rock wall?
Yes, choose plants that thrive in rocky conditions and create planting pockets as you build the wall.
How close to the tree can I build the wall?
Leave enough space (1-2 feet) between the wall and the trunk to allow for future growth and avoid root damage.
Do I need a permit to build a rock wall?
Check with your local authorities for any regulations or permits required for retaining walls.
What tools do I need to build a rock wall?
Essential tools include a shovel, level, hand tamper, gloves, safety glasses, and construction adhesive.
How do I maintain a rock wall around a tree?
Regularly inspect for damage, remove debris, control weeds, and prune plants to keep the wall stable and attractive.
How high can I build a rock wall without professional help?
As a general guideline, walls over 4 feet tall often require professional engineering and construction to ensure safety and stability. For walls exceeding this height, it’s best to consult with a qualified landscape professional or structural engineer.
Address: 1151 S Forest Ave, Tempe, AZ 85281, United States.
Phone: +1 (480) 965-9011.
Website: rockscapes.net.