Building a rocking chair can seem daunting, but with simple instructions, it’s an achievable and rewarding project. At rockscapes.net, we provide detailed guidance to help you create your own comfortable and stylish rocking chair. Learn simple techniques, choose the best materials, and get ready to enjoy the soothing motion of your handcrafted rocking chair. Explore rockscapes.net for design inspiration, rock types, and expert tips.
1. Understanding Rocking Chairs: A Beginner’s Guide
Are you curious about the mechanics and comfort behind rocking chairs? Rocking chairs offer more than just a place to sit; they provide relaxation and a gentle, rhythmic motion. Let’s explore the basics of how they work.
The magic of a rocking chair lies in the relationship between the shape of the rockers and the chair’s center of gravity. This balance creates the smooth, arcing motion we all love. The center of gravity is the balance point of the chair. If it’s too high, the chair will tip; if it’s too low, it won’t rock at all. According to research from Arizona State University’s School of Earth and Space Exploration, rocking chairs promote relaxation by stimulating the vestibular system, which controls balance and spatial orientation.
For a great rocking experience, aim for these qualities:
- Back Support: The chair should take pressure off your back, keeping your spine in a neutral position.
- Rhythmic Motion: The rocking motion should be smooth, comfortable, and rhythmic.
- Stress Relief: Rocking helps relieve nervous energy and promotes better blood flow.
2. Choosing The Right Wood For Your Rocking Chair Project
What wood type is best for your DIY rocking chair? The wood you choose dramatically impacts the chair’s durability, appearance, and suitability for indoor or outdoor use. Let’s delve into some excellent wood options.
The right wood depends on whether your rocking chair will live indoors or outdoors. Here’s a breakdown:
2.1. Best Wood for Outdoor Rocking Chairs
What are the best wood options for outdoor rocking chairs, considering durability and weather resistance? These woods are durable and weather-resistant, perfect for creating a long-lasting outdoor rocking chair.
- Ipe: This tropical hardwood is incredibly dense and resistant to cracking, decay, and extreme weather. Its natural oils repel insects and fungi. Untreated ipe can last up to 40 years outdoors. Due to its density, ipe is best suited for experienced woodworkers.
- Teak: A popular, albeit expensive, choice for outdoor furniture, teak is naturally water and pest-resistant thanks to its high oil content. It doesn’t expand or shrink much in harsh conditions and is relatively easy to work with. However, sourcing teak can be challenging and environmentally impactful.
- Western Red Cedar: A readily available and economical option, Western Red Cedar resists warping, decay, and insects. It has a beautiful red hue. While its lifespan is shorter than ipe or teak, its affordability makes it a great choice. Being a softer wood, it may show wear and tear over time.
- Fir: A durable and widely available wood, fir has been a staple in the wood industry for years. It resists decay and insects, offering a lifespan of 10-15 years. This affordable wood also resists warping.
2.2. Top Wood for Indoor Rocking Chairs
What wood types are recommended for indoor rocking chairs, focusing on aesthetics and workability? These woods provide beauty and workability, ideal for crafting a stylish and comfortable indoor rocking chair.
- Mahogany: Mahogany is a popular hardwood known for its beautiful red hue, which darkens over time. Its medium texture and heavy density make it suitable for experienced woodworkers. When properly treated, it is highly durable.
- Walnut: Walnut is a strong, fairly lightweight wood celebrated for its rich brown color. It offers excellent dimensional stability and strength properties. Its medium density makes it accessible for novice woodworkers.
- Ash: Ash is tough, flexible, and durable, making it ideal for DIY projects. It holds screws and glue well and is easy to work with.
- Birch: Birch is affordable, hard, and stable, commonly found in the Northern Hemisphere. Its medium density makes it a good option for woodworkers of all skill levels.
3. Essential Tools and Materials for Building Your Rocking Chair
What tools and materials are necessary to build a rocking chair, ensuring a smooth and successful project? Gathering the right tools and materials is crucial for building a rocking chair.
3.1. Key Tools You’ll Need
What tools are essential for building a rocking chair, covering measuring, cutting, and assembly? Having these tools on hand will make the building process much smoother and more efficient.
- Tape measure
- Sander
- Square
- Jigsaw
- Circular saw or table saw
- Miter saw
- Drill
- Kreg jig (for pocket holes)
- Nail gun (optional, but helpful)
3.2. Lumber and Materials Checklist
What lumber and materials are needed for a rocking chair project, specifying dimensions and types? This list ensures you have everything required to construct your rocking chair from start to finish.
Lumber:
- 2 – 1×2 at 8’
- 3 – 1×3 at 8’
- 2 – 1×4 at 8’
- 1 – 1×6 at 8’
Cut List:
- Backrest top frame: 1 – 1×2 at 16”
- Backrest side frames: 2 – 1×2 at 18 – 1/2”
- Armrest slats: 2 – 1×3 at 2 – 1/2”
- Sides of the backrest: 2 – 1×3 at 21”
- Slats of the backrest: 5 – 1×4 at 19”
- Seat sides: 2 – 1×3 at 23”
- Seat front and back: 2 – 1×2 at 17 – 1/2”
- Slats of the seat: 5 – 1×4 at 19”
- Armrests: 2 – 1×3 at 22”
- Side frame tops: 2 – 1×3 at 12 – 1/4”
- Sides of the frame: 4 – 1×3 at 24 – 1/2”
- Bottom of the frame: 2 – 1×2 at 19 – 1/2”
- Rockers: 2 – 1×6 at 35” – Rocker
Materials:
- 1-¼ “ pocket hole screws
- Clamps
- Pocket hole plugs
- Safety gear (glasses, gloves, mask)
- Wood glue
- Sanding supplies (various grits)
- ¼ “ spade bit
- 1- ¼ “ wood screws
- 20 – 1 – ¼ “ 2” long bolts and ¼ “ nuts
- Paste wax
- Finishing supplies (stain, paint, varnish)
4. Step-by-Step Guide to Building Your Rocking Chair
How do you assemble a rocking chair, from the backrest to the final finishing touches? Follow these steps carefully to construct your rocking chair.
4.1. Assembling the Backrest Frame
What’s the first step in building a rocking chair, and how do you properly assemble the backrest frame? This initial step forms the foundation of your rocking chair’s back support.
 Assembling Rocking Chair Backrest
Using a Kreg jig set for ¾” material, drill pocket holes at each end of the 16” backrest top frame. The 1×2 backrest side frames should be 18 ½ “ long.
Connect these three pieces using 1 ¼ “ pocket screws and wood glue. Allow the glue to dry completely before moving on.
4.2. Attaching Armrest Supports, Backrest Sides, and Slats
How do you attach the armrest supports, backrest sides, and slats to the frame, ensuring structural integrity? Properly attaching these components adds strength and comfort to the backrest.
Cut the 1×4 armrest support at a 20-degree angle.
Shape the bottoms of the backrest sides. Attach them to the backrest side frame with glue and 1 ¼” wood screws.
Attach the armrest supports to the backrest sides using glue and 1 ¼” wood screws.
Attach the backrest slats to the backrest top frame and backrest sides with glue and 1 ¼” wood screws.
4.3. Constructing the Seat
How do you build the seat of the rocking chair, including the sides, front, back, and slats? Creating a sturdy and comfortable seat is essential for enjoying your rocking chair.
 Rocking Chair Side View
Using the Kreg jig, drill pocket holes in all ends of the seat front and seat back pieces. Assemble using wood glue and 1 ¼” pocket screws.
Attach the seat slats to the seat sides, seat back, and seat front with 1 ¼” wood screws and wood glue.
Ensure the seat front and side are flush, and the back edge of the back slat is flush with the back edge of the seat back.
4.4. Building the Side Frames
What steps are involved in building the side frames, including the tops, bottoms, and sides? The side frames provide the structural support for the entire chair.
Cut the 1×3 armrest at a 10-degree angle and round out the side frame bottom at a 10-degree angle.
Using the Kreg jig with ¾” material, drill pocket holes into the side frame tops and bottoms. These pocket holes will secure the pieces together.
Assemble all pieces with wood glue and pocket screws. Repeat for the other side.
4.5. Attaching the Rockers
How do you properly attach the rockers to the base, ensuring a smooth and safe rocking motion? Attaching the rockers correctly is vital for the chair’s functionality and safety.
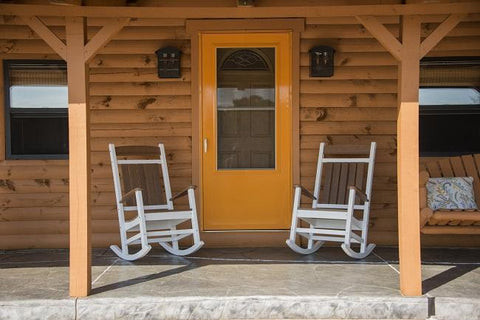 White Porch Rocking Chairs
Clamp the rockers to the side frame sides. The rounded areas allow for a seamless connection.
Ensure the rocker overhangs the front of the rocking chair by 4” and extends further in the back to allow for ample movement.
Draw the correct shape and cut with your jigsaw, ensuring a gentle and smooth curve. A radius of 62-½” is ideal for the rockers.
Use a ¼” spade bit to drill holes through the clamped pieces. Secure the rockers with glue, bolts, and nuts.
Sand away any excess wood with your sander or jigsaw.
4.6. Securing the Backrest to the Frame
How do you attach the backrest to the side frames, ensuring a secure and stable connection? Connecting the backrest to the frame creates a cohesive and strong chair structure.
Set the rocking chair in a standup position. Attach clamps to secure the backrest to the side frame assemblies.
Ensure the corner of the armrest sits flush with the back edge of the backrest side, resting on the armrest support. Drill through with your spade bit to attach the side frame sides to the backrest side.
Use wood glue and ¼” bolts and nuts for additional security.
Repeat the process on the other side.
4.7. Finishing Touches: Staining, Painting, or Varnishing
What are the final steps to complete your rocking chair, including staining, painting, or varnishing? These finishing touches enhance the chair’s appearance and protect it from the elements.
 Rocking Chair Stain, Paint, Or Varnish
Ensure everything is even and the rocker rocks smoothly.
Paint, stain, or varnish the rocker to fully finish it off, depending on your desired look.
4.8. Decorating and Personalizing Your Rocking Chair
How can you decorate and personalize your rocking chair to make it even more comfortable and inviting? Adding personal touches makes your rocking chair unique and cozy.
Add throw pillows, a throw blanket, or custom cushions to make your chair even more comfortable.
Place a wicker basket next to your rocker for storing extra pillows and blankets. Add a nightstand to hold your coffee or books.
4.9. Enjoy Your Rocking Chair
What is the final step after building your rocking chair, and how can you best enjoy your creation? Relax and take pride in your accomplishment by enjoying your new rocking chair.
 Final View of Rocking Chair
Your rocking chair is now ready to enjoy! Relax with your favorite book and take pride in your DIY project.
There’s nothing quite like completing a do-it-yourself project and knowing you made it yourself. Congratulations on your accomplishment!
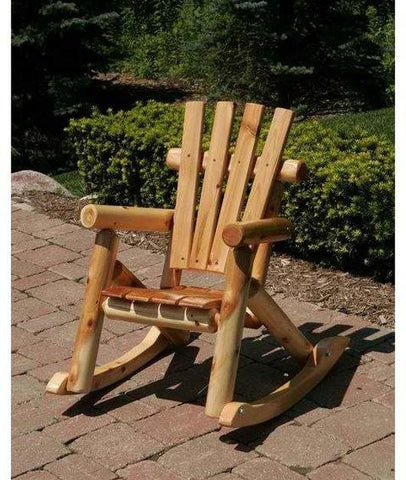
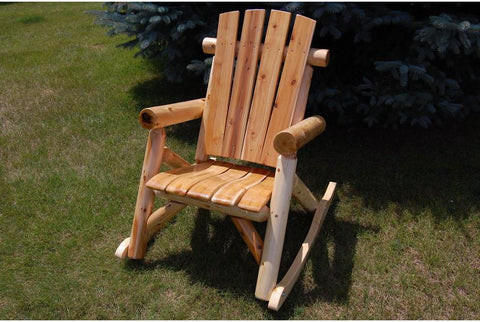
5. Rocking Chair Styles and Design Inspirations
What are some popular rocking chair styles, and where can you find inspiration for your own design? Exploring different styles can help you create a rocking chair that perfectly matches your taste.
- Traditional Rocking Chairs: Classic designs with spindle backs, often made from high-quality wood like oak or maple.
- Adirondack Rocking Chairs: A more rustic style, perfect for outdoor settings, typically made from weather-resistant woods like cedar or teak.
- Modern Rocking Chairs: Sleek, minimalist designs with clean lines, often incorporating metal and ergonomic features.
- Glider Rocking Chairs: These chairs don’t have traditional rockers but glide back and forth on a smooth mechanism, ideal for nurseries.
For design inspiration, visit rockscapes.net, where you can find numerous ideas and detailed information on various rock and landscape designs. You can also find inspiration on other websites and magazines.
6. Maintenance Tips to Keep Your Rocking Chair in Top Shape
How should you maintain your rocking chair to ensure it lasts for years to come? Regular maintenance keeps your rocking chair looking great and functioning smoothly.
- Regular Cleaning: Wipe down your rocking chair regularly with a damp cloth to remove dust and dirt.
- Inspect and Tighten: Check for loose screws or bolts and tighten them as needed.
- Protect from the Elements: If your rocking chair is outdoors, cover it during harsh weather to prevent damage.
- Reapply Finish: Reapply stain, paint, or varnish every few years to protect the wood and maintain its appearance.
- Lubricate Moving Parts: For glider rocking chairs, lubricate the gliding mechanism periodically to ensure smooth operation.
7. Common Mistakes to Avoid When Building a Rocking Chair
What are some common mistakes to avoid when building a rocking chair, ensuring a successful outcome? Avoiding these pitfalls will help you create a rocking chair that is both beautiful and functional.
- Inaccurate Measurements: Ensure all measurements are precise to avoid misaligned parts.
- Using the Wrong Wood: Choose a wood that is appropriate for the intended use (indoor or outdoor) and your skill level.
- Poor Joinery: Use strong joinery techniques to ensure the chair is sturdy and durable.
- Improper Rocker Shape: The rockers need a smooth, gentle curve for a comfortable rocking motion.
- Rushing the Finishing Process: Take your time with staining, painting, or varnishing to achieve a professional finish.
8. The Benefits of Rocking: More Than Just a Chair
What are the physical and mental benefits of using a rocking chair? Rocking chairs offer more than just a comfortable seat; they can improve your well-being.
- Stress Relief: The rhythmic motion can be soothing and help reduce stress and anxiety.
- Improved Circulation: Rocking can improve blood flow and reduce swelling in the legs and feet.
- Back Pain Relief: Rocking can help relieve back pain by promoting better posture and reducing pressure on the spine.
- Better Sleep: The gentle motion can help you relax and fall asleep more easily.
According to the Mayo Clinic, rocking can also benefit people with dementia by reducing anxiety and improving mood.
9. Where to Find High-Quality Rocking Chair Materials
Where can you find high-quality materials for building your rocking chair, ensuring a durable and beautiful finished product? Sourcing the best materials is key to a successful build.
- Local Lumberyards: Support local businesses and get expert advice on wood selection.
- Online Retailers: Websites like Rockler and Woodcraft offer a wide variety of lumber, hardware, and finishing supplies.
- Rockscapes.net: While primarily focused on rock and landscape designs, rockscapes.net also provides valuable information on wood types and their applications in outdoor furniture.
10. FAQs: Addressing Your Rocking Chair Building Questions
What are some frequently asked questions about building a rocking chair, and how can you find the answers? This FAQ section addresses common concerns and provides helpful tips.
10.1. What is the best wood for an outdoor rocking chair?
Durable woods like Ipe, Teak, and Western Red Cedar are excellent choices for outdoor rocking chairs due to their resistance to decay, insects, and weather.
10.2. How much does it cost to build a rocking chair?
The cost varies depending on the wood and materials you choose, but typically ranges from $50 to $200.
10.3. What tools do I need to build a rocking chair?
Essential tools include a tape measure, sander, square, jigsaw, circular saw, miter saw, drill, and Kreg jig.
10.4. How do I ensure the rockers are properly shaped?
Use a jigsaw to cut a smooth, gentle curve with a radius of approximately 62-½” for optimal rocking motion.
10.5. What is the best way to finish a rocking chair?
Stain, paint, or varnish can be used to protect the wood and enhance its appearance. Choose a finish that is appropriate for the intended use (indoor or outdoor).
10.6. How do I maintain an outdoor rocking chair?
Regularly clean the chair, inspect and tighten hardware, protect it from the elements, and reapply the finish as needed.
10.7. Can a beginner build a rocking chair?
Yes, with simple instructions, patience, and the right tools, a beginner can successfully build a rocking chair.
10.8. What are the benefits of using a rocking chair?
Rocking chairs can reduce stress, improve circulation, relieve back pain, and promote better sleep.
10.9. How do I choose the right size for my rocking chair?
Consider the height and weight of the user to ensure the chair is comfortable and supportive.
10.10. Where can I find design inspiration for my rocking chair?
Explore online resources like Pinterest, magazines, and websites like rockscapes.net for design ideas and tips.
Ready to start your rocking chair project? Visit rockscapes.net for more inspiration, detailed guides, and expert advice. Discover the beauty and versatility of rocks and landscape design while creating a comfortable and stylish addition to your home. Contact us today to learn more and explore the endless possibilities of rockscapes.net! Our address is 1151 S Forest Ave, Tempe, AZ 85281, United States, and our phone number is +1 (480) 965-9011. Visit our website at rockscapes.net.