Changing the chisel on a rock breaker is a crucial maintenance task for anyone working with hydraulic hammers. At rockscapes.net, we understand the importance of keeping your equipment in top condition, ensuring efficient and safe operation when dealing with diverse rock types and landscaping projects. Replacing your chisel correctly not only maximizes the lifespan of your hydraulic breaker but also guarantees optimal performance in stone arrangement and other rock-related tasks, and the right tools will make the difference, whether you’re dealing with granite, slate, or any other type of rock.
1. Understanding The Importance Of Chisel Replacement
Why is knowing how to change a chisel on a rock breaker so important? Regular chisel replacement is essential for maintaining the efficiency and longevity of your hydraulic rock hammer. Worn or damaged chisels can significantly reduce the breaker’s performance, leading to increased operational costs and potential equipment damage.
1.1. Identifying Wear And Tear
How do you know when it’s time to replace your chisel? Look for these signs of wear and tear:
- Rounded or flattened tip: A chisel with a sharp, defined point is necessary for effective breaking.
- Cracks or fractures: These can weaken the chisel and lead to breakage during operation.
- Significant material loss: If the chisel has visibly worn down, it’s time for a replacement.
- Reduced breaking efficiency: If you notice the breaker is taking longer or struggling to break through materials, the chisel may be the culprit.
1.2. Consequences Of Neglecting Replacement
What happens if you ignore these warning signs? Neglecting chisel replacement can lead to several negative consequences:
- Decreased Productivity: A worn chisel requires more force and time to break materials.
- Increased Fuel Consumption: The breaker has to work harder, consuming more fuel.
- Equipment Damage: Excessive force can strain other components of the breaker.
- Safety Hazards: A broken chisel can become a projectile, posing a risk to operators and bystanders.
2. Essential Tools And Equipment
Before you start, gather the necessary tools and equipment to ensure a smooth and safe chisel replacement process.
2.1. Safety Gear
What safety gear do you need? Prioritize safety by wearing the following:
- Safety Glasses: To protect your eyes from flying debris.
- Work Gloves: To provide a firm grip and protect your hands.
- Steel-Toed Boots: To safeguard your feet from falling objects.
- Ear Protection: To minimize noise exposure during the process.
- High-Visibility Vest: To ensure you are visible to others in the work area.
**2.2. Required Tools
What tools will you need to get the job done? Here’s a list of essential tools:
| Tool | Purpose |
|---|---|
| Hammer | To drive out and insert the chisel pin. |
| Pin Punch/Drift Pin | To help remove and install the chisel pin without damaging it. |
| Retaining Pin Removal Tool | Specifically designed to safely remove retaining pins without causing damage to the chisel or breaker. |
| Socket Wrench Set | For loosening and tightening bolts or nuts on the breaker. |
| Grease Gun | To lubricate the chisel and breaker components. |
| Cleaning Rags | To wipe away dirt and debris. |
| New Chisel | The replacement chisel, ensuring it matches the breaker model. |
| Chisel Pin | Some replacements require a new chisel pin |
2.3. Optional But Helpful Items
Are there any other items that can make the job easier? Consider these optional tools:
- Work Bench: Provides a stable surface for tool placement and part inspection.
- Parts Tray: Keeps small parts organized and prevents loss.
- Penetrating Oil: Helps loosen stubborn or rusted parts.
**3. Step-by-Step Guide To Changing A Chisel
Now, let’s get into the step-by-step process of changing the chisel on your rock breaker.
3.1. Preparation
How do you prepare the rock breaker for chisel replacement?
- Park the Excavator/Breaker Safely: Park the excavator on a level surface, engage the parking brake, and turn off the engine.
- Position the Breaker: Lower the breaker to the ground, ensuring it is stable and accessible.
- Clean the Area: Use cleaning rags to remove dirt, debris, and excess grease from around the chisel and retaining pin area.
3.2. Removing The Old Chisel
What’s the best way to remove the worn chisel?
- Locate the Retaining Pin: Identify the retaining pin that secures the chisel in place. This pin usually runs perpendicular to the chisel.
- Apply Penetrating Oil (If Necessary): If the pin is difficult to remove, apply penetrating oil and let it sit for a few minutes.
- Use the Pin Punch and Hammer: Align the pin punch with the retaining pin and gently tap it with the hammer to drive the pin out. Use the Retaining Pin Removal Tool for added safety and efficiency if available.
- Remove the Chisel: Once the retaining pin is removed, carefully pull the old chisel out of the breaker. It might be stuck due to dirt or grease, so apply steady pressure.
 Removing retaining pin from rock breaker chisel
3.3. Inspecting The Components
What should you look for during inspection? After removing the old chisel:
- Examine the Chisel Bushings: Check the bushings inside the breaker where the chisel sits. Replace them if they show signs of wear or damage.
- Inspect the Retaining Pin: Look for bends, cracks, or excessive wear on the retaining pin. Replace it if necessary.
- Clean the Chisel Housing: Use cleaning rags to remove any remaining dirt, grease, or debris from the chisel housing.
- Grease the Interior: Apply a layer of grease to the inside of the chisel housing to ensure smooth operation and prevent corrosion.
3.4. Installing The New Chisel
How do you correctly install the new chisel?
- Grease the New Chisel: Apply a generous layer of grease to the new chisel, especially on the part that will be inserted into the breaker.
- Insert the Chisel: Carefully slide the new chisel into the chisel housing, ensuring it is properly aligned.
- Align the Pin Holes: Line up the holes in the chisel and the breaker for the retaining pin.
- Insert the Retaining Pin: Insert the retaining pin through the aligned holes. Use the pin punch and hammer to gently tap the pin into place until it is fully seated.
- Verify Proper Installation: Ensure the chisel is securely in place and the retaining pin is flush with the breaker housing.
3.5. Final Checks And Lubrication
What are the final steps before using the rock breaker?
- Lubricate the Chisel: Use the grease gun to lubricate the chisel through the grease fittings on the breaker.
- Test the Breaker: Start the excavator and briefly test the breaker to ensure the chisel is functioning correctly.
- Inspect for Leaks: Check for any grease or hydraulic fluid leaks around the chisel area.
- Clean Up: Remove all tools and equipment from the work area and dispose of used rags and grease appropriately.
4. Choosing The Right Chisel For The Job
Selecting the correct chisel type is crucial for optimizing performance and preventing damage.
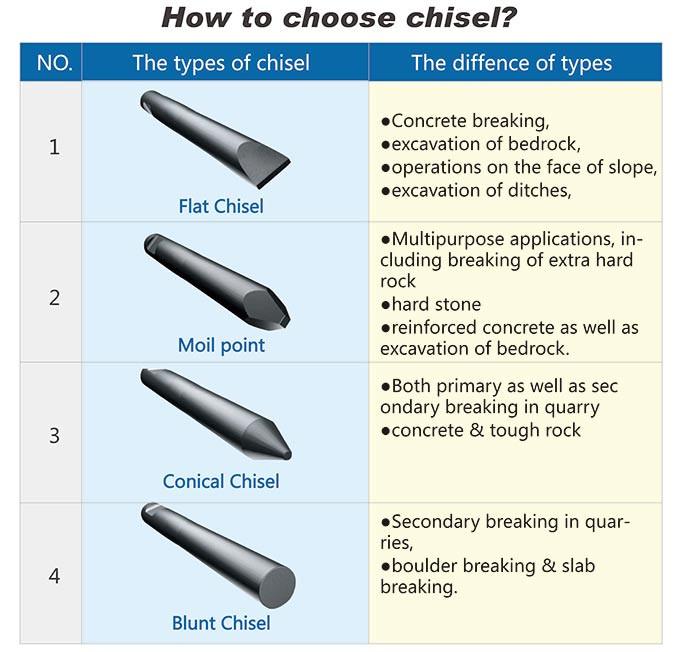
4.1. Types Of Chisels
What are the different types of chisels available? Here’s a quick overview:
| Chisel Type | Application |
|---|---|
| Moil Point Chisel | Ideal for breaking hard stone, extra hard rock, and reinforced concrete. |
| Wedge/Flat Chisel | Suitable for softer rock layers, concrete breaking, and ditch excavation. |
| Blunt Chisel | Best for breaking medium-hard rocks or reducing the size of small, cracked stones. |
| Conical Chisel | Primarily used for breaking tough rocks like granite and quartzite in quarries, as well as heavy concrete. |
 Different types of rock breaker chisels
4.2. Matching The Chisel To The Material
How do you choose the right chisel for the job?
- Rock Hardness: For very hard rocks, use a moil point or conical chisel. For softer rocks, a wedge or blunt chisel will suffice.
- Breaking Application: For concrete breaking, a wedge or moil point chisel is typically used. For precise breaking in quarries, a conical chisel is preferred.
- Job Site Conditions: Consider the environment. If you’re working in a confined space, a smaller chisel may be more appropriate.
4.3. Expert Recommendations From Rockscapes.Net
Looking for personalized advice? At rockscapes.net, our experts can guide you in selecting the perfect chisel for your specific needs. Contact us with details about your project, and we’ll provide tailored recommendations.
5. Maintenance Tips For Chisel Longevity
Proper maintenance is key to extending the life of your chisels and hydraulic breaker.
5.1. Regular Lubrication
Why is lubrication so important? Regular lubrication reduces friction, prevents corrosion, and dissipates heat, all of which contribute to chisel longevity.
- Frequency: Lubricate the chisel every 2-4 hours of operation, or as recommended by the breaker manufacturer.
- Grease Type: Use a high-quality, heavy-duty grease specifically designed for hydraulic breakers.
- Application: Apply grease through the grease fittings on the breaker until you see fresh grease coming out around the chisel.
5.2. Proper Operating Techniques
How you operate the breaker can significantly impact chisel life.
- Vertical Operation: Always operate the chisel vertically to the material surface. Angled operation can cause uneven wear and stress.
- Avoid Continuous Hitting: Do not continuously hit the same spot for extended periods. Move the breaker to a new point to prevent overheating and chisel damage.
- Appropriate Downward Force: Apply steady, downward force on the breaker. Excessive force can damage the chisel and breaker components.
- Do Not Use as a Lever: Never use the chisel as a lever to pry rocks or other materials. This can cause bending or breakage.
5.3. Storage Practices
How should you store your chisels when not in use?
- Clean the Chisel: Before storing, clean the chisel to remove dirt, grease, and debris.
- Lubricate the Chisel: Apply a layer of grease to prevent corrosion.
- Store in a Dry Place: Store the chisel in a dry, protected area to prevent rust and damage.
- Protect the Tip: Use a protective cap or wrap the tip of the chisel to prevent damage during storage.
6. Troubleshooting Common Issues
Even with proper maintenance, you may encounter some common issues with your chisel and breaker.
6.1. Chisel Is Stuck
What should you do if the chisel gets stuck in the breaker?
- Apply Penetrating Oil: Spray penetrating oil around the chisel housing and let it sit for a few minutes.
- Use a Hammer and Punch: Gently tap the chisel housing with a hammer and punch to loosen the chisel.
- Check for Debris: Remove any visible debris or obstructions that may be causing the chisel to stick.
- Consult a Professional: If the chisel remains stuck, consult a professional technician to avoid damaging the breaker.
6.2. Premature Chisel Wear
Why is your chisel wearing out too quickly?
- Incorrect Chisel Type: Ensure you are using the correct chisel type for the material you are breaking.
- Improper Lubrication: Verify that you are lubricating the chisel frequently and adequately.
- Aggressive Operation: Avoid excessive force and continuous hitting.
- Check Bushings: Inspect the chisel bushings for wear and replace if necessary.
6.3. Breaker Is Not Breaking Effectively
What if the breaker is not performing as expected?
- Check Chisel Condition: Ensure the chisel is not worn, cracked, or damaged.
- Verify Hydraulic Pressure: Check the hydraulic pressure of the excavator and breaker to ensure it is within the recommended range.
- Inspect Hydraulic Lines: Look for leaks or damage in the hydraulic lines.
- Consult a Technician: If the problem persists, consult a qualified technician to diagnose and repair the breaker.
7. Safety Precautions
Safety is paramount when working with rock breakers and changing chisels.
7.1. General Safety Rules
What are the basic safety rules to follow?
- Read the Manual: Always read and understand the manufacturer’s manual for the breaker and excavator.
- Wear Safety Gear: Wear appropriate safety gear at all times, including safety glasses, gloves, and steel-toed boots.
- Inspect Equipment: Regularly inspect the breaker, chisel, and hydraulic lines for damage.
- Secure Work Area: Ensure the work area is clear of bystanders and hazards.
- Proper Training: Only trained and qualified personnel should operate and maintain hydraulic breakers.
7.2. Avoiding Common Injuries
How can you prevent common injuries?
- Hand and Finger Injuries: Use caution when handling the chisel and retaining pin. Wear gloves and use tools to avoid pinching or crushing injuries.
- Eye Injuries: Always wear safety glasses to protect your eyes from flying debris.
- Foot Injuries: Wear steel-toed boots to protect your feet from falling objects.
- Hearing Damage: Use ear protection to minimize exposure to loud noise.
7.3. Emergency Procedures
What should you do in case of an emergency?
- First Aid Kit: Keep a well-stocked first aid kit on-site.
- Emergency Contacts: Have a list of emergency contacts readily available.
- Shut Down Equipment: In case of an accident or equipment malfunction, immediately shut down the breaker and excavator.
- Seek Medical Attention: Seek medical attention for any injuries, no matter how minor.
8. Expert Advice From Rockscapes.Net
At rockscapes.net, we’re dedicated to providing you with the best resources and expert advice for all your rock and landscape needs.
8.1. Consulting With Our Experts
Need personalized advice? Our team of experienced professionals is available to answer your questions and provide tailored recommendations for your specific projects. Contact us today to schedule a consultation.
8.2. Training Programs
Looking to enhance your skills? We offer comprehensive training programs on rock breaker operation, maintenance, and safety. Our programs are designed to equip you with the knowledge and skills you need to work efficiently and safely.
8.3. Accessing Our Online Resources
Want to learn more? Explore our extensive online resources, including articles, videos, and guides on various topics related to rock and landscape. Visit rockscapes.net to access our library of valuable information.
9. The Future Of Rock Breaking Technology
As technology advances, the future of rock breaking is evolving.
9.1. Innovations In Chisel Design
What’s new in chisel technology?
- Advanced Materials: Manufacturers are using advanced materials like high-strength alloys and composites to create more durable and efficient chisels.
- Improved Geometry: New chisel designs are optimized for specific breaking applications, improving performance and reducing wear.
- Smart Chisels: Some chisels are equipped with sensors that monitor wear, temperature, and vibration, providing valuable data for maintenance and optimization.
9.2. Automation And Robotics
How are automation and robotics changing the game?
- Remote-Controlled Breakers: Remote-controlled breakers allow operators to work from a safe distance, reducing the risk of injury.
- Robotic Breaking Systems: Fully automated robotic systems can perform rock breaking tasks with precision and efficiency, reducing labor costs and improving productivity.
9.3. Sustainable Practices
What about sustainability?
- Eco-Friendly Materials: Manufacturers are exploring the use of eco-friendly materials in chisel production.
- Recycling Programs: Recycling programs for used chisels are gaining popularity, reducing waste and conserving resources.
- Energy-Efficient Breakers: New breakers are designed to be more energy-efficient, reducing fuel consumption and emissions.
10. Frequently Asked Questions (FAQs)
Here are some frequently asked questions about changing chisels on rock breakers:
10.1. How Often Should I Change The Chisel On My Rock Breaker?
The frequency of chisel replacement depends on the type of material you are breaking and the intensity of use. Regularly inspect the chisel for wear and tear, and replace it when you notice signs of damage or reduced performance.
10.2. Can I Sharpen A Worn Chisel Instead Of Replacing It?
While it may be possible to sharpen a slightly worn chisel, it is generally recommended to replace it. Sharpening can alter the chisel’s geometry and weaken its structure, leading to premature failure.
10.3. What Type Of Grease Should I Use For My Rock Breaker Chisel?
Use a high-quality, heavy-duty grease specifically designed for hydraulic breakers. This type of grease is formulated to withstand the high pressures and temperatures associated with breaker operation.
10.4. How Do I Prevent The Retaining Pin From Getting Stuck?
Regularly lubricate the retaining pin and chisel housing to prevent corrosion and sticking. If the pin is difficult to remove, apply penetrating oil and let it sit for a few minutes before attempting removal.
10.5. Can I Use A Chisel From A Different Brand On My Rock Breaker?
It is generally not recommended to use a chisel from a different brand unless it is specifically designed to be compatible with your breaker model. Using an incompatible chisel can damage the breaker and void the warranty.
10.6. What Should I Do If I Can’t Remove The Chisel Pin?
If you cannot remove the chisel pin, try applying penetrating oil and using a pin punch and hammer to gently tap it out. If it remains stuck, consult a professional technician to avoid damaging the breaker.
10.7. How Can I Tell If The Chisel Bushings Need To Be Replaced?
Check the chisel bushings for signs of wear, such as excessive play or movement of the chisel within the breaker housing. If the bushings are worn, replace them to ensure proper chisel alignment and prevent damage to the breaker.
10.8. Is It Safe To Operate A Rock Breaker With A Cracked Chisel?
No, it is not safe to operate a rock breaker with a cracked chisel. A cracked chisel can break during operation, posing a risk to operators and bystanders. Replace the chisel immediately if you notice any cracks or fractures.
10.9. Where Can I Buy Replacement Chisels For My Rock Breaker?
Replacement chisels can be purchased from authorized dealers of hydraulic breakers and construction equipment suppliers. You can also find a wide selection of chisels at rockscapes.net.
10.10. What Are The Best Practices For Storing A Rock Breaker When Not In Use?
When storing a rock breaker, clean and lubricate all components, including the chisel. Store the breaker in a dry, protected area to prevent rust and damage. Cover the breaker to protect it from dust and debris.
Conclusion
Knowing how to change a chisel on a rock breaker is a vital skill for anyone working in construction, landscaping, or demolition. By following this step-by-step guide and implementing the maintenance tips provided, you can ensure your equipment operates efficiently and safely. Remember to always prioritize safety, choose the right chisel for the job, and consult with experts when needed.
Ready to take your rock breaking skills to the next level? Visit rockscapes.net for more expert advice, a wide selection of high-quality chisels, and personalized support for all your rock and landscape needs. Contact us today and discover how we can help you achieve your project goals with confidence and ease. Our address is 1151 S Forest Ave, Tempe, AZ 85281, United States, and you can reach us by phone at +1 (480) 965-9011. Let rockscapes.net be your trusted partner in transforming landscapes and achieving remarkable results.