Cleaning reef rock is essential for a healthy and vibrant saltwater aquarium. At rockscapes.net, we provide expert advice and high-quality rock to help you create the perfect aquatic environment. This comprehensive guide will cover everything you need to know about reef rock cleaning, from identifying different types of rock to step-by-step cleaning methods and maintenance tips.
Table of Contents
- Understanding Reef Rock
- 1.1 What is Reef Rock?
- 1.2 Types of Reef Rock
- 1.3 The Importance of Reef Rock in Aquariums
- Why Clean Reef Rock?
- 2.1 Preventing Algae Growth
- 2.2 Removing Detritus and Waste
- 2.3 Maintaining Water Quality
- 2.4 Reducing Harmful Bacteria
- When to Clean Reef Rock
- 3.1 New vs. Established Tanks
- 3.2 Signs Your Reef Rock Needs Cleaning
- Methods for Cleaning Reef Rock
- 4.1 Natural Curing Method
- 4.2 Bleach Curing Method
- 4.3 Acid Curing Method
- 4.4 Manual Cleaning Methods
- Step-by-Step Guide to Bleach Curing Reef Rock
- 5.1 Preparing Your Equipment and Workspace
- 5.2 Creating the Bleach Solution
- 5.3 Soaking the Reef Rock
- 5.4 Rinsing and Dechlorinating
- 5.5 Final Rinse and Inspection
- Step-by-Step Guide to Acid Curing Reef Rock
- 6.1 Preparing Your Equipment and Workspace
- 6.2 Creating the Acid Solution
- 6.3 Soaking the Reef Rock
- 6.4 Neutralizing the Acid
- 6.5 Final Rinse and Inspection
- Manual Cleaning Techniques
- 7.1 Scrubbing with a Brush
- 7.2 Using a Powerhead or Water Blaster
- 7.3 Siphoning Debris
- 7.4 Utilizing Reef-Safe Invertebrates
- Maintaining Clean Reef Rock
- 8.1 Regular Water Changes
- 8.2 Proper Filtration
- 8.3 Avoiding Overfeeding
- 8.4 Monitoring Water Parameters
- Safety Precautions
- 9.1 Handling Bleach and Acid
- 9.2 Protecting Yourself
- 9.3 Proper Ventilation
- Troubleshooting Common Issues
- 10.1 Persistent Algae Growth
- 10.2 Unstable Water Parameters
- 10.3 Introduction of Pests
- Choosing the Right Cleaning Method for Your Needs
- The Benefits of Pristine Reef Rock
- Expert Tips for Long-Term Reef Health
- Frequently Asked Questions (FAQ)
- Conclusion
1. Understanding Reef Rock
1.1 What is Reef Rock?
Reef rock is more than just a pretty decoration; it’s the backbone of a thriving saltwater aquarium. This porous rock, typically composed of calcium carbonate, provides a natural habitat for beneficial bacteria, which are crucial for maintaining water quality. These bacteria break down harmful substances like ammonia and nitrite through a process called the nitrogen cycle, ensuring a healthy environment for your fish and invertebrates.
1.2 Types of Reef Rock
There are several types of reef rock, each with unique characteristics and benefits:
- Live Rock: Harvested directly from the ocean, live rock is teeming with beneficial bacteria, algae, and other microorganisms. It’s the most natural option but can also introduce unwanted pests and requires a curing process.
- Dry Rock: This rock is previously live rock that has been dried out, killing off most of the original organisms. It’s a safer option as it reduces the risk of introducing pests, but it needs to be seeded with beneficial bacteria to become “live.”
- Man-Made Rock: Created artificially from materials like concrete or aragonite, man-made rock is an environmentally friendly option. It’s free from pests and often has a porous structure ideal for bacterial colonization.
- Mined Rock: This rock is extracted from land-based deposits and is generally free of organic material, making it a clean slate for your aquarium.
 Different types of Live Rock and Dry Rock
1.3 The Importance of Reef Rock in Aquariums
Reef rock plays several critical roles in a saltwater aquarium:
- Biological Filtration: The porous structure provides a vast surface area for beneficial bacteria to colonize, facilitating the nitrogen cycle and maintaining water quality.
- Habitat: It creates a natural and secure environment for fish, invertebrates, and corals, reducing stress and promoting healthy behavior.
- Aesthetic Appeal: Reef rock forms the foundation of your aquascape, allowing you to create stunning and realistic underwater landscapes.
2. Why Clean Reef Rock?
Cleaning reef rock is essential for maintaining a healthy and vibrant aquarium ecosystem. Over time, reef rock accumulates detritus, algae, and other unwanted substances that can negatively impact water quality and the health of your tank inhabitants.
2.1 Preventing Algae Growth
Algae are a natural part of any aquarium, but excessive growth can be detrimental. Algae compete with corals for nutrients and light, and large blooms can suffocate corals and reduce oxygen levels in the water. Cleaning reef rock removes accumulated organic material that fuels algae growth, helping to keep it in check.
2.2 Removing Detritus and Waste
Detritus, which includes fish waste, uneaten food, and decaying organic matter, can accumulate in the pores of reef rock. As detritus breaks down, it releases harmful substances like ammonia and nitrates, which can stress or even kill your aquarium inhabitants. Regular cleaning removes this waste, preventing the buildup of harmful compounds.
2.3 Maintaining Water Quality
Clean reef rock contributes directly to maintaining stable and healthy water parameters. By removing detritus and preventing excessive algae growth, you can keep ammonia, nitrite, and nitrate levels in check, as well as maintain proper pH and alkalinity levels.
2.4 Reducing Harmful Bacteria
While beneficial bacteria are essential for the nitrogen cycle, harmful bacteria can also thrive in an aquarium, especially in areas with accumulated waste. Cleaning reef rock helps to reduce the population of these harmful bacteria, promoting a healthier environment for your fish and invertebrates.
3. When to Clean Reef Rock
Knowing when to clean your reef rock is crucial for maintaining a balanced aquarium ecosystem. The frequency and intensity of cleaning depend on several factors, including the age of your tank and the specific conditions within it.
3.1 New vs. Established Tanks
- New Tanks: In a new aquarium, the reef rock should be cured before introducing any livestock. Curing removes dead organic matter and allows beneficial bacteria to colonize the rock. The curing process can take several weeks, and during this time, regular water changes and testing are essential.
- Established Tanks: In an established tank, reef rock cleaning should be part of your regular maintenance routine. The frequency will depend on factors like the bioload of your tank (the amount of waste produced by your inhabitants) and the efficiency of your filtration system.
3.2 Signs Your Reef Rock Needs Cleaning
Here are some signs that your reef rock may need cleaning:
- Excessive Algae Growth: If you notice a sudden increase in algae growth, especially nuisance algae like hair algae or cyanobacteria, it could be a sign that your reef rock is accumulating too much organic material.
- High Nitrate Levels: Elevated nitrate levels, even after regular water changes, can indicate that detritus is building up in your reef rock.
- Foul Odors: A foul or sulfurous odor coming from your tank is a clear sign of decaying organic matter and the presence of harmful bacteria.
- Visible Detritus: If you can see visible detritus accumulating on your reef rock, it’s time for a cleaning.
- Decreased Coral Health: If your corals are not looking as vibrant as usual or are exhibiting signs of stress, such as tissue recession, it could be due to poor water quality caused by dirty reef rock.
4. Methods for Cleaning Reef Rock
There are several methods for cleaning reef rock, each with its own advantages and disadvantages. The best method for you will depend on the type of rock you have, the extent of the buildup, and your personal preferences.
4.1 Natural Curing Method
The natural curing method involves soaking the reef rock in saltwater for an extended period, allowing natural processes to break down organic material and establish beneficial bacteria. This method is ideal for new rock or rock that has been removed from an established tank for a short period.
- Process: Place the rock in a container filled with saltwater, ensuring good circulation and aeration. Perform regular water changes (every few days) to remove accumulated waste. Monitor water parameters like ammonia, nitrite, and nitrate, and continue the curing process until these levels stabilize at zero.
- Pros: Gentle, promotes beneficial bacteria growth.
- Cons: Time-consuming (can take several weeks), may not be effective for heavily soiled rock.
4.2 Bleach Curing Method
The bleach curing method involves soaking the reef rock in a diluted bleach solution to kill off organic material and unwanted organisms. This method is effective for removing stubborn algae and sterilizing rock, but it must be done carefully to avoid harming beneficial bacteria.
- Process: Soak the rock in a diluted bleach solution (1 part bleach to 10 parts water) for 24-48 hours. Rinse thoroughly with dechlorinated water to remove all traces of bleach. Allow the rock to dry completely before returning it to the tank, or soak it in fresh saltwater with a dechlorinator.
- Pros: Effective for removing algae and sterilizing rock, relatively quick.
- Cons: Harsh, can kill beneficial bacteria, requires careful rinsing and dechlorination.
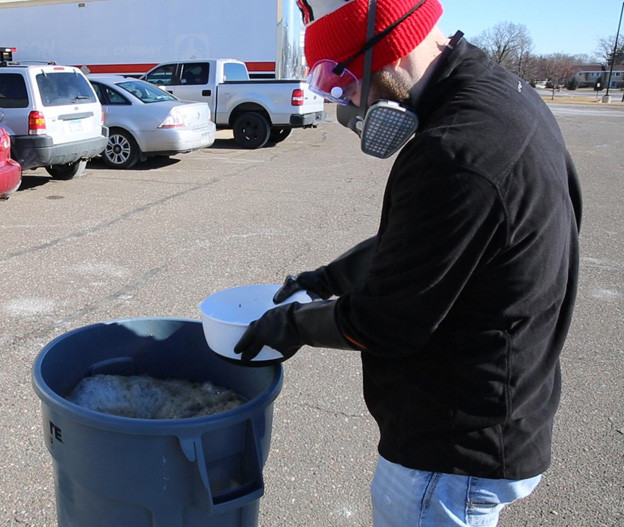 Wearing protective gear during a bleach cure of live rock
4.3 Acid Curing Method
The acid curing method involves soaking the reef rock in a diluted acid solution to dissolve calcium carbonate and remove deeply embedded organic material. This method is highly effective for cleaning heavily soiled rock but should only be used as a last resort due to its potential risks.
- Process: Soak the rock in a diluted muriatic acid solution (1 part acid to 20 parts water) for a few hours, monitoring the reaction closely. Rinse thoroughly with water and then soak in a solution of baking soda and water to neutralize any remaining acid.
- Pros: Highly effective for removing stubborn buildup.
- Cons: Risky, can damage rock structure, requires careful neutralization and safety precautions.
4.4 Manual Cleaning Methods
Manual cleaning methods involve physically removing algae and detritus from the reef rock using brushes, powerheads, or siphons. These methods are gentle and can be used regularly to maintain clean rock.
- Process: Use a brush to scrub the surface of the rock, dislodging algae and detritus. Use a powerhead or water blaster to blast away loose debris. Siphon the debris out of the tank during your regular water changes.
- Pros: Gentle, can be done regularly, does not require removing rock from the tank.
- Cons: Can be time-consuming, may not be effective for deeply embedded buildup.
5. Step-by-Step Guide to Bleach Curing Reef Rock
If you’ve determined that bleach curing is the right method for your reef rock, follow these steps to ensure a safe and effective cleaning process.
5.1 Preparing Your Equipment and Workspace
- Gather Your Supplies:
- Bleach (unscented, additive-free)
- Large plastic container (e.g., a Brute trash can)
- RO/DI water or tap water
- Dechlorinator (e.g., Brightwell Aquatics Erase Cl or Seachem Prime)
- Chlorine test strips
- Arm-length gloves
- Goggles
- Protective clothing
- Stirring stick or spoon
- Choose a Well-Ventilated Outdoor Area: Bleach can release toxic fumes, so it’s essential to work in a well-ventilated area, preferably outdoors.
- Protect Your Workspace: Cover the ground with a tarp or plastic sheeting to protect it from bleach splashes.
5.2 Creating the Bleach Solution
- Fill the Container with Water: Fill the plastic container with water, leaving enough room for the rock. Most reefers like to use purified RO/DI water but in this case, tap water is suitable as well.
- Add Bleach: The general recommendation is a 1:10 ratio of bleach to water (e.g., 1 gallon of bleach for every 10 gallons of water). Always add the bleach to the water, not the other way around, to prevent splashing concentrated solution.
- Mix Thoroughly: Use a stirring stick or spoon to mix the bleach and water until well combined.
5.3 Soaking the Reef Rock
- Submerge the Rock: Carefully place the reef rock into the bleach solution, ensuring it is fully submerged.
- Soak for 24-48 Hours: Allow the rock to soak in the bleach solution for 24-48 hours. This will give the bleach enough time to kill off organic material and unwanted organisms.
5.4 Rinsing and Dechlorinating
- Rinse Thoroughly: After soaking, remove the rock from the bleach solution and rinse it thoroughly with clean water.
- Dechlorinate: Fill the container with fresh RO/DI water and add a dechlorinator according to the manufacturer’s instructions. Let the rock soak in the dechlorinated water for 24 hours to neutralize any remaining bleach.
- Test for Chlorine: Use chlorine test strips to test the water for chlorine. If chlorine is still present, repeat the dechlorination process until the test strips show a reading of zero.
5.5 Final Rinse and Inspection
- Final Rinse: Give the rock a final rinse with clean RO/DI water.
- Inspect the Rock: Check the rock for any remaining signs of organic material or algae. If necessary, repeat the bleach curing process or use a manual cleaning method to remove any stubborn buildup.
- Return to Tank or Cycle: Once you’re satisfied that the rock is clean, you can either return it to your established tank or begin the cycling process in a new tank.
6. Step-by-Step Guide to Acid Curing Reef Rock
Acid curing is a more aggressive method for cleaning reef rock and should only be used when other methods have failed. Follow these steps carefully to ensure a safe and effective cleaning process.
6.1 Preparing Your Equipment and Workspace
- Gather Your Supplies:
- Muriatic acid (hydrochloric acid)
- Large plastic container
- RO/DI water
- Baking soda
- pH test kit
- Arm-length gloves
- Goggles
- Protective clothing
- Stirring stick
- Choose a Safe Outdoor Area: Acid can release dangerous fumes and cause burns, so it’s crucial to work in a well-ventilated outdoor area, away from children and pets.
- Protect Your Workspace: Cover the ground with a tarp or plastic sheeting to protect it from acid splashes.
6.2 Creating the Acid Solution
- Fill the Container with Water: Fill the plastic container with RO/DI water.
- Add Acid: The recommended ratio is 1 part muriatic acid to 20 parts water. Always add the acid to the water slowly and carefully, stirring constantly.
- Mix Thoroughly: Use a stirring stick to mix the acid and water until well combined.
6.3 Soaking the Reef Rock
- Submerge the Rock: Carefully place the reef rock into the acid solution. You should see bubbling as the acid reacts with the calcium carbonate in the rock.
- Soak for a Few Hours: Allow the rock to soak in the acid solution for a few hours, monitoring the reaction closely. Do not leave the rock in the acid for too long, as it can damage the rock structure.
6.4 Neutralizing the Acid
- Rinse Thoroughly: After soaking, remove the rock from the acid solution and rinse it thoroughly with water.
- Neutralize: Fill the container with fresh water and add baking soda until the pH of the water reaches 7.0. Let the rock soak in the baking soda solution for 24 hours to neutralize any remaining acid.
- Test pH: Use a pH test kit to ensure that the pH of the water is stable at 7.0. If not, repeat the neutralization process.
6.5 Final Rinse and Inspection
- Final Rinse: Give the rock a final rinse with clean RO/DI water.
- Inspect the Rock: Check the rock for any remaining signs of organic material or algae. If necessary, repeat the acid curing process or use a manual cleaning method to remove any stubborn buildup.
- Return to Tank or Cycle: Once you’re satisfied that the rock is clean and neutralized, you can either return it to your established tank or begin the cycling process in a new tank.
7. Manual Cleaning Techniques
Manual cleaning techniques are gentle and can be used regularly to maintain clean reef rock without the need for harsh chemicals.
7.1 Scrubbing with a Brush
- Use a Soft Brush: Choose a soft-bristled brush that won’t damage the surface of the rock.
- Scrub Gently: Gently scrub the surface of the rock to dislodge algae and detritus.
- Rinse: Rinse the rock with clean water to remove any dislodged debris.
7.2 Using a Powerhead or Water Blaster
- Direct Water Flow: Direct the flow of water from a powerhead or water blaster at the rock to blast away loose debris.
- Target Problem Areas: Focus on areas with heavy algae growth or detritus accumulation.
- Siphon Debris: Use a siphon to remove the dislodged debris from the tank.
7.3 Siphoning Debris
- Use a Siphon: Use a siphon to vacuum up detritus and debris from the surface of the rock and the substrate.
- Regular Water Changes: Incorporate siphoning into your regular water changes to maintain a clean tank environment.
7.4 Utilizing Reef-Safe Invertebrates
- Introduce Clean-Up Crew: Introduce reef-safe invertebrates like snails, crabs, and starfish to your tank to help control algae and detritus.
- Choose the Right Species: Research different species to determine which ones are best suited for your tank and your specific needs.
8. Maintaining Clean Reef Rock
Maintaining clean reef rock is an ongoing process that requires regular attention and proactive measures.
8.1 Regular Water Changes
- Frequency: Perform regular water changes (e.g., 10-20% every 1-2 weeks) to remove accumulated nitrates and other waste products.
- Use RO/DI Water: Use RO/DI water for water changes to avoid introducing phosphates and other contaminants.
8.2 Proper Filtration
- Mechanical Filtration: Use a protein skimmer and filter socks to remove particulate matter from the water.
- Biological Filtration: Ensure that your tank has adequate biological filtration to support the nitrogen cycle.
- Chemical Filtration: Use chemical filtration media like activated carbon and phosphate remover to remove dissolved organic compounds and control algae growth.
8.3 Avoiding Overfeeding
- Feed Sparingly: Avoid overfeeding your fish and invertebrates, as uneaten food contributes to detritus buildup.
- Target Feed Corals: Target feed your corals with appropriate foods to avoid excess nutrients in the water.
8.4 Monitoring Water Parameters
- Test Regularly: Regularly test your water parameters (e.g., ammonia, nitrite, nitrate, pH, alkalinity, calcium, magnesium) to ensure they are within the appropriate ranges.
- Adjust as Needed: Adjust your maintenance routine as needed based on your water test results.
9. Safety Precautions
When cleaning reef rock, especially when using harsh chemicals like bleach or acid, it’s essential to take proper safety precautions to protect yourself and your environment.
9.1 Handling Bleach and Acid
- Wear Protective Gear: Always wear arm-length gloves, goggles, and protective clothing when handling bleach or acid.
- Avoid Splashing: Be careful to avoid splashing bleach or acid, as they can cause burns and damage to surfaces.
- Work in a Well-Ventilated Area: Work in a well-ventilated area to avoid inhaling toxic fumes.
- Never Mix Chemicals: Never mix bleach or acid with other chemicals, as this can create dangerous reactions.
Always heed bleach chemical warnings and follow safety precautions, including wearing protective gear and ensuring proper ventilation.
9.2 Protecting Yourself
- Wash Hands: Wash your hands thoroughly after handling reef rock or aquarium water.
- Avoid Contact with Eyes and Skin: Avoid contact with your eyes and skin, as aquarium water can contain harmful bacteria and pathogens.
- Seek Medical Attention: If you experience any adverse reactions, such as skin irritation or respiratory problems, seek medical attention immediately.
9.3 Proper Ventilation
- Work Outdoors: Whenever possible, work outdoors to ensure proper ventilation.
- Use a Fan: If you must work indoors, use a fan to circulate air and remove fumes.
- Open Windows: Open windows and doors to increase ventilation.
10. Troubleshooting Common Issues
Even with the best cleaning and maintenance practices, you may encounter some common issues with your reef rock. Here are some tips for troubleshooting these problems.
10.1 Persistent Algae Growth
- Identify the Type of Algae: Determine the type of algae you’re dealing with, as different types require different treatment methods.
- Adjust Lighting: Adjust your lighting schedule and intensity to reduce algae growth.
- Increase Water Changes: Increase the frequency and volume of your water changes to remove excess nutrients.
- Use Algae Control Products: Consider using algae control products, such as phosphate remover or algaecides, but use them with caution, as they can harm corals and other invertebrates.
10.2 Unstable Water Parameters
- Test Regularly: Test your water parameters regularly to identify any imbalances.
- Adjust Maintenance Routine: Adjust your maintenance routine to address any imbalances, such as increasing water changes or adjusting your filtration.
- Identify the Cause: Identify the underlying cause of the unstable water parameters, such as overfeeding or inadequate filtration.
10.3 Introduction of Pests
- Quarantine New Additions: Quarantine all new fish, invertebrates, and corals before introducing them to your main tank to prevent the introduction of pests.
- Inspect Reef Rock: Inspect new reef rock carefully for any signs of pests, such as Aiptasia anemones or bristle worms.
- Use Pest Control Products: Use pest control products, such as dips or treatments, to eliminate any pests before they can spread.
11. Choosing the Right Cleaning Method for Your Needs
Selecting the right cleaning method for your reef rock is essential for maintaining a healthy aquarium. Consider these factors when making your decision:
- Type of Rock: Live rock requires a gentler approach, while dry rock can withstand more aggressive cleaning methods.
- Extent of Buildup: Lightly soiled rock can be cleaned with manual methods, while heavily soiled rock may require bleach or acid curing.
- Your Comfort Level: Choose a method that you are comfortable with and have the necessary equipment and knowledge to perform safely.
12. The Benefits of Pristine Reef Rock
Maintaining pristine reef rock offers numerous benefits for your aquarium:
- Improved Water Quality: Clean rock helps to maintain stable and healthy water parameters, reducing stress on your fish and invertebrates.
- Reduced Algae Growth: Removing detritus and organic material prevents excessive algae growth, keeping your tank looking clean and attractive.
- Enhanced Coral Growth: Healthy corals thrive in a clean environment with stable water parameters.
- Healthier Inhabitants: A clean tank environment promotes the health and well-being of all your aquarium inhabitants.
13. Expert Tips for Long-Term Reef Health
Here are some expert tips for maintaining long-term reef health:
- Research Your Inhabitants: Research the specific needs of your fish, invertebrates, and corals to ensure you are providing the right environment and care.
- Observe Your Tank Regularly: Observe your tank regularly for any signs of problems, such as changes in behavior or appearance.
- Be Patient: Reef keeping is a marathon, not a sprint. Be patient and allow your tank to mature and stabilize over time.
- Seek Advice: Don’t be afraid to seek advice from experienced reef keepers or aquarium professionals.
At rockscapes.net, we’re passionate about helping you create a thriving and beautiful reef aquarium. We offer a wide selection of high-quality reef rock, expert advice, and all the resources you need to succeed.
14. Frequently Asked Questions (FAQ)
1. How often should I clean my reef rock?
The frequency depends on your tank’s bioload and filtration, but aim for manual cleaning during water changes every 1-2 weeks.
2. Can I use tap water to clean reef rock?
Tap water is suitable for the initial bleach cure, but always use RO/DI water for rinsing and dechlorination.
3. Is bleach curing safe for my aquarium?
Yes, when done properly with thorough rinsing and dechlorination.
4. How can I tell if my reef rock is fully cycled?
Test your water parameters; ammonia and nitrite should be zero, and nitrates should be stable.
5. What type of bleach should I use?
Use plain, unscented bleach without additives or soaps.
6. Can I clean live rock with bleach?
It’s not recommended as it will kill beneficial organisms. Use natural curing or gentle manual cleaning instead.
7. What is the ideal bleach-to-water ratio for curing?
A 1:10 ratio (1 part bleach to 10 parts water) is generally recommended.
8. How long should I soak reef rock in bleach?
Soak for 24-48 hours for effective sterilization.
9. What dechlorinator products do you recommend?
Brightwell Aquatics Erase Cl and Seachem Prime are excellent options.
10. How can I prevent algae from growing on my reef rock?
Maintain proper water parameters, avoid overfeeding, and ensure adequate filtration.
15. Conclusion
Cleaning reef rock is a crucial aspect of maintaining a healthy and vibrant saltwater aquarium. By understanding the different types of reef rock, the reasons for cleaning, and the various cleaning methods available, you can create a thriving ecosystem for your fish, invertebrates, and corals. Whether you choose the natural curing method, the bleach curing method, the acid curing method, or manual cleaning techniques, be sure to follow the safety precautions and maintenance tips outlined in this guide.
Ready to take your reef aquarium to the next level? Visit rockscapes.net today to explore our wide selection of high-quality reef rock and discover expert advice to help you create the aquarium of your dreams. Contact us at 1151 S Forest Ave, Tempe, AZ 85281, United States, Phone: +1 (480) 965-9011. Let us help you bring the beauty of the ocean into your home!